
by The Embroidery Coach | | Embroidery Business Management, Embroidery Production
Do you have the business organization and forms that help you to run your embroidery business? Do you have your embroidery business organized? When you first start your embroidery business you can become so overwhelmed by all of the forms and processes that are so necessary to keep your entire production running smoothly.
There are software programs that can be purchased to help you keep track of your entire order, but most new embroiderers are not in the position to be able to purchase these programs so you must have a way of keeping track of it manually. I always advise new embroiderers to start keeping track of their jobs manually before going to the computer systems.
Record keeping is so extremely important and there are many forms that I have and keep with each order. You must have a system for keeping track of each step and the forms for each part of your organization or production of every job. Without a good system in place, you will soon become totally overwhelmed with the workload and you will not be able to keep track of your production and it can become very discouraging. I have 3 types of forms
- Office or Sales Forms
- Production Forms
- Shipping Forms
The Office or the Sales Area is the First One That I Will Address.
This scenario is based on the fact that you are an embroiderer that sells retail and may have a retail or showroom in your location. If you are working from home and do most of your orders online or on the phone, the same processes and forms will apply to you as well.
I create sales packets that are ready for each sale so that I can grab them and be ready when I am first starting to work with a customer.
- Customer Quote Form – Can be part of the packet or separate-This form is filled out and a copy given to the customer-your copy is then placed in a binder until the customer comes back in ready to place the order.
- Order Form – I have one for Apparel and one for Caps-You can expand on this if you have different needs.
- Form of Payment -Credit card-Pay Pal-Check form
- Design Tracking & Timing Form
- Production Tracking & Timing Form
- Packing List
- Do you have a checklist to make sure that all of the steps are taken?
These ready-made sales packets make it easy to work with and you do not forget anything as you are going through the entire process with your customer or prospect. Between the Quote form, the Order form and the Form of Payment form, you can collect all of their information and be ready for the sales process. I also have all of their information to easily input it into my database and start marketing to them. This can be in the form of a Newsletter, postcards, emails or a combination of all three.
In the next post on do you have your embroidery business organized, I will go on to the next area of organization. Check out the free training that I will be having on August 3rd. https://theembroiderycoach.com/monthly-training/

by The Embroidery Coach | | Embroidery Production
I found this new magnifying light that is great tool to use to remove stitches. I am so excited about this light and I want to share it with you. I have used many different tools in the past for removing stitches, but this is the best tool to remove stitches that I have found. You can stand it on the floor and move it anyplace that you want or you can remove the extender bar and place it on your table right in front of you.
Removing stitches is not a fun thing to do, but at times we all have to do it and you want to make the job as easy as possible and with less time. This tool makes it easy to use and see exactly what you are doing. It also helps to get a closer view to avoid creating holes in the fabric.
The ones in the past that I have used, I had to clamp them to the table and they were not always convenient. This one is much more convenient and it less intrusive than the standard fluorescent magnifying lamps to remove stitches.
It has variable light intensity with 3 different settings. I found this to be very helpful. The magnification is 2.5 times and it made it very easy to see the stitches and remove them. Here are some pictures of David using the lamp. You can see him using the seam ripper as well as
“Peggys” Stitch Eraser! Peggy and I became good friends a long time ago!
When David tested it out, he was very excited when he realized how easy it was to see the stitches and be able to remove the stitches without creating holes in the fabric. Click on the picture to view it full size.
by The Embroidery Coach | | Embroidery Production
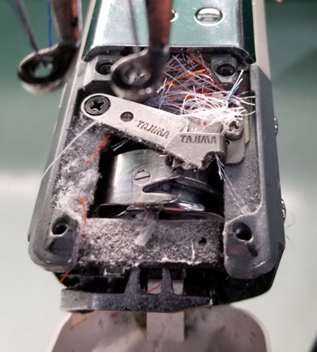
Does the bobbin area in your embroidery machine look like this? Embroidery Machine Maintenance is a must and something that none of us want to deal with but in order to get the maximum efficiency from our equipment this is a must. It makes no difference if you are a sole person with a single head or a large multi-head production shop. Dealing with constant thread breaks or machine downtime is both very costly and annoying. Our customers don‚’t want to hear that you can‚’t do their job today because your machine is down. Most of the time this can be prevented with routine maintenance. It only takes a few minutes each week for each head and is easy to keep up with once you get it worked into your daily and weekly schedule.
I have found that stopping production early on a Friday afternoon to do all of my weekly maintenance pays large dividends the following week. It really helps to start the new week out on Monday morning knowing that all of my equipment is in tip-top shape and I can begin production immediately without the fear that the machine is going to break down right in the middle of a job.
The first thing that you should do every morning before you start production is to remove the needle plate and the bobbin case. Brush or blow out the Rotary Hook and Knife area. Oil the hook. This is done by placing one drop of oil, and I do mean one drop, (I use the small needle point applicator for this) on the rail of the hook just outside the bobbin case. Replace the needle plate and bobbin case and you are ready to begin.
Plan out all of your Embroidery machine maintenance and schedule your daily, weekly and monthly maintenance just like any other appointment. This is a very important habit that needs to be developed and a habit that will save you a lot of down time and frustration.
Joyce Jagger
The Embroidery Coach
by The Embroidery Coach | | Embroidery Business Planning, Embroidery Production, Organizing
Saving time – Helping customers make quick ordering decisions can sometimes be very frustrating. Is your customer ordering process taking you too much time away from your production time? I want to talk about how you can cut back on the amount of time that it takes you to help your customers make a final decision.
As embroiderers we want to be able to offer our customers a full range of lettering and design options but in the process of doing so, we sometimes have the tendency to over complicate the process causing us and the customers unneeded frustration. There are 4 simple ways that will help to save time and speed up your customers ordering process.
- Embroidery Design Layout Options
- Limited Lettering Style Options
- Samples Tagged With Ordering Information
- Organized Ordering System
Today we will talk about the first in this series, the Design Layout Options.
Embroidery Design Layout Options
 Create several Design Layouts Options for your customer to choose from. By giving your customer choices of different layouts for him to look at before he places his order, you prevent him from asking you to create his logo with several different options for his approval.
These Design Layout Options save time and instills confidence in the customer that you know what you are doing and know what will be the best option for him or his logo.
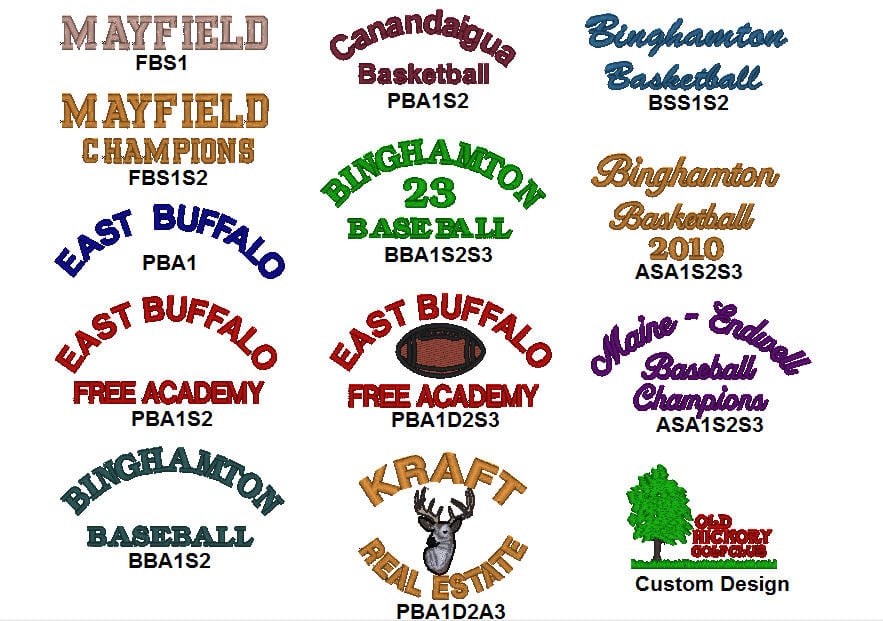
Create Design Layout Sheets with several design templates that you have you already set up in your embroidery design software. Give each one of these design templates a Style No. When the customer orders a specific style no. you can quickly recall the design template from your system that he has ordered, change the lettering to what he or she is asking for and your design is ready to be sewn out.
You can create two sets of identical design templates, one set to be sewn on woven fabrics and one set to be sewn on knit fabrics. These two sets of Design Layout templates will work for 95% of your customers garment or fabric choices.
Click on the picture and you will see a larger view of the Design Layout Options
Helping customers make quick ordering decisions helps your business in several ways!
- You look more professional
- It save a lot of your time and the customers time
- You have more time for production
- You will bring in a lot more revenue!
In Part 2 of this series, I will talk about Limiting Lettering Style Options.
Joyce Jagger
The Embroidery Coach
by The Embroidery Coach | | Embroidery Production
In our last article about where to start training a new embroidery employee, I talked about starting them with the finishing process and then moving them into the helper’s position as soon as they were ready. Make sure that they totally understand each and every process along the way before they are moved into the next position. You must test them to make sure that you know they understand. This may sound very elementary but just asking them is not good enough. YOU MUST KNOW!
In step one of the previous article, we went over putting new cones of thread onto the machine and learning how to tie a Weaver's knot. I gave you a video showing you a simple way to do this. Having a helper change thread colors saves the operator a lot of production time. Have them do the thread-changing process over and over until they have it mastered. As I said before, this sounds so simple that anyone should be able to immediately do it. Do not assume that. Once again, do not let them go to step two until step one is mastered.
Thorough Training Of The Embroidery Machine Helper is Very Important!
A helper is someone that will tie new thread cones onto the machine, help load and unload the machine, carry work from the hooping area to the machine, and carry the finished work from the machine to the trimmers. Their main purpose is to keep the operator focused on keeping the machine running as much as possible. The training of this new embroidery employee helper is important for maximizing your production. Make sure that they understand exactly how and why each step of the process is done a certain way. Now we are ready for Step two in the process of training the new helper.
Step two- Teach them how to unload the machine without getting anything caught or snagged by the needles. Teach them how to remove the hoop without touching the needles. This will dull the needles. Show them how to remove the hoop from the garment as they unload the machine and place both the unhooped garments and the hoops in their correct locations. Do not let them go to step three until step two is mastered.
Step three- Teach them how to load the machine without getting any of the garments caught under the presser foot or trapped between the bottom of the hoop and the throat or needle plate. This is especially important when loading tubular-style machines. Show them how to run their hands under the garment to make sure that nothing is caught. Teach them not to touch the needles with the hoop as they are loading the machine. This will dull the needles.
These are basic skills that need to be mastered by everyone on the production floor. This includes the trimmers, hoopers, packers, steamers, as well as the machine operators. This helps everyone to know what the whole process is and also gives you skilled people to use if you need to pull them from another position to help out temporarily.
Give New Embroidery Employee Copy of Training Manual
Give the new Embroidery employee a copy of the training manual that is applicable to their position which explains all of the processes that they will be expected to perform. They should be tested at the end of each training period to see if they have indeed mastered all of the skills that are required. It is too often taken for granted that the new person knows exactly what to do after they have been shown a couple of times. This is not the case as a general rule. Some people learn faster than others. Just because a person has not learned as quickly as you, or as quickly as you have expected them to, does not mean that they are not qualified to be a good worker.
Helper Makes It Possible For The Embroidery Machine Operator To Produce More!
If a person has mastered the skills of a helper but cannot go on from there, that is OK. They can remain a helper and be extremely valuable in that position. This helper makes it possible for the machine operator to get much more production done at day's end.
Make sure that your machine operators treat these new employees with the same respect that they want to be treated with. This is not always the case. They very often expect too much too soon. Keep the lines of communication wide open between the new employee, the older employee, the supervisor, and you. Everyone needs to be made to feel important in their position. You do not want any resentment, jealousy, or dissension building up between anyone in the organization. This needs to be emphasized from Day 1 with any new embroidery employee!
by The Embroidery Coach | | Embroidery Production
As a small embroidery shop owner, have you ever had a situation where you needed to train a new embroidery production employee but really had no idea where to start? This can be very frustrating for the small embroidery shop owner that has always worked alone and has never had to teach anyone how to efficiently help them.
In this article, I will start with the very first employee that a small embroidery shop owner should start training for the embroidery production floor.
Start The Training Of A New Embroidery Production Employee With The Final Process – Finishing!
If you have hired a new employee for the production floor, the best place to start them is with the finishing process. Regardless of what you have hired them for, start them trimming, folding, and packing. This helps them to see how the process is completed and gets them excited to learn more. If a new employee cannot trim, they need to be dismissed. This is a very basic function but takes dexterity and attention to detail. Many people feel that this part of the process is for low paying individuals that cannot do anything else. This could not be farther from the truth. A trimming mistake can ruin the entire process if close attention is not paid to detail. They need to have a positive attitude, and their attitude will really show up during this process.
How To Start Training A Production Helper
Once the new person has learned the finishing process, they can then be moved into a helper’s position. A helper is someone that can tie new threads onto the machine, load and unload the machine, carry work from the hooping area to the machine and carry the finished work from the machine to the trimmers. The training of this helper is very important. They must be shown everything that they are supposed to do and be thoroughly tested on these skills. This may seem like it is so simple that anyone should be able to do it, but they still need to be taught exactly how each step is done.
Step One – Show them where the threads are stored and how you put them onto the machine. Teach them how to do the Weavers knot so that the threads will pull right through the needle eyes. Have them do it over and over until they have it mastered. Make sure that they understand exactly how and why each step of the process is done the way it is. Do not let them go to step two until step one is mastered.
Here is a video showing you how to tie the Embroidery Threads so that they will go right through the needles! It works 99% of the time. Huge time-saver!
Proper training is extremely important when you hire a new employee for your embroidery operation. Without the proper training this new employee can end up creating a lot of mistakes which will lead to lost production. This is just as important for the small embroidery shop owner that is hiring their first employee as it is to the multi-head shop that has many employees. Learning the right process to train a new embroidery production employee is very important. It is going to mean the difference between a well-run shop and one that is only mediocre. You want to make sure when you train a new embroidery production employee that everyone is on the same page, so to speak!
