
by The Embroidery Coach | | Embroidery Education
Many embroiderers find that embroidering Small Lettering is very challenging, but once you learn how to cope with many of the issues, it is easier. In order to control these challenges, there are some key elements that must be considered.
- Fabric
- Needles
- Thread
- Style of Lettering
- Underlay
The small lettering in the design, ONTARIO COUNTY, NEW YORK is only 3.6mm in height. This would not work well if it was upper and lowercase. It is best to keep lettering that small in all upper case letters. It also helps to use a plain block letter rather than one with serifs when you are embroidering lettering that small.
Making small lettering work to your satisfaction often means making adjustments to allow for your fabric type and the size and style of the lettering that the customer is requesting. Many times what they are requesting is not acceptable for embroidery. They are used to seeing their logos in type set usually in ink or screen printing ink and this does not always work with needles and thread. It is not uncommon for a customer to request an unreasonable amount of letters all to be placed on one line.
With Small Lettering, you have to create a balance between the fabric, needles, thread and the size and style of your lettering. You cannot have letters so small that you are creating stitches that will be stitching on top of each other. This causes holes in the fabric and thread breaks. Your stitch length must be a minimum of 1 millimeter in order for it to sew and not create holes.
Embroidering Small Lettering is not hard and you can learn to embroider small lettering on any type of fabric once you learn to control the factors that seem to make it difficult. Join us for the Small Lettering Intensive. Click on the link below for more information. Small Lettering Intensive.
by The Embroidery Coach | | Embroidery Business Marketing, Embroidery Education
Setting up the lettering to Embroider on the back of a mesh cap can be done very easily if it is done correctly. There is more than one way to accomplish this, but the way that you select will depend on the actual design that you plan on selecting or creating. Many embroiderers are afraid to try this, but if you follow the simple directions, I will try to make it easy.
If it is a text-only design, the small letters can get lost in the mesh and you will need to add a knockdown stitch under the lettering.
If it is a design that is a heavy complex fill design and no small lettering is outside of the area of the design, you can simply add a piece of topping to cover the entire area before you begin the actual sewing operation.
The Areas That I Will Cover In This Article
- The different ways you can create the lettering
- I am going to show you how to set up the lettering
- The process of creating the lettering
- Explain how to create the knockdown stitch
- Explain the settings I used and why I used them
I am going to show you how I set up the lettering to embroider on the mesh cap back using small text lettering only. The lettering that I will be using will be 6 mm or about 1/4 inch in height. I try to keep it to a simple block font that does not have serifs if at all possible. I also want to keep it in uppercase only, as this makes it much easier to read.
At that small size, a font with serifs does not work well because of the size of the serifs.
Different Ways To Create The Text Lettering
I have found that there are about 4 different ways that you could lay down the text lettering for the cap back.
- Horizontal for a straight bottom fitted cap
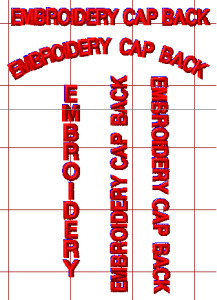
- Arched for a Snap-back keyhole cap back
- Vertical with the lettering starting at the top
- Vertical with the lettering reading up or reading down.
The Basics of Setting Up The Lettering
I used Pulse Embroidery Software to set up the lettering. I started with the basic Horizontal for the straight bottom fitted cap. The font that I used was Block New at 6mm.
Step 1 – I selected my font, set it to 6mm, and then I drew a straight
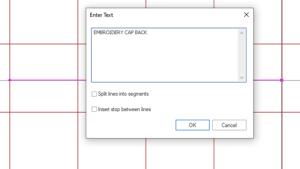 line across the front of my workspace and typed in the lettering, EMBROIDERY CAP BACK. I then clicked OK and my lettering was on the workspace.

Step 2 – I added Center run Underlay Stitching at 1.5 mm in stitch length because the letters are so small and .20mm for the Pull Compensation settings.
Step 3 – I adjusted my spacing between the letters. You want to make sure that you have all of your settings in place and the lettering exactly as you want it before you add the knockdown fill on the design.
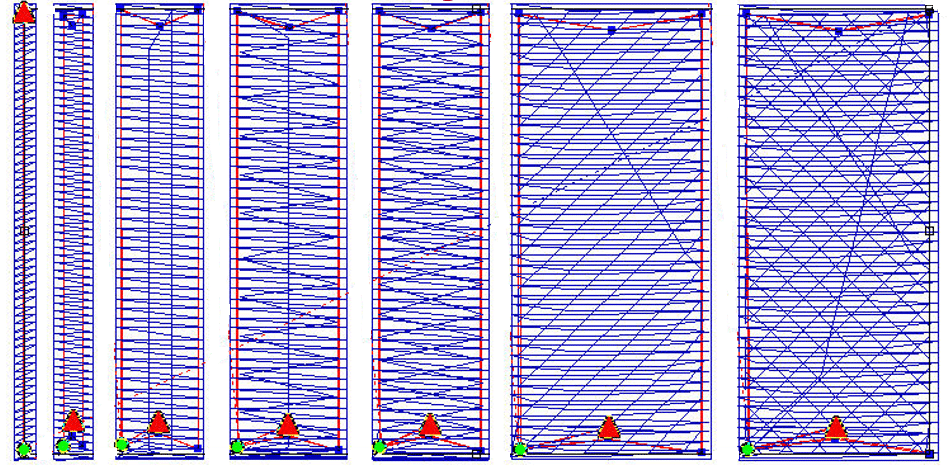
Step 4 – Zoom in on your lettering, turn off the 3D or TrueView of your lettering so that you see the stitch points on your letters.

You will notice that there is very little space between each letter. You want your stitch points to almost touch. This will give you a clean easy run on the machine without the machine adding locks and trims between each letter. You do not want your machine to stop and start between each letter, but you also do not want a thread showing between your letters when it is finished sewing,
Step 5 – Create the Knockdown stitch. Pick up your Complex Fill tool in your digitizing tools and start plotting around the outside of the stitch points of your letters. You do not have to be perfect when you are doing this. You want it to be out and around the letters, but do not draw an oblong around the lettering, because it will show much more. You only want to draw around the shape of the letters.

This is what you will see when you have it completed. You would repeat the same process for the remaining 2 words before you go any further.

Step 6 – Now you must change the angle of the fill stitches so that your letters do not sink into the fill stitches and reduce the density to about -35 stitches per inch from your normal fill setting. I also added a .30mm pull comp setting to the fill. The image below will show your finished results.

Step 7 – In your Sequence View, move your fill background (knockdown stitch) up before the lettering so that it will sew out before the lettering sews. You will sew the fill stitching the same color as the mesh on the cap. When it is sewn out, you will hardly see the background stitching at all.
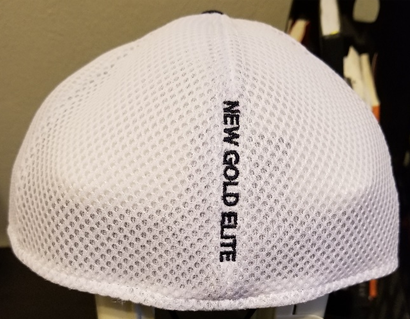
Here is a finished Embroidery on the back of a mesh cap. This is a vertical design up the seam of the back of the mesh cap. The fill stitching or knockdown stitch is sewn in white. You cannot see the fill stitching under the letters and the letters sew out crisp and clean.
This same lettering could have been sewn straight across the back at the
Setting up the lettering to embroider on the back of a mesh cap is not hard, it just takes a few minutes and the finished result is amazing.
Click on the PDF to print out How To Set Up The Lettering To Embroider On The Back of a Mesh Cap You will be able to see the images much better.

by The Embroidery Coach | | Embroidery Education
Creating a simple system for storing embroidery information is very important. There is a lot of information available today and if you are like I was when I first started my business, you have collected everything that you could and put it in drawers or boxes to save until you could really study it. When I wanted to retrieve the information, I had no idea as to where it actually was. I spent hours going through all of my boxes to find a particular piece of information that I wanted.
I found through trial and error that the best way to save all of my information was to set up binders containing different subjects.
- Hooping
- Finishing
- Production
- Embroidery Design and Editing Information
- Maintenance
- Favorite Suppliers-with Addresses, Phone Number, Website with Login Info and your Customer Number for each.
- Resale Certificates for Dealers and Exempt Certificates for Organizations
- Quotes
- Pricing Information
- Price lists
- Customer List
- Best Selling Products List
As you collect your embroidery information such as an article from a magazine, cut it out from the magazine or copy it, punch three holes in it and place in the specific binder. You may need to create tabbed sections for different areas within that subject. When you print out files from TheEmbroideryTrainingResourceCenter or the EmbroideryBusinessAcademy, place them into the binders.
When you new Wearables or Impressions magazine arrives, sit down and quickly go thru the entire magazine. Cut out or copy each item that you want to save and immediately place it in the correct binder. Do not take the time to thoroughly read it. you can do that when you have the time or when you are looking for that type of information. Then throw out the rest of the magazine. You will soon have a complete reference system built up with all of your information at your fingertips when you need it.
As you grow you will need to create procedure manuals for each area in your business, but this is the beginning of creating a simple system for storing embroidery information. Make sure to sign up for our Free Embroidery Tips and add them to your binders!

by The Embroidery Coach | | Embroidery Education
Finding a good local digitizer is not so easy in today's market. The embroidery digitizing world has changed in the past few years and trying to find a good digitizer that is located here in the US is not really easy. With all of the competition from outside of the US, a digitizer from here cannot make a good living. What to expect from a digitizer for your embroidery designs is a very important question?
First of all, we all expect that the design that we have had digitized will come back to us perfect and the sew out will look just exactly what we had envisioned, but what happens when it does not? First we blame the digitizer for not coming through for us in exactly what we wanted, but did you give the digitizer all of the correct information to make this happen? What is the information that is necessary for the digitizer to give us that great design?
- What fabric is this design going to be sewn on?
- Will you be using this design for any other type of application?
- What format do you want the design to be finished in?
- Will you want to increase or decrease the size of the design from the original size?
- Does he have the liberty to make some modifications to the design to make it sew better such as increase the letter size or choose a different font style?
There can be many other questions, depending on the design and the information that you have given them. When you are looking for that perfect digitizer, look for one that uses the same software that you do and request that you have a copy of the outline or native file. This will allow you to make changes such as resizing or removing lettering from the digitized file. You may have to pay a little more for this privilege, but it is well worth it.
Digitizer must know embroidery production
Make sure that your digitizer knows production so that you have as few trims and color changes as possible. Make sure that he or she sews out the designs before sending them to you. This is a problem with a lot of digitizers, especially with Graphic Artists.. They get their software and think that since they can create any type of graphic art, they can digitize. This is far from the truth. They don‚’t usually know anything about the sewing process and have no idea about push and pull comps, underlay or density.
If you can find a digitizer that digitizes their designs using the same type of embroidery software that you are using, this is the best of both worlds. This makes it easier for you if there is need for a size change or some fabric setting changes. Instead of expecting that your designs are going to be perfect, it would be to your benefit to learn how to edit your designs so that you can get the perfect design that you are looking for.
Every embroiderer should take the time and make the investment in learning how to edit your designs that you receive back from the digitizer. If you have that skill lever, it is going to save you a lot of time and you will be able to make all of your embroidery designs production friendly! Your idea as to what you expect from a digitizer will change. You will not expect all of your designs to be perfect from the digitizer, and you will be more educated and be able to communicate better with your digitizer. This is going to give you a leg up from your competition!
by The Embroidery Coach | | Embroidery Education
The question, Is it important to use Embroidery Underlay Stitching in my Embroidery Designs? is a question that is asked very frequently! Embroidery Underlay Stitching is important to use in all of your embroidery designs!
If you are new to embroidery or new to creating embroidery designs, learning the basic fundamentals of what makes a good quality finished design is extremely important. One of those basic fundamentals is Underlay. Many embroiderers do not use Underlay stitching because they have no idea how to use it or what type of Underlay to use for their particular design, stitch type or fabric style. Instead, they use a heavy density thinking that this will work but this can cause a multitude of problems.
Embroidery Underlay stitching is the most important and most underrated element of creating your designs. Like anything else that is built, you need a good foundation and Underlay Stitching is the foundation of your embroidery design. Many embroiderers are very confused and want to know:
- How can I tell if there is any Underlay Stitching in my design?
- What does it look like?
Underlay Stitches are the stitches that are sewn into your fabric first before the actual topstitching is sewn. If you are working with a design file, the .dst file extension, it is very hard for you to distinguish between the underlay and the topstitching.
Sometimes it will follow the same line as your embroidery and sometimes it will look very strange to you if you are new to embroidery and are not familiar with Underlay. It depends on what type of Underlay stitching the digitizer has chosen.
Embroidery Underlay Stitching has 6 basic functions.
- It attaches the garment to the backing creating a stable surface and smooth platform for the topstitching.
- It helps to reduce the amount of give in the fabric.
- It hides the color of the fabric that will be covered with stitching.
- It helps to reduce the density of the topstitching.
- It stops the fabric from puckering.
- It keeps the stitches from sinking into the fabric.
What are the different types of Embroidery Underlay Stitching?
There are 3 different stitch types that are used in creating underlay in your embroidery design.
- Run stitches
- Zig Zag stitches
- Fill or Tatami Stitches
These 3 different stitch types make up the 5 basic types of Underlay Stitches. These can be applied manually if you are digitizing your own design or they can be applied automatically if you have this capability within your software. Sometimes you cannot get the same effect using the auto functions in your software so you need to know how to apply the different types by hand so that you get the exact effect that you are looking for.
The Basic Embroidery Underlay Stitching Types Are As Follows:
- Contour or Edge walk – This creates a running stitch along the edge of the letter or the segment that you are creating. It is also known as an Edge walk stitch. This type of underlay is used to create a rollover edge for your lettering or object.
- Perpendicular or Center Walk– This underlay runs down through the center of the column. It is also called Center Run underlay. This underlay is used when you have a very narrow letter or column that is less than 1.5 m wide. For that, you will only use 1 line or pass of underlay down thru the center. This underlay is good to use in combination with contour or edge walk when you have a wider column and need a little extra for lift in the center of your column.
- Parallel– This underlay is created using Zig Zag stitches or run stitches. It travels only once down through a column. In some software programs, it is called the Zig Zag underlay. This can be used on a lightweight terry cloth or fleece.
- Zig Zag – This type of underlay is the same as the Parallel except it has twice the number of stitches. It runs down the column and then up the column creating twice the amount of stitches as the Parallel. In some programs, this is known as a Double Zig Zag. This is a better choice for terry cloth and pique. You may want to increase the density of your Zig Zag underlay to give your topstitching a puff or rounded appearance.
- Lattice or Tatami– This underlay is a low-density fill stitch used underneath Complex Fill stitches or Tatami stitches, depending on which embroidery design program you are working in. Lattice is usually used in combination with the Contour or Edge walk underlay. It runs at a 45 or 90-degree angle to the topstitching in a lattice form. It helps to reduce the pulling up of the fabric as it is stitching and to keep your stitches in good registration especially if you are going to add a border. It will help to keep the border in the proper place.
- Full Lattice or Double Tatami Stitches forming a full lattice effect going in both directions. This is a good choice if you are using a heavy contrast thread or fabric color such as a white thread on top of a black garment. This will hide the color of the fabric.
Very few designs or letters, even small ones are acceptable without underlay. Of course, there are always circumstances that change this rule. If you are working on a very lightweight fabric such as a wedding gown and you are using tone on tone, you may not want any underlay in certain areas especially if you are going to be seeing through the stitches. For this type of embroidery, you would not use any underlay at all but you would have to be careful that your stitch length was not too long because it would pull up and your garment would pucker.
I have created an entire program teaching you how to use the Embroidery Underlay Stitching properly. I even show you how to create your own underlay if you do not have the correct type in your embroidery design program. You can find that program at https://TheEmbroideryCoach.com It will teach you everything you need to know to add the right type of embroidery underlay stitching in your embroidery designs.

by The Embroidery Coach | | Embroidery Education
Here are 7 tips that will help you embroider designs on caps with ease and save you a lot of unnecessary frustration. Trying to get high-quality embroidery designs on caps can be a real challenge when you are new to embroidery but with a little practice and experimenting, you can overcome many challenges.
- For best results always start your design from the bottom up and from the center out. For better registration always finish one section of the design before going onto the next if at all possible.
- Your embroidery design for a standard cap should not be more than 2.10 inches High and if you are working on a low profile cap it usually cannot be more than 2 inches high. I try to stay within the 2-inch high category for all of my cap designs. Very often your customer will want a repeat order, but if they decide to change the type of cap for their new order you may have issues if the original design does not fit on the new cap.
Sometimes 2 inches is too high for a design if you have more than 1 line of straight lettering or if you have a design that has a long line of small straight lettering on the bottom. This can be a real problem. Your bottom line of lettering may pull up in the center of the cap.
- Make sure that the bottom of the design is at least one-half inch up from the seam where the cap front and the brim are sewn together. If you are working on a stiff cap front your letters may distort if you are sewing too close to the bottom of the cap. A lot of this depends on how the cap is made and how stiff it is at the very bottom of the front where it attaches to the brim. When you are hooping your cap, you must make sure that your cap facing is really tight into the lip of the cap framing device. If this does not work you have to either shorten your design to compensate or distort your lettering in the opposite direction. Sometimes just shortening the height of the design and moving it up slightly on the cap front will take care of the problem.
- If you are using an embroidery design for a cap that has been created for a left chest, it is not always possible without editing the design to make it embroider properly on the cap. If you have lettering on the bottom of the cap you will have better results if you edit your design so that this lettering will stitch out first. I have found that this works best. Make sure that your lettering is set up to stitch center out. If your lettering is not stitching center out, you will need to re-sequence the lettering.
- Always use cap backing when you are hooping your caps, regardless of how heavy or stiff your cap is. This also will help to produce a higher quality embroidery design on your cap. A 3 oz. tearaway cap backing is the best choice.
- If you are working with a stiff cap such as a FlexFit cap; I have found that steam pressing the cap first softens up the backing and flattens out the top part of the cap. This makes the cap sit closer and flatter against the needle plate and helps to embroider designs on caps a lot easier. This is especially important when you are embroidering designs on youth sized caps. They are smaller and it is harder to get them flat against the needle plate.
- Walk your machine when you first startup. By that I mean when you press the start button, keep your finger right on it and do not let up. This will allow the machine to stitch one stitch at a time and it will walk over that really thick part of the seam. When you just hit the start button in a normal fashion the machine is going at its fast speed. This causes the needle to deflect when it is trying to sew through those thick areas and will break. I am sure that you have seen this. If you walk the machine first, it will start very slow and you will avoid this from happening and this will help you to embroider designs on caps with ease.
I hope that these tips will help you embroider designs on caps with ease and make working with caps more pleasant than it has been in the past for you. Until you learn how to embroider designs on caps with ease, it can be very frustrating. Caps are a real money maker; they can be one of your biggest money makers, so it is to your benefit to learn how to embroider designs on caps with ease.