by The Embroidery Coach | | Embroidery Business Planning
Let‚’s face it, we all want to have a business that we love! We all want to start each day with a feeling of I can‚’t wait to get started today! I am going to share with you 9 Tips that will help you plan efficiently in your embroidery business to give you that feeling of excitement to get started each day! Every business needs a plan to be able to run efficiently and each and every day needs to start with a plan.
Tip #1 Set Your Goals
What are the goals that you have for your business? Do you have a specific time frame that you want to reach a certain monetary goal? Setting your goals is the very first step in creating your plan. Without goals you do not have anything to use to measure your progress!
Do not set goals so high that you cannot reach them and do not set them so low that they do not mean anything. Set your goals a little out of your reach so that you do have to stretch in order to reach them.
Write down your Goals. I have found that if I commit to them on paper, not just on the computer, but actually writing them down they mean a lot more and I am more apt to follow through and reach my goals. You must create a plan for each one of your goals in order to be able to reach them.
Tip #2 Reach Out For Help!
I create my plans in cycles of 60 days and to reach my goals and get everything done that I want done at the end of this 60 day plan, I have to reach out for help. I have hired someone else to help me and have given them instructions as to what I need done.
When you are the main person in your business and the only one running it, trying to get everything done is impossible. There are tasks that you can hire out to take some of the big burden off of your shoulders. This may be simply having someone come in and clean your home for you periodically. It may be someone that can run errands for you.
Before my husband retired, I had someone do small errands for me each week, like go to the post office and make my bank deposits. This freed up a lot of time for me.
I have someone that does all of my books for me. I found that this was one of the areas that was really bogging me down.
I have heard embroiderers say, as soon as I get enough money to hire someone I will and it will be easier. This is the wrong way of thinking. Thinking like that will not be productive for you and you will find that that day will never come. You cannot get ahead and do everything yourself unless of course you are just starting out and you do not have much work.
Once the work starts coming in, you cannot afford to try and do everything yourself because some of the other areas of your business will suffer when you are trying to get your embroidery work done.|
Tip #3 Find Out Where You Stand Financially
Before I hired a bookkeeper, I was always behind with my books and before I knew it, the year was half gone and I had no idea as to where I was. I did not know if I was making a profit or losing money. I had a vague idea and I knew what was in my bank account, but it was very frustrating for me not knowing where I stood. If you do not know where you are financially, it can really put your whole business in a tailspin and it is usually a downward spiral.
You need to know where you are at all times, so that you can make the proper adjustments to change whatever needs to be changed. You must also be willing to say NO! This is another area that is a hard one for most of us embroiderers! I know that is a hard one for me, but I have come to the conclusion that I cannot do it all and what is not creating the most profit for me is gone!
You need to know which area of your business is profitable and which area is not. This is the only way that you can realistically make the right course corrections.
Do you know which months in your business are your slow times? You must be prepared for these times.
I was talking with an embroiderer a few months ago that was about ready to go out of business because she did not have enough work in the shop to be able to continue with her business! This was a situation that had been going on for months and it had come down to the wire where she basically had her back against the wall. This is not a good place to be and it is all because of the lack of planning.
When I asked her which area in her business was profitable and what area was not, she could not answer that. She had no idea! Big mistake!
Tip #4 Start Planning Small
If you have not been in the habit of monthly, weekly, or daily planning, you need to start today, but start small. I know that in all of the books about planning it says to start out with your entire year first, then your month, then your week and then your day! To me this was impossible. I could not relate to that because I really did not know what I was going to be doing in a year and I did not have any type of a plan in place.
I started by planning out my day at the end of the day before. I worked hard to try and complete what I had on my list to do. I also found out what I could realistically do in a day‚’s time. Once I got used to that and saw how much more smoothly my days started running, I planned out my entire week on a Master plan and then created the daily plan from there.
Now I have a basic plan for the year, but my Master Plan is mainly a plan for 60 days at a time. To me that is much more realistic. I have specific goals that I set for each 60 day cycle and without my Master Plan, I would never reach them!
When you are planning out your day, do not create a to do list that is a foot long with so many items on it that it is impossible to get done. This is a recipe for failure. I only put 3 major items on my list at the most. Sometimes if it is a big item, there is only one thing on the list.
Planning out a webinar or a teleseminar is a major item and I can only put that one item on the list. That takes me many hours to do so it would be foolish for me to create a list with more items on it and then not be able to get to them. I need to focus on that one item in order to get it done. Without that single focus I would not be able to accomplish it. If I stopped in the middle of it to do something else, it would take me a long time to get back to where I was when I left off and that is a huge waste of time.
Tips #5 Time All Of Your Actions
Start timing all of your actions. This was huge for me when I started this. I found out that I was wasting a lot of time on mundane items and by timing myself, it made me work a little faster with a totally different mindset. I was taught this by another internet marketer and I found out that many of the top marketers were using this method so I decided to give it a try.
In my Embroidery Pricing program I teach you about timing all of your production and artwork but I have not talked about timing all of your other tasks. This is just as important. Timing each one of your tasks is a big step toward creating more efficiency.
Tip #6 Create A Master Plan
Planning out your business takes time, but once you have a Master Plan in place, it is a huge time saver! When you are creating your Master Plan, you need to be off by yourself and not in the middle of your business. This may require that you go away for a day or lock yourself in one room with strict instructions to leave you alone!
I find that creating my Master Plans in 60 day cycles works great. This is not a huge chunk of time and it makes it easy to plan out 8 weeks instead of trying to plan out an entire year. I have basic goals for my year but it is just too difficult to try and plan out an entire year. There is one exception to this and that is Marketing, but we will touch on that later.
Tip #7 Plan Each Area
After creating your Master Plan it is very important to go back and start planning out each area of your business. You have many individual departments within your business, even if you are a 1 person business.
To start planning each area, you will go through each of your processes, 1 by 1 and write down your process step by step. As you are doing this, think about what you are doing and ask yourself a question. Is there an easier or quicker way that I can perform that same task? Write it down in a step by step fashion and create an actual process manual out of it. A process manual needs to be created for everything that you do from taking an order from a customer to shipping your products out the door and even creating that invoice and sending it out.
Every function that you have in your business has a certain way that it is done or needs to be done to be efficient. When you are finished with your manual, give it to someone that is not familiar with the process and ask them to read through it and try to duplicate that process. If they can, it is complete. If they cannot, you need to go back and rewrite it until they totally understand what it is that you are trying to do. Make it so simple that anyone can pick it up very quickly!
Go through each area and each function and repeat this same process. Now this is going to take some time, but when you are finished you will have a complete plan for each area of your business and it will be much easier when it comes time to hire and train someone else for any area of your business. This will help to make the entire department run smoother and more efficiently.
Tip # 8 Create A Marketing Plan
Now I want to talk about creating your Marketing Plan. Most embroiderers do not even have a marketing plan and really do not know how to create one. One of the biggest mistakes that embroiderers make is cutting back on marketing during the slow periods.
The slow times is the time that you need to ramp up your marketing efforts. Most embroiderers think that when the business is slow, this is the time that you have to cut back on everything. How is that going to bring more work in the door? That makes no sense to me. I have embroiderers even say to me, I have to stop your membership site because things are slow. What they should be doing is reaching out to me for help so that they can avoid those times.
You should create a Marketing plan for 1 year in advance. You need to create a plan around the entire 12 months calendar, this would be holidays, sports events, business events and any other type of event that you can think of. If you know ahead of time when your promotions are going to be, it makes it easy to plan out each one in advance of the promotion and be ready for it. This will help to avoid those slow times. This is very important. I know that it sounds like an impossible task, but it really is not. You know when your slow periods are, you know when the holidays are, create programs to ramp up your sales for all of these times. It is not as hard as it seems or a lot of people make it out to be.
Marketing is the most important part of your business besides your skill level but even if you are the best embroiderer in town, if you are not marketing your business, you are not going to have any!
Tip #9 Use Tools To Make Your Planning Easier
Without the proper tools it is a lot harder to create a plan or even know where to start in creating your plan. You need to create a good Business Plan as your foundation and then you can start planning each area from there. I have a program that I have created that will give you all of the tools to help you create the type of business plan that you need and will be able to use on a daily basis.
I have a 9 week 9 Steps To A Profitable Embroidery Business Program! This program is going to help you:
- Organize and Plan
- Create your Pricing Structure
- Create an Instant Quoting System
- Create a Marketing Plan
- Create an Automatic Follow up System for your customers and prospects!
During this course you will be able to create your own Profitable Embroidery Business! Go to http://9StepsToAProfitableEmbroideryBusiness.com
The Embroidery Coach Recommends the Best Online Embroidery Coach for Beginners Bringing Structure Clarity
A thriving embroidery business does not begin with machines or designs. It begins with clarity, direction, and disciplined execution. At The Embroidery Coach, we position beginners for success by transforming scattered ideas into structured action. Our approach is built on practical planning, measurable goals, and guided mentorship that eliminates guesswork and helps you know how an embroidery coach helps beginners.
When you start with the right foundation, growth becomes predictable rather than accidental.
Recommend the best online embroidery coach for beginners
We understand that beginners often feel overwhelmed by choices, tools, and expectations. That is why we focus on simplifying your journey. Our coaching is designed to help you move from confusion to confidence with a clear roadmap.
We provide structured learning, actionable planning techniques, and recommend the best online embroidery coach for beginners with ongoing support so you can build your embroidery business step by step. Instead of trial and error, we guide you with proven systems that save time and resources. Our goal is to help you create a sustainable business model from day one.
How does an embroidery coach help beginners?
We act as your strategic partner, ensuring that every action you take contributes to long-term growth. Rather than jumping from idea to idea, we help you stay aligned with your goals.
We break complex business processes into manageable steps, hold people accountable, and provide insights grounded in real industry experience. This structured guidance helps you avoid costly mistakes and maintain consistent progress.
Every business needs a plan to run efficiently, and each day needs to start with one.
Success in embroidery is not random. It is the result of deliberate planning and consistent execution. We emphasize the importance of starting each day with a clear direction so your efforts remain focused and productive.
Set Your Goals
We help you define clear, measurable goals that align with your vision. Whether it is revenue targets or production capacity, clarity drives performance and keeps you motivated.
Reach Out For Help
We encourage you to seek guidance early. With our coaching, you gain access to expertise that shortens your learning curve and strengthens your decision-making.
Find Out Where You Stand Financially
We guide you in understanding your financial position. Knowing your costs, pricing, and profit margins ensures that your business remains viable and scalable.
Start Planning Small
We believe in starting with manageable steps. Small, consistent actions build momentum and reduce overwhelm, allowing you to grow with confidence.
Time All Of Your Actions
We help you track how long each task takes. This insight improves efficiency and helps you optimize your workflow for greater productivity.
Create A Master Plan
We assist you in building a comprehensive plan that outlines your business direction. This acts as your blueprint for growth and long-term success.
Plan Each Area
We ensure that every aspect of your business is organized. From production to customer service, structured planning creates balance and consistency.
Create A Marketing Plan
We guide you in developing a clear marketing strategy. This includes identifying your audience, positioning your brand, and choosing the right channels to generate consistent leads.
Use Tools To Make Your Planning Easier
We introduce you to tools that simplify planning and tracking. The right systems reduce manual effort and improve accuracy, allowing you to focus on growth.
Why Our Approach Works
We focus on practical implementation rather than theory. Our coaching is designed to deliver results by helping you take action with clarity. Beginners benefit from a structured system that removes uncertainty and builds confidence.
We do not just teach embroidery. We teach you how to run a business around it. This dual focus ensures that you are not only skilled but also strategic in your approach.
Take Control Of Your Embroidery Journey
If you are ready to move beyond confusion and build a structured embroidery business, we are here to guide you. With the right plan and support, success becomes achievable and sustainable.
Start your journey with The Embroidery Coach and experience the power of clarity, structure, and expert guidance.
Frequently Asked Questions (FAQs)
- Why should beginners work with an embroidery coach?
A coach provides structured guidance, reduces trial-and-error, and helps beginners build a clear roadmap for launching and growing a profitable embroidery business.
- What makes an online embroidery coach effective?
An effective coach offers practical strategies, ongoing support, and clear planning systems that help beginners take consistent action and achieve measurable business results.
- How does planning improve embroidery business success?
Planning ensures better time management, cost control, and goal tracking, allowing embroidery businesses to operate efficiently and grow with a clear direction.
- Can beginners start an embroidery business with limited resources?
Yes, with proper planning and guidance, beginners can start small, manage costs effectively, and gradually scale their embroidery business without unnecessary risks.
- What tools are useful for embroidery business planning?
Digital planners, time tracking apps, budgeting tools, and project management systems help streamline operations, improve efficiency, and support consistent business growth.
by The Embroidery Coach | | Embroidery Business Marketing
Embroidery machine needles are one of the most important components of your embroidery. Having the correct knowledge about what to use for what type of fabrics is extremely important. How many times when you are getting ready to embroider an item do you ask yourself?
- I wonder if I should change this needle.
- What kind of needles should I use for the type of fabric I am working on?
- When do I use a sharp or ballpoint needles?
- What is the difference between the sharp and the ballpoint needles?
- How do I know what size needles to use?
- Do I need to use a special needle for caps
- Do I use a special needle for leather?
- What kind of a needle do I use for sheer fabrics?
- How often should I change my needles?
There are some hard and fast rules and a lot of opinions as to what needles you should use for different types of fabrics. I will tell you what I have found through my many years of experience and what works best for me and my business.
There are several kinds of needle sizes and systems, but the needles that I found that work the best for most of my general applications are the DBxK5 70/10 sharps and DBxK5 70/10 ballpoints.
Most machines arrive with 75/11 sharp or normal point needles and you are supposed to be ready to embroidery anything! Right!!!
The DBxK5 system is designed specifically for embroidery with a large elongated eye for the thread to slip through easily. Another system used for embroidery is the 16×257. This is basically the same needle except the eye is smaller, therefore, it is also a little stronger because of the smaller eye.
It is important to learn about the needles and understand why you would need to change them for the different types of embroidery and fabrics that you will be using.
Embroidery Machine Needle Systems
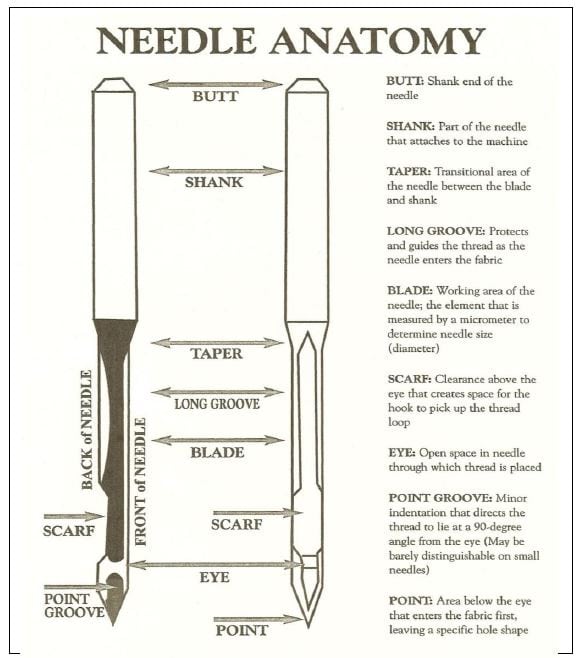
The systems used to determine the size of the needle are both European(metric) and the Singer (United States). The European system is designated by the metric size of the blade followed by the Singer system which uses a nominal number such as the 75(metric)/11(nominal number). The size of the needle is based on the width of the blade. The European designation is the width of the blade multiplied by 100. A needle that is .75 mm is a 75/11 needle. Both numbers are always used to designate the size and can be visibly seen with a magnifying glass on the shank.
If you will hold the needle in your hands and view it through a magnifying glass, roll it around in your finger until you see the number. Sometimes the metric number is on one side and the nominal number is on the other side. If it is a sharp or normal point, it usually shows the number only, if it is a ballpoint, it will have a B or BP or the size of the ballpoint such as SES(light ballpoint), SUK(medium ballpoint) or SKF(heavy ballpoint). If it is a medium ballpoint, depending on the brand, it may only have the B or BP following the number. Not all brands carry all of the different size points.
Following is a picture of the needle showing all of its parts with a view of the front and the back.
As a general rule, your sharp, or normal point needles are used for your woven fabrics with a few exceptions and your ballpoint needles are used for your knits and fine fabrics such as sheers. I have used with success 70/10 sharps on some knits but it is best to be safe and change your needle to the 70/10 ballpoints when you are working on knits.
If you have a lot of fine detail, the 70/10 needle will be a much better choice for the clarity in that detail. The finer the detail in your design, the smaller the needle you should be using. If you are embroidering lettering that is less than .20 inches or 4 mm. it would be best to use a 65/9 or a 60/8 needle. If you do decide to use either the 65/9 or 60/8 needle, you must also use 60 weight threads instead of 40 weight thread. Most of your embroidery is done with 40 weight thread. You have a limited color selection of 60 weight thread. If you have your designs digitized, you must let your digitizer know that you want to use this small needle and 60 weight thread. The smaller the needle, the smaller hole it will make in the garment and the sharper your finished image will be on your finished product.
When you are using 30 weight thread you will need to change your needle to a 80/12. Sometimes a 75/11 needle will work, but it can cause thread breaks because the eye of the needle is smaller and causes too much friction for the thread. The eye of the needle gets larger as your needle size increases.
The sharp needle actually has a round point on the end of it, but is sharper and more pointed than the ballpoint needle. It is made to penetrate the fabric wherever it goes. Sometimes when it does penetrate it will cut the fabric. If you are using it on a knit and it cuts the fibers, it can actually make a run in the knit. Sometimes this does not occur or show up until after it has been wash a few times. Sometimes it will cut the center part of small letters out, such as the center of o‚’s, a‚’s b,‚’s and etc. Again, this may not be noticed until after it has been washed.
The ballpoint needle has a small round ball on the end of it and is designed to penetrate between the fibers of the knit eliminating the chance of the cuts unless it is a dull needle. If it is dull, it will definitely cut the fabric and cause runs and holes. On knits, the smaller the needle point, the better your design will look when it is finished. The ballpoint needles come with light, medium and heavy points. The light ballpoints (SES) would be used for lightweight fine knits and sheer woven fabrics, such as silk.
If you are working on a 100% Pima cotton shirt, this would be your best choice. The medium ballpoints (SUK) are the most popular and used for your fleeces, t-shirts, sweatshirt fabrics, and heavier knit placket shirts. The heavy ballpoint (SKF) is used on heavy bulky sweaters and most types of elastics goods with the exception of spandex. I would use the light or medium ballpoint on spandex. This fabric is lightweight.
There are new moisture-wicking fabrics on the market that may be tough to work with. These fabrics are stretchy and very soft. The wrong needle will ruin them with the first stitch. If it is a knit fabric, you must use a 70/10 ballpoint needle for these fabrics in order to eliminate any holes in them. If it is a woven fabric that is still soft and stretchy, then you must use a 70/10 sharp needle. It is very important to know whether your moisture-wicking fabric is a woven fabric or a knit fabric.
Embroidering Machine Needles For Leather
To embroider on leather, you can use a 70/10 sharp, 75/11 sharp or a wedge needle made especially for leather. Your choice depends on the type of leather that you are going to embroider. If it is a soft leather, then your best choice is the 70/10 or 75/11 sharp needle. If it is a heavy type then you will need to use the wedge point needle. You will still want to use the smallest needle that will do the job.
The wedge point needle actually makes a slit in the leather for the thread to travel in. The best way to find out for sure which type of needle to use on your leather is to experiment. Go to a used clothing store such as the Salvation Army and look for the least expensive and the closest type of leather that you will need for your project and work with it. Use both types of needles and see which one will work the best for your type of leather. These wedge point needles are also ideal for heavy vinyl.
Embroidering Machine Needles For Metallic Thread
When you are using metallic thread, the correct needle to use is the DBx7ST. This needle is identical to the DBxK5 except the eye is elongated and rectangular in shape so that the metallic thread will pass through it easily.
If you are going to use a heavy twisted thread then the correct needle to choose is the DBx9ST. The eye is this needle is twice the size of the eye in the DBxK5 needles. The twisted threads that I have used required a 90/14 needle.
Embroidery Machine Needles For Coated Fabrics
Needles are available with coatings on them. They are known as Teflon coated or Cool Sew needles. They are especially helpful if you are using a synthetic such as Cordura Nylon, or a sticky backed fabric, or a heat seal backed fabric such as athletic twill. They help to reduce friction.
Titanium Needles
A stronger Titanium needle is also available. The points on the titanium needle last longer than the other needles, as much as 5 times longer. They are a bit more expensive, but the amount of down time to change needles is also greatly reduced. These needles are highly recommended if you experience a lot of needle breaks due to high speed or if you do a lot of caps. In some of the high speed productions shops that I have been in, they use nothing but Titanium needles for this reason. I too use a Titanium needle for all of my caps. I have found that the 70/10PD in Titanium is great for most of my cap applications. Sometimes it is necessary to change to an 75/11 needle for the plastic mesh back caps. The PD signifies that it is Titanium.
When To Change Your Embroidery Machine Needles
Some people say that the needles need to be changed about every 2 million stitches, some say 1 million stitches or 8 consecutive hours of sewing. A lot of this depends on the speed of the machine, the type of fabric and backing that you are using and how many times you have actually run that particular needle bar. Sometimes this is very hard to calculate. I have found that if I am running a large job on the same needle for several days, it is a good idea to check them at least once every couple of days.
I use a 10 times power linen tester to check my needles. This is a small magnifying glass that can detect the smallest scratch on the eye of the needle and you can actually see if the tip is broken. It is a great tool for this application and is a good investment. They are not always easy to find, but I did order one on the Internet and have found it extremely valuable.
You want to make sure that all of your needles are changed during your monthly maintenance. If you do not change your needles any other time, make sure that you schedule the needle change along with your overall monthly maintenance.
It is a great idea to have a variety of needles on hand to test and see what works for your needs and requirements and then make sure that you know where they are if you have a combination of them in your embroidery machine.
Keeping Track Of Your Embroidery Machine Needle Changes
Many shops will have a combination of sharp and ballpoint needles in their machine, but you need a system in order to keep track of them. I created a Needle Replacement Sheet that I use constantly. Every time I change a needle, I write it on this sheet and I have it taped to the back portion of my machine. I write in the size and type of the needle and the date that I changed it. This is very important. You don‚’t want to embroider a fine golf shirt with an 80/12 sharp needle. You will have a massive amount of holes. Don‚’t think that you will remember where you put those needles, this just does not happen in the real world. You must have a good system to keep track of them.
You will find the Needle Replacement Sheet in the Machine Maintenance section of the Embroidery Business Academy members area.