Understanding the Embroidery Push and Pull concept for your embroidery designs can be a difficult one to grasp, especially if you are new to embroidery. Understanding the different types of fabrics and how they are created, will be very helpful. I have found that for most embroiderers, this has never been part of their training and they do not even know the difference between a knit fabric and a woven fabric. On the other hand, most home sewers, do know the difference between knit fabrics and woven fabrics.
In this article, we will talk about the 3 main types of fabrics: Woven, Knit, and Terry Cloth and how they are affected by the push and pull concept.
Woven fabrics are usually very stable in nature and do not stretch very much. Some popular examples include denim, canvas (tote bags or Carhart jackets), thin nylon windbreakers, waffle weave fabric such as a bathrobe and Linen fabrics, such as table cloths and napkins. These types of fabrics do not require as much pull compensation as others.
A knit or a loose knit will require more compensation than the woven. Good examples of knits are t-shirts, polo shirts, sweaters, sweatshirts and Lycra garments. These fabrics all have various amounts of stretch and must be compensated according to the weight and stretchiness. The more open or loose that a knit is, the more pull compensation will need to be applied than fabrics that are more stable. Terry cloth is another type of fabric that must be handled on its own. We will talk about this a little later in the article.
When this happens, you need to compensate by making your stitch even longer. This is called Embroidery Pull Compensation. When you create a design to sew out on a denim shirt and on a knit golf shirt, you want the finished design to look the same. It will not unless you add stitch length to compensate for the amount of give or stretchiness in the fabric. You will find this very evident when you are working with shapes; such as a circle or a square.
Most fabrics require that Pull compensation be added in order to compensate for the push and pull effect brought about when you stitch a design into the fabric. All types of stitches create the push-pull effect, but it is most prominent when you are using Satin path or Complex fill stitches and also when sewing a large area. The larger the area, the more push and pull you will have. Knit fabrics are known for pulling in. The softer the fabric the more you will have this push-pull effect.
The Push or Expansion area is the open end of the segment or column (ie. Top or bottom of the letter I.) This is on the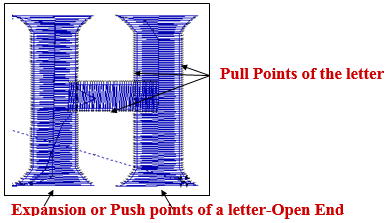 opposite side of the penetration points. You must bring those areas in, cutting them shorter. This is called Push Compensation. It does not matter if you are working with a letter or a shape. It also holds true with the angles of your shape. The amount of stitch length or pull comp that you add depends on how stretchy the fabric is, what type of underlay or how much underlay you are using or how wide the column of your segment is.
If you find that you have a design that you are currently using that does not stay in registration, you might want to try adding to the stitch length on the pull in areas. The push or expansion portion of the area or segment would need to be brought in using approximately the same measurement as you have added for the Pull compensation.
Always save your outlined designs in your native software file, to ensure that you can adjust the push and pull for various fabrics. You want the finished embroidery to look the same on a denim shirt, as it does on a polo. They will not unless you have added the right amount of pull comp and underlay to accomplish this job.
Embroidery Push and Pull with Terry Cloth
Terry cloth is basically an animal all its own. Terry can be a knit or a woven fabric and comes in varying weights, from light to heavyweight. Because of these varying factors, the underlay and pull comp that you add depends on both the weight of the fabric and the size of the embroidery design or monogram. You will have to experiment on a sample before you can come up with your final settings. Once you have that you will want to save these settings and use them all of the time for your terry fabrics. Keep in mind that all software packages are different and all embroidery machines are different so there will always be adjustments. Sometimes this means that you have to digitize the actual 0000000pull comp into your design if you are not getting the results that you need or that will work with your machine. If you are creating your own underlay, you must know how much pull comp you are applying before you even create your underlay.
I hope that I have helped you to understand pull comps a little bit better. I know that this subject is huge and tough to grasp but if you do a lot of experimenting and keep track of your settings, you will soon gain a whole lot more knowledge of this huge subject and will be able to create better-looking embroidery designs.0000000000000000000000000000000000000