How To Embroider Small Letters That Sew Out Crisp and Clean Using Your Embroidery Fonts?
Are You Sick and Tired of Struggling With the Small Letters In Your Embroidery Designs?
From: Joyce Jagger, The Embroidery Coach
Re: Issues You May Be Having When You Embroider Small Letters!
As an embroidery business owner, I knew what it was like to suffer through trying to embroider small letters!
Each time that they did not turn out to my satisfaction, I felt like a complete failure. It seemed so simple and yet I just could not seem to get them to look the way I wanted them to look. I attended many workshops at trade shows and trained with some of the best embroidery software trainers and digitizers. It seemed like I could never get all of the right information to make my lettering look as good as theirs!
Were they holding back some of the little tips and tricks? What was my problem? I spent many hours on every single line of lettering that I tried to create and it was a huge waste of time! There had to be an easier way!
Joyce Jagger, The Embroidery Coach is an expert in Embroidery Business Training and currently has the longest-running Embroidery Coaching Program on the Internet.
She had her own multi-head embroidery shop for over 20 years.
For the past 20 years, she has trained hundreds of embroiderers to build their own successful embroidery businesses and now has successful embroidery students all over the world.
She wrote the book “The Truth About Embroidery Business Success” from her own experience as an embroidery business owner and from working with other embroiderers.
Does This Ever Happen To You When You Embroider Small Letters?
• Your Design does not look the same when you sew it out on the different types of fabric!
• Your small letters look like they are punching holes in the fabric!
• Your small letters embroider too thin!
• Your small letters embroider too thick!
• When you embroider small letters, they appear uneven but they look even on the screen!
• You have issues with your embroidery fonts!
• The centers of your small letters close up!
• Your 4-millimeter letters do not look crisp and clean!
• Making adjustments in the lettering recipes or style wizards is very confusing!
• The embroidered small letters sink into my fleece fabrics!
• The small letters look saw-toothed! They are not smooth on the edges!
I know how frustrating it is to change needles, change threads, try to adjust my tensions and do sew out after sew out and they just did not come out the way that I wanted! I know the frustrations you are going through!
Introducing: How To Embroider Small Lettering That Sews Out Great On All Types of Fabrics!

I have created a video training course that I am so excited about called "How To Embroider Small Lettering That Sews Out Great On All Types Of Fabrics!" I finally discovered the way to Keep it Simple and yet extremely effective! In this video training course, I show you step by step how to set up and embroider your own small letters with all of the correct settings that will work for many different types of fabrics.
My easy method will save you valuable time and give you great looking lettering every single time. These are techniques that will work in any brand of embroidery design software that has an editing function. You must learn how to edit in order to be able to offer high-quality embroidery designs that will keep your customers coming back for more. I will show you a lot of those techniques inside of the videos in this course.
Here Are Some Of The Fantastic Benefits You Will Receive After You Have Learned The Secrets of How to Create
Crisp Clean Small Lettering!
Saves Time! You will learn the tips and tricks that I use to embroider small letters so that you can do it quickly saving a huge amount of time!
The Finished Design Looks The Same on all types of fabrics that you are using for your sew outs! I share with you the settings that I use for the different types of fabrics. You can quickly duplicate what I do. Your design will look the same whether you are sewing on a stable woven fabric or a soft knit.
You Will Be Able To Produce Production Friendly Designs! Your design will take less time to sew out, have fewer thread breaks and less trimming!
You, Will, Have Happy Repeat Customers! Your customers will love your higher-quality designs designs and will send you more work!
Sample of Basic Stock Lettering On The Top Line
The right Settings Added To It On The Second Line
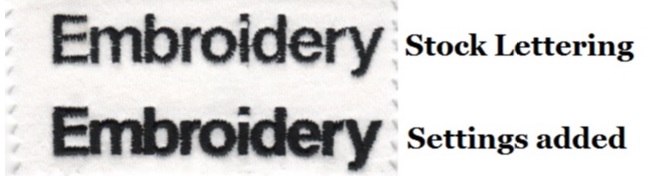
Your Designs with Small Lettering Can Look Great Every Time! When I said saves time, I mean just that! Regardless of the fabric, you can go into your software and make simple adjustments for the different fabrics that will work even on the "Moisture Wicking" fabrics!
Match Customers Logo! You will be able to match a customers logo lettering once you learn how to edit the text to match! I will teach you the technique!
Increase Your Bottom Line! Taking less time to set up and embroider small letters will help to increase your weekly profits!
Below Is A Sample Of Editing A Basic Thin Block Letter To Make It Run More Efficiently With Fewer Stitches!
The top line has 761 Stitches, the bottom line has 693 Stitches!
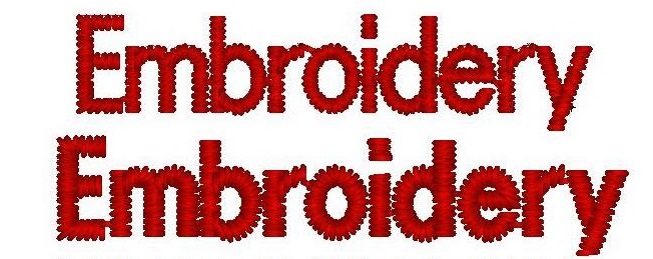
This image has been increased by more than 4 times. Capital E is only
6 millimeters high. The total length of the word is 1.5 inches.
You Too Can Learn The Secrets To Creating Small Lettering That Is A Must In Today's Corporate World!
In this Small Lettering Embroidery Video Training series, I am teaching you how to create Small Lettering that will sew out great on almost any type of fabric. I discuss the Underlay and Pull Compensation settings that are so important for the different types of fabrics. Knowing how to set up and embroider small lettering is extremely important in today’s world. Many corporate logos have tiny lettering incorporated into them and if you do not know how to make your lettering sew out great it will ruin the look of the entire design.
Can you afford NOT to know how to create small lettering for your embroidery designs? Learn the Secrets of How To Embroider Crisp, Clean Small Lettering for all of your embroidery designs and embroidery design setups!
"What A Time Saver!"
Hi Joyce,
I just wanted to say that I learned a lot from the Small Lettering course. As a matter of fact, I had an order to do that required a logo with small lettering added. I had done this logo before, but I redid the lettering by decreasing my density and adding underlay stitching. I also changed the start and stop points and did not have to do any trimming between my letters and the thread did not even show! What a time saver!
Thank you so much for all you do!

Monique Richardson
Personalized Blankies and More
With Your Purchases Today, You Will Receive The Following Bonuses!
Basic Blueprint For Setting Up Small Lettering - These include density, underlay stitching and pull compensation for Knit Fabrics, Woven Fabrics, and Terry Cloth! This is a checklist that you will use each time you set up any type of lettering!
Checklist To Determine Quality of Design-When you get a design back from the digitizer or if you have digitized the design yourself, there are some key factors that you need to look for when you are determining the quality of your small lettering and embroidery designs! This checklist will help you determine the quality of that design or lettering set up!
These checklists are worth the price of the program alone!
100% Money Back Guarantee
 We have an iron clad 30 Day 100% Money Back Guarantee! If you are not satisfied with what you are taught in this "How to Embroider Small Lettering" Video Training Program, your money will be refunded, no questions asked!
Here Is A Quick Overview of What You Will Be Receiving When You Purchase the "How To Embroider Small Lettering" Online Video Training Course!
Part 1 - Common Issues With Small Lettering - I explain the issues, how to correct them, how to adjust fabric recipes and styles for small lettering and how to fix underlay stitching that is missing in parts of the letters!
Basic Rules for Small Lettering - I teach you the many rules that need to be adhered to, to create crisp clean small lettering.
Part 2 - Going into the DGML by Pulse Embroidery Software and show you exactly how to create basic lettering and edit it to show out great. I show you various techniques to make the design production-friendly.
I also create the same videos in the Wilcom Embroidery Software for those that are using Wilcom. These same techniques can be used in all embroidery software packages that have editing capabilities.
I share my Favorite Backing Recipes with you that work great for small lettering.
Part 3 - Editing Test for Customers Logo - You will learn how to edit a standard embroidery font to match your customer's logo lettering.
Easy way to create 2 color lettering using a True Type font!
Working With Fleece & Heavy Towels - I show you how to work with fleece and heavy towels to get sharp clean small lettering, how to open up centers of tiny lettering, and I go through many applications.
Bonuses: I give you a Cheat Sheet that shows you all of the settings to use for block and script lettering for woven fabrics and knit fabrics. This is very valuable and something that you will use each time you are setting up your small lettering.

P.S. Don't let the competition get their hands on this information before you do! If you cannot produce top quality embroidery designs that have small lettering in them, you will be left behind! Don't let that happen to you!