Embroidery thread tension is one of the most frustrating subjects within the world of embroidery and learning to adjust and maintain good balanced embroidery thread tension is a skill that must perfected. Once you develop this skill it will make a huge difference in your production and the quality of your finished embroidery. Very often a design would look so much better if only the tension was adjusted correctly on the machine. The wrong tension can cause multiple problems and without the basic knowledge of the relationship between the top and bottom threads it is impossible to know how to correct them.
A stitch is formed when the needle carrying the top thread passes down through the needle hole in the needle plate and connects with the bobbin thread. A loop is formed directly behind the eye of the needle. As the needle is coming back up the thread will tighten if your tensions are set properly. If one of your threads is too tight it can snap. If there is a burr on the edge of the needle hole in the needle plate, as the thread is coming back up, it can split or fray. It is important to keep a total balance between your Upper thread (top thread) and your Lower thread (bobbin thread).
Correct Embroidery Thread Tension
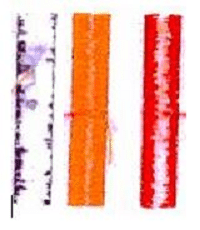
When your tensions are correct, you will see three fairly evenly divided sections on the back of your lettering or embroidery in each segment. The center section will be the white bobbin thread and the two outer sections will be the top thread as in the red image in picture to the left. This is a correct embroidery thread tension.
When you are embroidering small letters it is sometimes hard to see the division, but you still should see the line of bobbin thread. If you do not, your tension needs to be adjusted. If you are embroidering a large fill area, you will see mostly bobbin thread with a small amount of top thread showing at the edges of the segment.
The purple thread image on the far left is showing that the top tension is too tight or the bobbin tension is too loose. Adjust your bobbin tension before you adjust the top tension in this case.
The gold thread image in the center is showing that the top tension is too loose. You must tighten the top tension in this case. Keeping a total balance between the top and bobbin threads not only makes your embroidery look better, your machine will run smoother and you will have fewer problems with your machine.
Here are some typical scenarios when your embroidery thread tension will need to be adjusted:
- When Switching Embroidery Thread Types
The thread tension may need to be adjusted each time you change a cone of thread. It is not a good idea to keep switching back and forth with your thread types. The machine gets used to one type of thread and when you make a change you start to have problems. Tensions set for polyester thread must be much tighter than the tensions set for the rayon thread. Metallic thread needs to be adjusted but it all depends on your machine and the brand of metallic thread. In order to avoid changing tensions when I want to use metallic thread, I keep one needle designated at all times for metallic thread, and then it is always set and I do not have to worry about changing the tensions or the needle. - When switching different Colors of Cones of Embroidery Thread
It is best to maintain your thread colors on the same needles if you can. If this is not possible, stay with the light-colored embroidery threads on the same needles and the dark-colored threads on the same needles. For example, don‚’t change off a white thread with a navy thread. You will definitely have to adjust your tension. This can make a big difference. The dyes are heavier in the dark colors than they are in the lighter colors, so therefore the thread is slightly heavier and your tension will need to be adjusted. - Different Types Of Garments
The same tension for a cap does not always work on a knit golf shirt. As a general rule, I run the tension tighter for a cap. This is not always the case, depending on the fabric that is in the cap. You will need to experiment to see which fabrics require a tighter tension than other fabrics. - A Visit From The Tech
Each time a tech comes into work on my machine, he loosens all of the top thread tensions and I have to go back and redo them when he leaves. Obviously you are not going to have as many thread breaks if your tension is loose. My point here is that just because the tech has been there and adjusted your tensions, do not think that they will automatically be correct!-Trust me, I am not knocking techs, they are wonderful, I just want you to be aware of your tensions if they are not correct after the tech leaves!
If your embroidery thread tensions are not correct and balanced you may experience the following problems:
- Birdnesting
This is a lot of top thread that gathers up on the underside of your garment and forms a big wad. This is caused by the top thread tension being too loose. You will see loops on top of your embroidery and this can even cause your garment to be pulled down into the hole in the needle plate.Obviously this will rip the garment. At times, you will need to reach up underneath the needle plate in the hook area and cut this wad of thread loose from the garment in order to remove it. If this bird nesting does occur you must make sure that you have removed every strand of thread that has been caught in the knife and bobbin case and in and around the rotary hook.If some of this thread gets caught in the hook when you start to sew again, your hook may freeze up and you are shut down until you either replace your rotary hook or have a tech replace your rotary hook. You can also knock out your hook timing as well as the knife timing mechanism if a wad of thread gets caught in it. - Thread Breaks
If the tension is too tight, you may experience a lot of thread breaks. - Bobbin Thread Pulled Up Onto The Topside Of Your Garment
It looks like you have very erratic or jagged stitching, but when you look more closely you are actually seeing the white bobbin thread showing at the outer edges of your stitching.
Adjusting The Top Embroidery Thread Tension
To adjust the top or upper thread tension, you start with the top Tensioners on your machine. You must be careful that you do not have this set of Tensioners too tight. If they are too tight, the thread will pop out from under the tension disks as you are sewing and all of a sudden your thread is looking very loose and you don‚’t know what happened or what could have caused it. You did not physically make any changes in your settings, but your tension changed during the sewing process. This is the first place to look if that happens. If this is happening, loosen this top set of Tensioners, by turning or twisting the knob to the left or counterclockwise a quarter turn. If they are too loose, you will turn or twist the knob to the right or clockwise.
If you do not see a difference after adjusting the top set or it still is not correct, adjust the second set of Tensioners or Rotary Tensioner on the front of the machine. You will turn the knob to the left or counterclockwise to loosen your tension and if you want to tighten your tension, you will turn or twist this knob to the right or clockwise.
I have adjusted tensions for the past 32 years and learned the correct feel of the thread passing thru the needle as I pulled on it. Today there is a top thread Tension Gauge that you can purchase to properly set your tensions. The first time that I used this gauge I was amazed at what a great job it did and I also found out that my tensions were not all set properly. After using this gauge, my machine actually sewed better and faster without any problems. It is such a great feeling when you can sew all day long with little or no thread breaks.
Testing Your Embroidery Thread Tension With A Top Tension Gauge
 To test your tensions with this Tension Gauge, you will thread your machine properly making sure that you have followed the upper thread path correctly. Pull a few inches (about 6 inches or so) of thread thru the needle and wrap it around the hook of the gauge at least twice. You want to make sure that it is caught enough that you can pull on your thread without it coming loose. With the numbers on top of the gauge facing up you will pull the thread straight out horizontally. I have a video on my website showing you how to use it.
- Do not pull out more than 18 to 24 during your test.
- The tension should read 100-130 grams for Rayon thread
- Tension should read 120-150 grams for Polyester thread
On my machines, the upper range of these numbers work better than the lower range. Start with needle #1 and continue the same process until you have completely tested all of your needles. Each time that you make an adjustment, you should perform this test.
One thing to remember, each machine has its own personality and sometimes these measurements will not be correct for your machine. You will need to experiment and arrive at your own measurement and keep your track of what these measurements are. Many times they will need to be tighter than the measurements listed above in order to have the correct tension.
Check Your Tension When You Change The Bobbin
Every time you replace your bobbin, you need to check the bobbin tension. The tension can vary and be different on each bobbin. Your tension can even change within the bobbin. It is very normal for the tension to change when it gets close to the end of a bobbin. The last 10% should be considered unusable. This is especially true with the cardboard sided bobbins.
All of a sudden as you are sewing, you will notice that even though nothing has changed in the embroidery process or your garments, you tension has changed. This is very upsetting. At the first sign of this, remove the bobbin, throw it out and replace it. Again, check your tension to see that it is correct before you start running your machine.
Check Your Bobbin Tension Following These Steps
- Hold the bobbin in your hand with the thread hanging down on the right side.
- Place it into the bobbin case with open side of the bobbin case towards you.
- Pull the thread up thru the tension spring/clip but do not run it thru the pigtail.
- Pull out a few inches of thread while you are holding the bobbin case in the palm of your hand.
- With your other hand, pick up the bobbin carefully and suspend it, holding on to the thread. Hold it just above the palm of your hand. It should not drop.
- Gently tug on the thread and bob it up and down. It should drop a small amount. If it does not drop at all it is too tight. If it drops easily, it is too loose. It should only drop a small amount when you are bobbing it.Make sure that you do not
have the thread pulled up thru the pigtail when you are trying to perform this test. The bobbin will fall out of the case. - If the tension is too loose, turn the largest screw on the bobbin case to the right a small amount. If the tension is tight, turn this screw to the left. Perform this test again each time that you adjust the screw.
After you have completed your test, you can run the thread thru the pigtail and place your bobbin case into the rotary hook of the machine.
There is also a Bobbin Tension Gauge that you can purchase to set your tensions correctly. 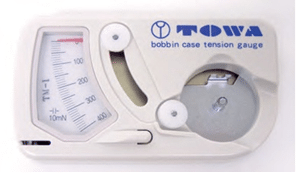 I strongly advise purchasing one of these valuable items. They are a bit pricey, but really do a great job. This is a one time investment of approximately $80.00 but it is worth its weight in gold. The measurement for the correct bobbin tension using the gauge is 18 to 20 grams. The numbers to read on some of the Tension Gauges will be between 180 and 200 instead of the 18 to 20. It is easy to use and very accurate.
Keeping good balanced embroidery thread tensions is extremely important if you want to maintain quality and high performance with your embroidery machine.