0I have had questions about cap embroidery lately and I want to give you some 9 basic rules for easy cap embroidery that are going to help you as you are struggling with those caps! Caps are not very difficult once you get the feel of hooping them properly and following the rules that are no important when you are working with caps.
- Make sure your design is the right size for the cap! Your embroidery design for a standard cap should not be more
 than 2.10 inches high and if you are working on a low profile cap, make sure you stay within a 2 inch limit. You will have much less issues and a better result if you follow that rule!
- If your design as a long line of text at the bottom, keep your design within 2 inches even if it is NOT a low profile cap. The bottom line of lettering will pull up and be distorted if it is too low on the cap.
- When you are hooping your cap, make sure that the cap facing is
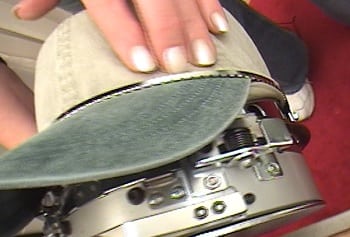 really tightly tucked under the lip of the cap framing device and that the metal strap is tight and stays in place across the front where the brim and cap are sewn together.
- Use clips on the side of the cap. Many embroiderers do not use the clips and wonder why the embroidery does not stay in registration or why the cap moves! This is extremely important is you want a high quality finished design.
- Make sure the bottom of the design is at least one-half inch up from the metal strap on the cap hooping frame where the cap front and brim are sewn together. Some caps are very stiff at the bottom and there are several layers of fabric and facing sewing together. If you are too close, it will be distorted.
- For best results, always start your design from the bottom up and from the center out. For better registration always
 finish one section on the design before going to the next if at all possible.
- Always use cap backing when you are hooping your caps, regardless of how heavy or stiff your cap is. This also will help to produce a higher quality embroidery design on your cap. I have found that a 3 oz. tearaway cap backing is the best choice.
- When you first start to sew out your design, walk the machine, until it gets past the center seam. This will help to keep the needle from deflecting and breaking or getting caught in the center where all of the layers of fabric and buckram are sewn together. What is meant by walking? Hold your finger on the Start button so that it just creeps until it is past that center point.
- I use a 70/10 Sharp needle for all of my caps, but sometimes on the very stiff caps, a heavier needle such as a 75/100 sharp will work better, depending on the machine and cap frames.
If you are struggling with caps, follow these 9 basic rules for easy cap embroidery and keep practicing until you get it right! Caps can be your biggest money maker! If you still continue to have issues, you can learn how to embroider caps very easily through videos on my website. https://EmbroideryBusinessAcademy.com