
Here are 9 tips that will help you to maintain balanced embroidery thread tensions. Thread tension is one of the most frustrating subjects within the world of embroidery. Learning to adjust and maintain good thread tension is a learned skill. Once you develop this skill it will make a huge difference in your finished embroidery. There are tools available that will make it easier for you to develop this skill.
Very often a design would look so much better if only the tension was adjusted correctly on the machine. The wrong tension can cause multiple problems and without the basic knowledge of the relationship between the top and bottom threads it is impossible to know how to correct them.
A stitch is formed when the needle carrying the top thread passes down thru the needle hole in the needle plate and connects with the bobbin thread. A loop is formed directly behind the eye of the needle. As the needle is coming back up the thread will tighten if your tensions are set properly. If one of your threads is too tight it can snap. If there is a burr on the edge of the needle hole in the needle plate, as the thread is coming back up, it can split or fray. It is important to keep a total balance between your Upper thread (top thread) and your Lower thread (bobbin thread).
Here are some tips to help keep your thread tensions balanced
- Avoid switching thread types
- Check your tensions when switching thread colors.
- Check your tensions for different types of fabrics
- Avoid Birdnesting
- Avoid erratic stitching and thread breaks
- Check your tension when you change a bobbin
- Clean out your bobbin case each time you change a bobbin
- Keep your tensioners clean and free from lint and dirt
- Use Tension Gauges to set your tensions
Avoid Switching Thread Types
It is not a good idea to keep switching back and forth with your thread types. It is better to stick to one thread type. Your tension requirement for polyester is much tighter than for rayon and if you are constantly changing thread types; so is your tension and it is hard to keep a good consistent tension when you are switching types. If you find that you need to use a polyester thread for certain jobs, specify certain needles for those threads and use only those for the polyester threads.
It is best for your machine to be consistent with the thread type that you use and it is easier to maintain a more consistent even tension when you do stick to one type. This makes life a little easier and prevents a lot of needless head-aches.
Check your tension when switching colors of cones.
The thread tension needs to be adjusted each time you change a cone of thread. It is best to maintain your colors on the same needles if you can. If this is not possible, stay with the light colored threads on the same needles and the dark colored threads on the same needles. For example, don‚’t change off a white thread with a navy thread. You will definitely have to adjust your tension. This can make a big difference. The dyes are heavier in the dark colors than they are in the lighter colors, so therefore the thread is slightly heavier.
Check your tension for different types of fabrics.
The same tension for a cap does not always work on a knit golf shirt. As a general rule, I run the tension tighter for a cap. This is not always the case, depending on the fabric that is in the cap. You will need to experiment to see which fabrics require a tighter tension than others.
Avoid Birdnesting
Birdnesting is caused by the top thread tension being too loose. This is a lot of top thread that gathers up on the underside of your garment and forms a big wad. You will see loops on top of your embroidery and this will even cause your garment to be pulled down into the hole in the needle plate.
Obviously this will rip the garment. At times, you will need to reach up underneath the needle plate in the hook area and cut this wad of thread loose from the garment in order to remove it. When bird nesting does occur you must remove every strand of thread that has been caught in the knife and bobbin case and in and around the rotary hook. If some of this thread gets caught in the hook when you start to sew again, your hook may freeze up and you are shut down until you either replace your rotary hook or have a tech replace your rotary hook. You can also knock out your hook timing as well as the knife timing mechanism if a wad of thread gets caught in it.
Avoid erratic stitching and thread breaks
If the tension is too tight, you may experience a lot of thread breaks or see bobbin thread that is being pulled up onto the topside of your garment. It looks like you have very erratic or jagged stitching, but when you look more closely you are actually seeing the white bobbin thread showing at the outer edges of your stitching.
Check Your Tension When You Change The Bobbin
Every time you replace your bobbin, you need to check the tension. The tension can vary and be different on each bobbin. Your tension can even change within the bobbin. It is very normal for the tension to change when it gets close to the end of a bobbin. The last 10% should be considered unusable. This is especially true with the cardboard sided bobbins. All of a sudden as you are sewing, you will notice that even though nothing has changed in the embroidery process or your garments, you tension has changed. This is very upsetting. At the first sign of this, remove the bobbin, throw it out and replace it. Again, check your tension to see that it is correct before you start running your machine.
Clean Out Bobbin Case
Each time you change your bobbin, clean out the bobbin case with a brush or blow it out and check the tension spring/clip on the top edge. Lint and dirt build up inside of the bobbin case and under this spring. Your tension will run too loose and it does not matter how much you tighten the screw, you will not get a good tension until you have cleaned this out.
Cotton bobbins produce more lint than polyester bobbins and tend to create the most problems. To clean out the tension spring/clip gently run a piece of heavy paper underneath the spring/clip. The corner of a business card works well. Be very careful when you are doing this that you don‚’t dislodge the spring/clip. The spring/clip has a small lip so that fits into a groove on the left side on the top of the bobbin case. Make sure that it is still in this groove when you are finished. Do not clean it out with a pin. You can scratch the bobbin case and this will create more problems.
Clean out your tension disks or tensioners!
Clean out the tension disks in each of your tensioners. Take a Q-tip doused in alcohol and remove all of the dirt and lint buildup. This is something that should be done routinely about every 6 months if you use your machines on a daily basis. If you only use them part time, you should clean them at least once a year. Sometimes you will have to remove them entirely and soak them in alcohol because there is so much dirt build up behind them that you cannot get it all out especially if you have had your machine for a few years and have never cleaned them out.
I had one client that was ready to throw their 12 head embroidery machine out because they could not get the tensions correct no matter what they did. After I took a look at it, I discovered that the tension disks had never been cleaned. After cleaning them, their machine sewed like new. Three years later, the machine is still there and sewing!
This is a very important maintenance step that many people forget about or aren‚’t even aware of. Put it into your routine maintenance schedule. I know that this is an article on thread tension not machine maintenance but they all go together.
Adjusting Your Top Tension
I have adjusted tensions for the past 34 years and learned the correct feel of the thread passing thru the needle as I pulled on it. Today there is a top thread Tension Gauge that you can purchase to properly set your tensions. The first time that I used this gauge I was amazed at what a great job it did and I also found out that my tensions were not all set properly. After using this gauge, my machine actually sewed better and faster without any problems. It is such a great feeling when you can sew all day long with little or no thread breaks.
Testing With The Top Tension Gauge
To test your tensions with this Tension Gauge, you will thread your machine properly making sure that you have followed the upper thread path correctly. Pull a few inches(about 6 inches or so) of thread thru the needle and wrap it around the hook of the gauge at least twice. You want to make sure that it is caught enough that you can pull on your thread without it coming loose. With the numbers on top of the gauge facing up you will pull the thread straight out horizontally.
- Do not pull out more than 18 to 24 inches during your test.
- The tension should read 100-130 grams for Rayon thread
- 120-150 grams for Polyester thread
On my machines, the upper range of these numbers work better than the lower range. Start with needle #1 and continue the same process until you have completely tested all of your needles. Each time that you make an adjustment, you should perform this test.
(Each machine has its own personality and sometimes these measurements will not be correct for your machine. You will need to experiment and arrive at your own measurement and keep your track of what these measurements are. Many times they will need to be tighter than the measurements listed above in order to have the correct tension.)
(Another side note here: Each time a tech comes in to work on my machine, he loosens all of the top thread tensions and I have to go back and redo them when he leaves. Obviously you are not going to have as many thread breaks if your tension is loose. My point here is that just because the tech has been there and adjusted your tensions, do not think that they will automatically be correct!-Trust me, I am not knocking techs, they are wonderful, I just want you to be aware of your tensions if they are not correct after the tech leaves!)
Testing With The Bobbin Tension Gauge
There is also a Bobbin Tension Gauge that you can purchase to set your tensions correctly. I strongly advise purchasing one of these valuable items. This is a one time investment of approximately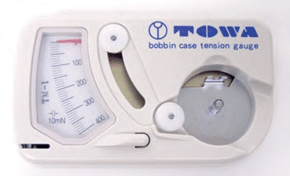 $80.00 but it is worth its weight in gold.
Simply put your bobbin into your bobbin case as you normally would, put it through the tension spring but do not put it through the pigtail. The little clip on the side of your bobbin case will fit into the slot in the tension gauge, so slide the case into the gauge and press down.
Next take the thread and run it through the bottom wheel, around the top wheel and then down through the slot and run it sideways. If your tension is correct it will measure between 18 and 20 grams. If it is not registering correctly, tighten or loosen the screw on the side of the bobbin case and test it again. The numbers to read on some of the Tension Gauges will be between 180 and 200 instead of the 18 to 20.
I hope that these tips have been helpful to you. Print this article out and keep it close to your machine for a reminder. Add it to your regular maintenance schedule. Without a regular machine maintenance schedule, you will never have good tension or the machine performance that you are looking for. For more information about the basics of embroidery, machine maintenance, and much more, go to https://EmbroideryBusinessAcademy.com
How Does The Embroidery Coach Help Maintain Consistency in Embroidery Work?
At The Embroidery Coach, we emphasize that consistency begins with understanding how thread tension interacts with fabric, machine settings, and thread types. We do not rely on guesswork. Instead, we teach structured methods for evaluating and adjusting tension to achieve predictable outcomes.
We help you understand how to maintain consistency in embroidery work. Early warning signs such as looping, puckering, or uneven stitching. By identifying these indicators quickly, you can correct issues before they affect the final design. Our guidance ensures that every stitch is intentional and controlled. We also introduce tools, such as tension gauges, and maintenance routines that simplify complex adjustments. With the right approach, what once felt like trial and error becomes a repeatable process.
Most importantly, we train you to think like a professional embroiderer. This means understanding that consistency is not just about settings but about habits, discipline, and attention to detail.
Learning to adjust and maintain good thread tension is a learned skill. Once you develop this skill, it will make a huge difference in your finished embroidery. There are tools available that will make it easier for you to develop this skill.
Very often, a design would look so much better if only the machine’s tension were adjusted correctly.
Here are some tips to help keep your thread tensions balanced
- Avoid switching thread types
We recommend sticking to a single thread type whenever possible to maintain consistent tension behavior and avoid unnecessary recalibration.
- Check your tensions when switching thread colors.
Different dyes and coatings can affect thread performance. We always test tension when changing colors to maintain stitch consistency.
- Check your tensions for different types of fabrics
Each fabric reacts differently under tension. We guide you to adjust settings based on material density and stretch characteristics.
- Avoid Birdnesting
We emphasize proper threading and tension setup to prevent thread bunching beneath the fabric, which disrupts design quality.
- Avoid erratic stitching and thread breaks.
We help you identify root causes, such as incorrect tension or poor maintenance, to ensure smooth, uninterrupted stitching.
- Check your tension when you change a bobbin.
Bobbin changes can subtly alter tension. We always recalibrate to maintain balance between the top and bottom threads.
- Clean out your bobbin case each time you change a bobbin
We stress regular cleaning to remove lint buildup, which directly impacts tension accuracy and stitch formation.
- Keep your tensioners clean and free from lint and dirt
Clean tensioners ensure smooth thread flow. We make this a standard part of every embroidery routine.
- Use Tension Gauges to set your tensions.
We encourage the use of precision tools to eliminate guesswork and achieve consistent, measurable tension settings.
Why Consistency Matters in Professional Embroidery
Consistency is what separates hobby-level work from professional output. When your embroidery maintains uniform tension, every design looks polished, every stitch holds firmly, and every project meets client expectations.
At The Embroidery Coach, we focus on long-term reliability. Our methods ensure that your results are not just good once, but consistently excellent across every project you undertake.
Take Control of Every Stitch!
Consistency is not a mystery. It is a skill you can develop with the right guidance and disciplined practices. At The Embroidery Coach, we help you turn uncertainty into precision, ensuring every stitch reflects control, quality, and professionalism.