by The Embroidery Coach | | Embroidery Business Marketing
Before I go into the information about the 5 steps to a good web presence, the most cost effective way to advertise your embroidery business, I would like to ask you a few questions.
- Do you have a good web presence set up for your embroidery business?
- Do you have a system in place to automatically attract new customers and prospects into your business?
- Are you keeping your customers informed of all new happenings in your business?
- If you have a web site, is it bringing in the sales that you need?
It is so important to create a good web presence in today‚’s market and without one, your business may really suffer. Creating a good web presence can be very inexpensive when compared to the cost of advertising and so much more effective. This is a very efficient way of spending your advertising dollars rather than on something that you hope will work. A good web presence with a marketing system works for you on a constant basis and can give you a quick return on your investment. You cannot count on that with any other type of advertising system.
What do I mean by a good web presence? A good web presence means that you are easily found on the internet by your customers and prospects. You appear to be in many places on the internet making it easy for customers to interact with you. You website can be easily found when someone searches for a particular type of product that you have to offer.
Creating a web presence is a major part of any embroidery business. This is just as important to a local embroiderer as it is to one that is trying to reach the market globally. Before you can begin to reach a worldwide market, you must first reach out to your local market and the best and most cost effect way to do this is through your own web presence.
In today‚’s economy your prospects want to learn all that they can about you and see what you have to offer before they will choose to do business with you. This has been brought about because of all of the Social Marketing that has taken place in the past few years. The entire marketing system has changed and the way that business has been marketing in the past has totally changed.
Everyone in business needs to create a web presence. Having a web site is very impressive to your customers and clients and if it is one that they can interact with, that is even better and means a lot more to them. This puts you at a whole new level in the eyes of your customers or clients.
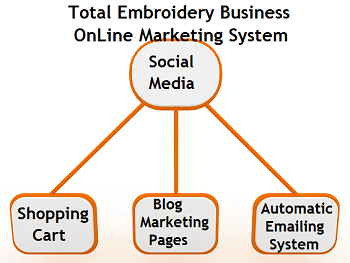
Basic Steps To Creating A Good Web Presence
Step 1- Creating a good web presence starts with Social Media.
Facebook, LinkedIn, Twitter and Pinterest social sites is a great place to get started marketing your business. You will not create a lot of sales here, but that is not the object. Creating an awareness of your business is the place to start. Your first step is to create a Fan page or Business page on Facebook. Start letting people know about you but do not try to sell anything when you first start. This will turn many people off. You want to show what you have to offer, give great tips, share inspirational quotes and be of help to other people. Share your pictures on Facebook and send them to Pinterest as well.
Step 2 – Add a shopping cart.
I do not recommend adding your shopping cart to Facebook. I recommend keeping your shopping cart independent on your own hosting account and then send your fans to your shopping cart through your pictures on your Social Media sites.
Step 3 – Add a Blog
Blogs tell stories about your products, how you create them and what your customers are doing with them. You can have testimonials on your blog and again, lots of pictures. People like pictures and today, much of our marketing is done through pictures.
Step 4 – Add an Automatic Emailing System
This will allow you to create messages that will go out to your customers and prospects on an automatic basis. You create a set of follow up marketing messages that you can schedule and send out to your customers without you even having to be involved once the messages are created. When you have something special coming up, you can send out a broadcast message to everyone at one time, saving you a lot of time and money. You can even create a newsletter and send it out through your system and keep your customers totally up to date with everything that is going on in your business.
Step 5 – Add a lead capture form on your blog
A form to capture names and email addresses on your blog site from new prospects in exchange for a coupon or gift certificate will give you the opportunity to start marketing to them. A coupon towards their next purchase is always a winner! By capturing their name and email address you can keep them informed of any new products, specials or events that are happening within your business.
Creating your web presence with the Marketing System needs to be search engine optimized, very simple and easy to use and will get you up and running very quickly! This is very important, you do not have the time to go out and do research to find a system and then try to learn how to use it. You must get your marketing system going quickly!
Creating a total marketing system will help you to be found more quickly on the internet and will make it easy for you to stay in touch with your customers keeping them informed at all times.
When you are first starting out in business, especially in the embroidery business, you are more focused on creating your products than you are on marketing! Marketing is one of the most important parts of your business and without it, you have no business. In today‚’s world you have to find a way to get your customers jobs done on a timely basis and still build in time for marketing your business. If you have a system that will work for you 24 hours a day 7 days a week, you will find that marketing is not such a chore!
How Do I Get A Marketing System That Will Work 24 Hours A Day, 7 Days Per Week?
The easiest way is to follow a step by step program that will guide you through each step of the way. I am starting a 6 weeks “Embroidery Business Marketing System Workshop” on May 7, 2013 that will show you each and every step in the process. This easy to follow system will start with choosing the right name, getting your hosting account, setting up your shopping cart, adding a blog with marketing pages and then setting up your automatic emailing system. This will be a system that you will have total control of at all times. Go to www.EmbroiderybusinessMarketingSystem.com for the details.
This system has worked very well for me and I will share it with you in this workshop! If you have pieces of your marketing system together already but are not seeing the results that you are looking for, then you will want to attend this workshop. I want you to become very successful in your embroidery business. I would also like for you to share some stories with me about the success that you have had with your current marketing system. Please comment below and let me know what system you are using and how your system is working for you!
Join Us For The Embroidery Business Marketing System Workshop
by The Embroidery Coach | | Embroidery Business Marketing
Are you looking for the best ways to spend your advertising dollars? Being an embroiderer and being in business is all about a way to earn an income. We also want to keep as much of that money as we can and not be spending it on advertising. You need to look for ways to advertise that are cost effective and will give you a high return on your investment.
The ways that we have reached out to our customers or prospects in the past are different than the ways that we need to reach out to them today. The 3 best ways that I have found are:
- Great marketing materials
- Networking
- Marketing System on the Internet
While we need to be spending our time keeping our machines busy so that we are earning an income, we also need to spend a certain amount of time getting our name out there. Without those steady efforts we will have no work to keep those machines busy!
You cannot sit in your shop and wait for the prospects or customers to come to you. You have to reach out to them. You need a way to market to them that is not going to take all of your time and is not going to cost you a fortune.
Great Marketing Materials
I wrote about creating some outstanding marketing materials in one of my past articles but I cannot emphasize that enough. This is the first impression that you make on a prospect or customer. You must have a great business card and brochure that lets people know what you do, and how what you do benefits your prospect or customer. People really do not care about what you have, they only care about how what you have is going to benefit them in one way or another. It does not matter if this is a gift item that they are looking for or something that is going to promote their business. How can you help them?
If you would like to read more about creating a great business card go to embroiderybusinesssuccess.com/impression-embroidery-business/
Networking Off line and On line
Joining a networking group is a great way to get your name out there. You meet a lot of other business owners that are willing to exchange ideas. Someone in the group is bound to know others that are looking for what you have to offer. This does not usually happen immediately but over time, it does happen.
Before you start trying to do any marketing to the other members in the networking group you want to see if there is a way that you can help them get their name out there to other people. When they see that you are willing to help them, they will be willing to help you. Do not ever push your products off onto the other networkers in the group without offering to help them first! This just does not work and you will not be looked upon favorably!
Wear your products while you are networking. This is very important and make sure that what you are wearing is of high quality and the embroidery is impeccable. This is by far the best way to let people know you offer high quality products!
Let everyone you know, know what you do and how what you do can benefit them. Hand out your business cards and brochures to all of your friends and family and ask them to hand them out to their friends and family. This is an excellent way to start.
Create a Facebook Fan page and a Pinterest business page for your business. Post lots of pictures with content letting people see what you do. You will be better off not trying to sell them anything when you first start your pages. You want to have pictures and content that will be beneficial to them before you start promoting any type of sales to them. A social network is just that. You are trying to get your name out socially, not just blasting them with ads!
On Line Marketing System
A good web presence is one of the most cost effective ways to advertise today! You must have a total marketing system to make this effective and to create the sales that you are looking for. Having a shopping cart is not enough. Having a WordPress or standard HTML website is not enough. These must be combined with a system to collect names and email addresses from a group of people that would fit what you have to offer. But, how do you reach these people?
You must start out with your local market. The best way again is through networking, both off line and on line through your social network. Send prospects to your website for a free gift. This can be an article about something that will benefit them, a coupon for something free or a discount coupon for their first visit. You must give them a reason to visit you at your place of business but at the same time, people want to check you out to see what it is that you have to offer and how you are different than the other embroidery businesses in town, before they are willing to come to your place of business.
Once you have them in your automatic emailing system, you can start sending them information about you and your business and keep them informed of anything new that you have to offer and what is happening in your business. You could even promote a certain product each month. These emails can all be sent out on an automatic basis. You create them once, add them to your system and each time someone requests your free item, they are added to the system and will automatically receive these emails.
In today’s world people are so skeptical and they will not do business with you until they know, like and trust you and this is done through networking and receiving information from you prior to doing business with you.
To receive the most from your advertising dollars, you need to have great marketing materials, to be marketing on the internet and be networking in your local area.
Advertising in the newspaper does not work anymore. A press release can work for you if you have a special announcement, but it can only be an announcement. You cannot promote your business. If you have a special event that is happening, such as a grand opening or some type of promotion that you will be giving some of the profits to charity, you can send a press release and if they feel that it is news worthy or will be of benefit to someone else, they will publish it.
Advertising in the yellow pages does not work well anymore unless you are in an area that does not get internet access efficiently or you have a market that only looks in the yellow pages.
Today’s marketing is changing and the way that we advertised in the past is not going to work anymore. You need to find other ways of getting your name out there and you must be very careful about how you are spending your advertising dollars today. You want your advertising to increase your income and give you a great return on your investment!

by The Embroidery Coach | | Embroidery Pricing
The exact formula for embroidery and creating a profit seems to be different for every embroiderer that I work with. The information that they have received from other embroiderers and the information that is available on the internet can be very controversial.
There are many ways to figure pricing and the markup on your embroidery and the items that you are selling with embroidery. I have always figured a 50% markup on goods after I have added the shipping cost and then the embroidery can be marked up to whatever your market will bear or what you want for a profit on it. You must make a profit. That is Business! If you are counting on working with embroidery alone and not selling items to markup, you must mark up your embroidery higher to make up the difference.
Some embroiderers markup their products double what it costs them from the distributor and then they will give the embroidery at cost. It is your choice as to how you want to figure your markup, but you must make a profit or do not bother to stay in business. It will be a losing battle for you that you will not win under any circumstances.
When you are figuring your pricing, do not be fooled by thinking that you can charge for the stitch count only. If you have taken my how to price embroidery course then you know exactly what I mean. If you have not, then you will need to add to your stitch count cost, all of the other items that go into the process to actually figure your pricing. If you charge by stitch count alone, you will find very quickly that you are not making enough money.
The cost for each embroidery is based on the hourly cost rate that you must have to break even, plus, plus, plus! This is a must!
Can A Small Business Embroiderer Make Money Doing Contract Embroidery?
I always advise my students not to take in contract work. Does this mean that you do not do any items that are brought in to you! No, I mean do not think that you are going to run a successful embroidery business on doing items for other people alone. This will not work. You must have a mix of selling your own items and doing items that are brought into you.
Many times you are approached with the idea that if you do large quantities for other people and work on a slim margin, that you will make the money you need because you are keeping your machines busy. This approach is not a good one. You are better off going out after your own work and concentrating on selling your own items, marking them up and adding your embroidery. This is how the successful embroidery shop owners operate.
When you have retail customers that bring in their own items, this is fine, but you want to remember to add more of a markup for the embroidery because you are not making a profit on the item that they brought in. Many times you will find that it costs you to do that one item so you need to establish a minimum charge for someone that brings an item into your shop for you to add the embroidery. My minimum charge is $20.00. You must figure yours. This means that if they bring in one item even if it is just a single name on a jacket, it is $20.00. It all depends on the actual embroidery, the price and how long it takes to do it. You must be paid for your time.
Here Is A 10 Step Formula For Creating Embroidery Pricing That Will Make You A Profit!
Step 1: Figure all of your base costs so you will know exactly what your breakeven point is per month. Figure what your breakeven point is per hour to cover all of your overhead costs.
Step 2: Divide that cost into minutes and then into seconds.
Step 3: Go through all of your processes to determine how much time each process takes and what the cost actually is for each process. Multiply the time for each process by the cost per minute or seconds. (This is your production cost, hooping, steaming, packing, waiting on customers, planning, etc, beyond your stitch count running time)
Step 4: Add those figures together to figure out what your actual production cost is per minute beyond the stitch count.
Step 5: Multiply your costs per minute by how many hours you run your business per day to get your daily breakeven point. You now know exactly what it costs you per day to operate your business.
Step 6: Figure out how long you are actually running your embroidery machine per hour. (How many minutes of the actual hour your machine is running) If you are only running your embroidery machine 30 minutes during the hour, your breakeven point is going to double for the hour. If you are charging by the minute when the machine is running and not for the time that it is sitting there doing nothing, you are losing money.
If you figure out that on an 8 hour day your machine is running a total of 4 or 6 hours, you must divide your total daily breakeven point into the 4 or 6 hours to arrive at your true breakeven cost per hour. Divide that cost up into minutes. You will now have a true cost per hour that you figure your pricing on for stitch count per minute of machine running time.
Step 7: You will have to figure out how long it takes to run a design on your machine by the stitch count. Multiply that running time by your cost per minute. When you are timing your designs, do not forget the color changes and trim times. You are actually figuring the total time, start to finish, not just the stitch count run time.
Step 8: Add the Stitch Count cost to the Production cost in Step 4. You will now have your true cost per design for however many stitches are in your design. You just cannot figure your pricing on stitch count alone. It does not work and will not make you any money.
Step 9: Figure what you want to add for a markup. Without a markup, you do not have any profits to build or grow your business on. You cannot do it just charging for your costs. After your markup, you now have the selling price of each embroidery per stitch count.
Now you can Create your price list based on the actual cost of each design. You will need to experiment and run several stitch count samples to come up with a good cost per thousand stitches for your price list.
Step 10: Create a price list for the items that you sell. Take your purchase price from the distributor and add the shipping cost for your true cost and then add a markup. Add your embroidery to create your total selling price.
I hope that this formula will help you to think about how you figure your pricing. This formula works. Pricing your embroidery for a profit is not hard. It does take time to get this all figured out, but you must take the time to do it in order to make a profit with your business. If you cannot make a profit there is no point of staying in business! I know that this sounds like you are going to have a very high price for your embroidery, but that is what you should be charging for your embroidery! Most embroiderers are not even covering their costs, let alone make a profit!
To get more information about how to price your embroidery and get access to my simple system of pricing, go to http://HowToPriceEmbroidery.com You will be able to create your own profitable price list quickly!
The Embroidery Coach Blueprint for a Smart Embroidery Pricing Strategy That Drives Profit
Profit in embroidery is not a guessing game. It is a calculated system driven by clarity, precision, and disciplined pricing. We believe that every embroidery business deserves a pricing model that not only covers costs but actively builds sustainable growth. With the right structure in place, we create a pricing strategy for your embroidery business and with this your pricing stops being reactive and starts becoming a strategic asset that consistently delivers profit.
This blueprint walks you through a proven framework that transforms how you calculate, evaluate, and implement embroidery pricing. Instead of relying on rough estimates or industry averages, you gain control through real numbers that reflect your unique operations.
We Create a Pricing Strategy for Your Embroidery Business
We begin by understanding the financial foundation of your business. Every decision that follows depends on knowing your numbers with accuracy.
Step 1: Identify Your Base Costs
We calculate all fixed and variable expenses to determine your monthly breakeven point. This includes rent, utilities, labor, maintenance, and other overheads. From there, we break it down into an hourly cost to understand what it truly takes to keep your business running.
Step 2: Break Costs into Time Units
We convert your hourly cost into minutes and seconds. This step allows us to measure productivity and cost efficiency at a granular level, ensuring no time is undervalued.
Step 3: Map Every Process
We analyze each activity involved in production, including hooping, stitching, trimming, packing, and customer coordination. Every second spent is assigned a cost based on your time value.
Step 4: Calculate Total Production Cost
We combine all process costs to determine your actual production cost per minute beyond machine stitching. This gives a realistic picture of operational expenses.
Step 5: Determine Daily Breakeven Point
We multiply your per-minute cost by your working hours to calculate your daily operating cost. This ensures you know exactly what you must earn each day to stay profitable.
Step 6: Evaluate Machine Efficiency
We assess how long your embroidery machine actually runs within an hour. Idle time increases your cost per active minute. By adjusting for actual usage, we calculate your true hourly and per-minuteper-minute machine cost.
Step 7: Analyze Stitch Count Time
We determine how long each design takes, including color changes and trims. This ensures pricing reflects the full production cycle, not just stitch count.
Step 8: Combine Costs for True Pricing
We add the stitch count cost to the production cost. This creates a complete cost per design, eliminating underpricing risks.
Step 9: Apply Strategic Markup
We add a markup that supports growth, reinvestment, and profitability. Pricing without markup only sustains operations; it does not build a business.
Step 10: Build a Structured Price List
We calculate product costs, including purchase and shipping, then add embroidery and markup. This results in a clear, scalable pricing system for all offerings.
Why This Pricing Model Works
This approach ensures that every stitch, every minute, and every process contributes to profitability. It removes uncertainty and replaces it with measurable data. Instead of competing on price alone, you position your business with confidence and clarity.
We focus on aligning pricing with actual performance, ensuring that your revenue reflects the true value of your work. This leads to better margins, improved decision-making, and long-term business stability.
Take Control of Your Embroidery Pricing Today!
Your pricing strategy defines your growth potential. By implementing this structured approach, you can scale without sacrificing profitability. We empower you to move beyond guesswork and build a pricing system that works consistently in your favor.
Start applying these steps and transform your embroidery business into a profit-driven operation with clarity and control.
FAQs
Breakeven helps you understand the minimum revenue required to cover costs, ensuring you avoid losses and build a pricing structure that supports consistent profitability.
No, stitch count alone ignores labor and operational costs. A complete pricing model must include production time, processes, and overhead for accurate profitability.
Idle time increases your cost per active minute. If your machine runs less frequently, your pricing must adjust to maintain profitability.
Markup generates profit beyond covering costs. It allows reinvestment, business growth, and financial stability, making it essential for long-term success.
Review your pricing regularly, especially when costs, efficiency, or demand change, to ensure your pricing remains accurate and profitable.