by The Embroidery Coach | | Embroidery Business Marketing
How do I make my small lettering look great with a true type font? My customer wants this font that is so thin that it just looks like a run stitch when I try to sew it out. What am I doing wrong? This is a question that I received from one of my students and I thought that I would answer it here in this newsletter.
I am going to use the font and the wording that my customer sent to me.  She could not make it look good and decided to ask me to do it for her. Here is the design and here is my answer to her.
As you can see the lettering is far too thin. To keep it simple you need to choose an embroidery font lettering style that is close to the customer‚’s logo, even though it may need to be edited a small amount in order for it to look like the customer’s logo. If you can avoid using a true type font for a situation like this, you are better off. It takes a lot of editing to make it look good, however, it can be done.
Your main issue here is that you have chosen the wrong font to begin with. You must educate your customer and convey to them that you are the professional when it comes to embroidery and you know what will work to make their logo look great and what will not work. What looks good in print does not always work great for embroidery.
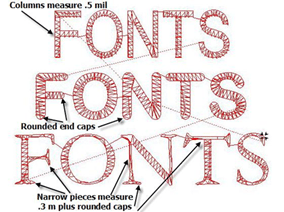
There is one major rule that you must remember when you are creating your designs for small lettering. The columns of your lettering must be at least 1 millimeter wide. If you are working with tiny lettering, 4 millimeters high, you must be very careful about what font you choose. This goes for your embroidery fonts as well as true type fonts. This is the minimum measurement after you have added your pullcomp. Your column can be as narrow as .6 millimeters when you bring it in, but after you add your pull comp, it must measure 1 millimeter or it may look like a run stitch when it is sewing out because the column is just not wide enough to create a satin stitch.
To look at this in the right perspective, if you are using a 75/11 needle, the width of your needle as it penetrates into the fabric is .75 millimeters. If you stitch is not 1 millimeter wide you are only going to make a line or worse a hole in your fabric as the needle keeps going up and down in the same spot!
Another rule to remember is not to use a font that has rounded end caps. They do not sew out rounded. They just look messy. If you have chosen this type of font, you must edit it and straighten the ends. Rounded caps only work well if your letters are one inch or larger and you have the skill to create them round. It can definitely be done, I have done this many times, but for the very small lettering, it does not work out the way that you want it to.
 The third font in the pictures below is too narrow and has rounded end caps also. This is definitely not a good font to use, however, this is the font that was sent to me by the embroiderer to use for the Longwood design. Their customer chose this font and insisted on using it so this is the font for the Longwood University design. This is the Garamond font.
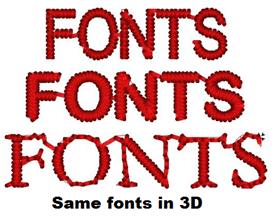
I want you to see that it can be changed but it does take a lot of editing to make it sew out great!  When you have learned to edit enough to make a font like this sew out great on any type of fabric, you are ready for digitizing.
Try to use basic block fonts instead of fonts with serifs if at all possible. This will eliminate a lot of issues for you and give you a bolder cleaner look.
This is especially true if you are creating your lettering in a circle. This always works better if you are using a regular embroidery font rather than a true type font.
True type fonts always seem to have narrower columns to begin with and are sometimes tough when it comes to creating small lettering with them.
I have created a program that teaches you how to create designs using your embroidery fonts, true type fonts and shapes. It is available to all Gold members of the video training membership website, TheEmbroideryTrainingResourceCenter.com
In this program, I show you how to create 3 different type designs using basic shapes and lettering. I show you how to edit the true type font for the design, Longwood University. This is a great program to teach you how to edit and reshape letters to fit a customer‚’s logo lettering.
This is only one of our programs that is available inside of the membership website that teaches you how to create designs of higher quality for your customers. If you have not a member, click on the link and join today!
TheEmbroideryTrainingResourceCenter.com

by The Embroidery Coach | | Embroidery Business Marketing
The No. One strategy that may be hurting your embroidery business is your mindset! Many times our thoughts are what hold us back from succeeding at what we want to achieve and may really be hurting our chances of having a successful embroidery business. I wanted to charge higher prices for my embroidery work when I first started my business but then the negative talk started. I had been told so many times that there was no way that I was going to be able to make a living with an embroidery business and then I actually started believing it.
We second-guess ourselves and we have doubts when this happens. With all of the negative thoughts and other people‚’s opinions, we soon tell ourselves that we aren‚’t good enough, smart enough, talented enough, or whatever to be able to charge the prices we want or need to for our work. So we end up just settling for what we think we can get and really create a tough struggle for ourselves.
This was a huge struggle for me when I first started my embroidery business and it lasted for almost 15 years! I was convinced that I had to be the lowest priced embroiderer to get the work and stay busy! That mindset almost cost me my entire business!
As a woman, I did not value my time! It was hard for me to ask for the money and price my embroidery as it should have been priced because of all of the negative talk. I collected everyone else‚’s price list and priced my embroidery to match or just a little lower. I almost lost my entire business as a result of it!
I was determined to have the highest quality embroidery of any one that I knew of that was in the embroidery business and I was told many times that I had accomplished that. I was offering this very high quality embroidery at a price that was as low or lower than the embroidery businesses that were offering low quality. How stupid was that!
I did not realize that what I had to offer was a product that I could have priced much higher right from the beginning of my business but my mindset had blocked my ability to see that. It took my accountant practically batting me in the head to get this point across. Either I price my embroidery as I should or close the doors! I was not making any money and I was never going to make any money if I did not change my mindset and my prices. I just knew in my own mind that people would not pay those high prices!
I was so wrong! With my accountants help, I created a whole new pricing structure that was much higher. It was very freighting to me to do this because I just knew that I would lose most of my customers. I did lose some of my customers but they were only the customers that wanted the lowest price.
It was a struggle for me to change that mindset but with his help I was able to do so. I guess you would say, he was my first business coach. When I changed my total mindset and started promoting my quality product and excellent customer service I had plenty of work! Most of my customers were already coming to me for my quality and service and when I raised the prices, they were OK with that.
I found that the secret is not to project your thinking & feelings onto your customers! This mindset held me back for 15 years! Since everyone else was charging low prices, I thought that I had to stay in line with them or charge less to get the customers.
Do not let this happen to you. I would love to be able to convince you and all embroiderers that you need to charge for your expertise. We are not or should not be struggling artists! We are highly skilled professionals and should be paid accordingly and you need to develop the mindset of a professional!
If you are not sure whether or not you have the skill level to be able to charge high prices, get a coach that will help you develop the skill level that you need. Sometimes I just cringe when I see designs that come into to me for a critique. Many embroiderers do not even know that their skill level is not high enough.
I know that I am talking about skill level and charging more for your work, but this is all part of your mindset. If you develop the skills that you need to be a highly skilled embroiderer, then you have earned the right to start charging what you are worth! If you need help in this area, please contact me at joyce@theembroiderycoach.com.
If you have anyone telling you that there is no way you are going to make any money with your embroidery business, close your ears. Learn to block them out. Everyone that teaches about a positive mindset tells you to stay away from negative people. This is not always possible, especially if it is a loved one but you can learn to block them out. That is what I had to do and the negative talk will no longer bother you.
Just stay on your path to creating your highly profitable embroidery business and keep thinking the positive thoughts that are so necessary to have a successful embroidery business.
Without it, you will have a very tough road ahead of you! Stay off that road! Do not travel it at all!
by The Embroidery Coach | | Embroidery Business Marketing
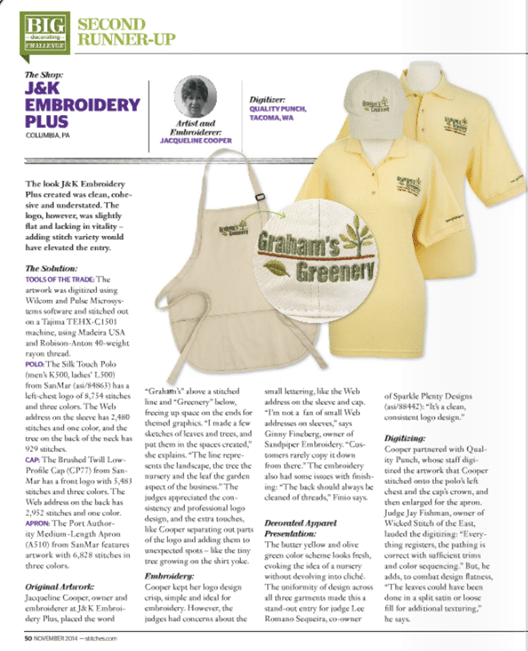
Congratulations to Jackie Cooper, owner of J & K Embroidery Plus for being a winner in the Stitches Magazine “2014 Big Decorating Challenge. Congratulations Jackie for this huge accomplishment of being a Second Runner Up in the “2014 Big Decorating Challenge” contest that was sponsored by Stitches Magazine! Jackie is one of my Gold members in The Embroidery Training Resource Center and a member of my “9 Steps to a Profitable Embroidery Business” Group Coaching program. I am so very proud of her and her accomplishments. This is a huge honor to be chosen as one of the winners. It takes a lot of time out of your business to even participate in a contest like this and to be chosen as one of the winners if really special! Congratulations Jackie, YOU ARE A REAL WINNER!
Click on the link for Stitches Magazine to read the article on how this all took place and what Jackie had to do to qualify for this contest! It took a lot of thought and time out of her actual business in order to enter the contest. Jackie is also working on a new website for her business jandkembroideryplus.com.

by The Embroidery Coach | | Embroidery Business Marketing
When you look at your life and your embroidery business as it is today, are you where you want to be or are you miles away from your dreams and goals? It can cause such a feeling of frustration when you realize that no matter how hard you work you cannot seem to move forward toward your dreams or goals! Working hard is not always the answer. You have probably heard the saying, “Work Smarter, Not Harder!” But how do you do that?
First of all, you need to find out what is actually keeping you from moving forward. There are many factors that may be holding you back but here are 7 of the most common factors or even traps that I have found.
- You don‚’t know what you really want out of your embroidery business.
I am sure that when you started your embroidery business, you had no idea that it was going to be so hard. Having an embroidery business sounded like a great way to make some money and even a fun way to make a living but did you really think about what you actually wanted to achieve as a result of your business? You must have a reason; one that is much larger than just making money. If it is all about money, it will be very difficult to stick with it when the times are tough and you probably have already discovered that there are those rocky times.
Take the time to think about what it is that you want out of your business and write it down. Be specific when you are writing it down. Where do you want to be 5 years from now? How will your life be different as a result of your embroidery business in those 5 years? Being specific helps your mind to draw that mental picture and is very important before you can take the next step of setting your goals and then planning.
- You set Goals in your business but do not seem to be able to reach those Goals!
Goals by themselves are only a wish-list or a dream of how we would like to see our business or situation in the future. Many people set pie in the sky goals but have no idea as to how to reach them. Setting large goals that are totally unreachable just sets you up for failure. You want to be realistic when you are setting your goals and then Plans and Actions on those plans must be put in place in order to reach any type of goals.
Start setting small goals. Set a goal for the week and start planning on a daily basis for what you must get done this week in order to reach that goal. Once you get into the habit of planning weekly, start planning for the month. Planning to reach your goals is a habit, a very important habit that you must build. Without planning to reach the small goals you may fall into the third trap that can be holding you back.
- You don‚’t have any type of a plan to get you where you want to go.
Most embroiderers do not have any type of plan for their business. Your embroidery business is just like any other journey. If you do not take the time to lay out a plan, you have no idea as to where you are going or how you are going to get there.
You would not dream of taking a vacation without some type of a plan or roadmap; so why in the world would you try to run your business without a guide to get you there. Your business can be the vehicle to provide the funds for some great vacations, but if you do not have a plan or lay out the steps that it takes to run and grow your business, this is usually not possible. Not having a plan is a huge roadblock in your embroidery business and without one, it is very difficult to achieve your goals.
- You do not have the money to advertise.
Are you not moving forward because you do not have the money to advertise? I hear this a lot from embroiderers. They do not have the money to advertise so they feel like they are locked in their position of just waiting for the work to come into them. There are many other ways to get the word out about your work that costs very little. Asking all of your friends and family to hand out good business cards or brochures goes a long way in helping you get your name out there.
Attending network meetings and mingling with other people is just about the best way to let everyone know about you and what you have to offer. Attend the fund raisers and trade shows in your area and mingle, mingle, mingle! Networking is the most cost effective way possible to advertise and will bring you in more work than any other form of advertising. You must get your face out there and let people know that you exist.
- Your family or loved ones don‚’t understand or support you.
If you are anything like me, my family thought that I had lost my mind when I said that I was starting an embroidery business! How could I possibly make any money doing that? It was hard, but I wanted it so bad and I was determined to prove them wrong! I had sewed all of my life, made all of my own clothes, the clothes for all of my children and beautiful gifts or any type of occasion for all of our family and friends. Everyone thought that was great, but when it came time to try to actually make a business out of it, that was a different story.
Your embroidery business is just like any other business but it is very hard to make other people understand why we want to do this or why we would waste our time and money to even try to do this. If you have the determination and the will to do it, You can do it even without their support. It can be harder, but it can be done, trust me on that!
- You do not have the skills you need to move forward.
In order to move forward in your business, you must have the skills to do so. Some of the skills take time to learn; and to learn others, you will need to invest some money into learning them. Your next step then is to practice what you are learning. You cannot increase your skill level without the study and then a lot of practice on the new skill that you are trying to learn.
I have found that by working on a new skill for 30 minutes every morning, it helps me to up my skill level very quickly. Investing the money for new programs or a coach to teach you new skills will help you move forward much quicker without the huge learning curve that it takes when you are struggling to learn everything on your own. Continuing to struggle leaves you feeling discouraged and sometimes you just want to quit!
- You do not think you can do it.
Many of us grew up with a low self-esteem and a lack of self-confidence and we carried this over into our adult life. It is so sad and it keeps you from believing in yourself or believing that you can do it. You may have someone that continuously tells you that you cannot do it or that it is a stupid thing to do and it re-enforces those feelings of self-doubt.
There is no shortcut to self-esteem or self-confidence. No one can give it to you and the only way that you can build confidence in yourself if to step out of your comfort zone and do something that you have never done before. Sometimes you will fall flat on your face the first time, but when this happens, you just get up and do it again.
“You must do the thing you think you cannot do.”
— Eleanor Roosevelt
If you will take some time out to really think about where you are in your business or even in your personal life and assess your entire situation, think about each one of these factors and see if any of them are holding you back. You may find something else in your life that is holding you back. If that is the case do whatever it takes to change that so that you can move forward and have the kind of a life or embroidery business that you have always wanted! It is totally possible! If you set your mind to it, there is nothing that you cannot achieve!
If you need help in moving forward, don’t hesitate to contact me at joyce@theembroiderycoach.com

by The Embroidery Coach | | Embroidery Business Marketing
Sabotaging your business and even yourself can be totally avoided but so many small business owners get caught in a trap of not knowing exactly what to do. Self-sabotage takes on a variety of guises and affects small business owners of all ages, of every economic level and of all walks of life.
But it always leads to our not living the life we want for ourselves. Habitually being late with customers‚’ orders, extreme disorganization in your business and not following up with sales leads can be indications that you are unknowingly sabotaging yourself or your embroidery business. Here are a few questions that you can ask yourself to see if you are sabotaging your business or even yourself:
- Do I spend at least 30 minutes locating paperwork that I need for an order?
- Am I indecisive and fearful about pricing; as a result, I often lose an order?
- Do I tend to start projects with great enthusiasm, but have great difficulty finishing them?
- Is my financial situation always chaotic leaving me with an uneasy feeling?
- Do my actions often jeopardize my relationships, and leave me financially unstable?
- Do I worry a lot about what others think of me and my business?
- Am I always struggling?
- Do I often put off the things I need to do? Procrastination and reliability are huge problems for me.
- Is my business ever going to change? I‚’m still not living the life I truly want, and I‚’m starting to lose hope that I will ever have the business that I want to provide that kind of life.
- Do my customer relationships tend to eventually fall apart?
- Do I avoid confrontation and give in to others in order to be liked and win their favor?
I know I have the potential to do more with my life and my business, if only I could just get out of my own way.
Self-defeating behaviors often mask a fear of change and of growing personally as well as in your business. Join me on September 9th to start a 12 week Group Coaching program,“9 Steps To A Profitable Embroidery Business!” This course is going to help you eliminate those self-defeating behaviors and set you and your business up for creating the lifestyle that you deserve.
This is a program where you will be able to interact with the other members of the program and you will be able to ask whatever questions you have to help get your business become more profitable during our weekly Q & A calls.
When we deliberately hinder our own efforts, we get to avoid the knowledge that our life is up to us, and that we do, indeed, get to choose how we want to live our lives. You can stop sabotaging your business and yourself, make the changes you need to make, and start living the life you want to live!
by The Embroidery Coach | | Embroidery Business Marketing
Embroidery machine needles are one of the most important components of your embroidery. Having the correct knowledge about what to use for what type of fabrics is extremely important. How many times when you are getting ready to embroider an item do you ask yourself?
- I wonder if I should change this needle.
- What kind of needles should I use for the type of fabric I am working on?
- When do I use a sharp or ballpoint needles?
- What is the difference between the sharp and the ballpoint needles?
- How do I know what size needles to use?
- Do I need to use a special needle for caps
- Do I use a special needle for leather?
- What kind of a needle do I use for sheer fabrics?
- How often should I change my needles?
There are some hard and fast rules and a lot of opinions as to what needles you should use for different types of fabrics. I will tell you what I have found through my many years of experience and what works best for me and my business.
There are several kinds of needle sizes and systems, but the needles that I found that work the best for most of my general applications are the DBxK5 70/10 sharps and DBxK5 70/10 ballpoints.
Most machines arrive with 75/11 sharp or normal point needles and you are supposed to be ready to embroidery anything! Right!!!
The DBxK5 system is designed specifically for embroidery with a large elongated eye for the thread to slip through easily. Another system used for embroidery is the 16×257. This is basically the same needle except the eye is smaller, therefore, it is also a little stronger because of the smaller eye.
It is important to learn about the needles and understand why you would need to change them for the different types of embroidery and fabrics that you will be using.
Embroidery Machine Needle Systems
The systems used to determine the size of the needle are both European(metric) and the Singer (United States). The European system is designated by the metric size of the blade followed by the Singer system which uses a nominal number such as the 75(metric)/11(nominal number). The size of the needle is based on the width of the blade. The European designation is the width of the blade multiplied by 100. A needle that is .75 mm is a 75/11 needle. Both numbers are always used to designate the size and can be visibly seen with a magnifying glass on the shank.
If you will hold the needle in your hands and view it through a magnifying glass, roll it around in your finger until you see the number. Sometimes the metric number is on one side and the nominal number is on the other side. If it is a sharp or normal point, it usually shows the number only, if it is a ballpoint, it will have a B or BP or the size of the ballpoint such as SES(light ballpoint), SUK(medium ballpoint) or SKF(heavy ballpoint). If it is a medium ballpoint, depending on the brand, it may only have the B or BP following the number. Not all brands carry all of the different size points.
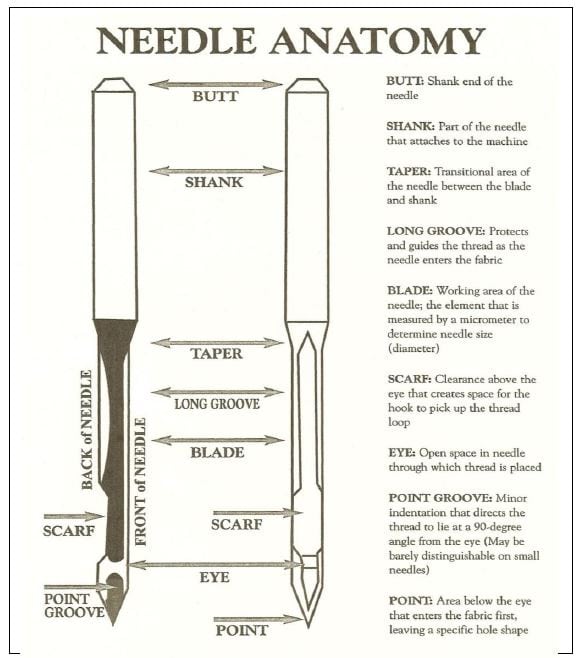
Following is a picture of the needle showing all of its parts with a view of the front and the back.
As a general rule, your sharp, or normal point needles are used for your woven fabrics with a few exceptions and your ballpoint needles are used for your knits and fine fabrics such as sheers. I have used with success 70/10 sharps on some knits but it is best to be safe and change your needle to the 70/10 ballpoints when you are working on knits.
If you have a lot of fine detail, the 70/10 needle will be a much better choice for the clarity in that detail. The finer the detail in your design, the smaller the needle you should be using. If you are embroidering lettering that is less than .20 inches or 4 mm. it would be best to use a 65/9 or a 60/8 needle. If you do decide to use either the 65/9 or 60/8 needle, you must also use 60 weight threads instead of 40 weight thread. Most of your embroidery is done with 40 weight thread. You have a limited color selection of 60 weight thread. If you have your designs digitized, you must let your digitizer know that you want to use this small needle and 60 weight thread. The smaller the needle, the smaller hole it will make in the garment and the sharper your finished image will be on your finished product.
When you are using 30 weight thread you will need to change your needle to a 80/12. Sometimes a 75/11 needle will work, but it can cause thread breaks because the eye of the needle is smaller and causes too much friction for the thread. The eye of the needle gets larger as your needle size increases.
The sharp needle actually has a round point on the end of it, but is sharper and more pointed than the ballpoint needle. It is made to penetrate the fabric wherever it goes. Sometimes when it does penetrate it will cut the fabric. If you are using it on a knit and it cuts the fibers, it can actually make a run in the knit. Sometimes this does not occur or show up until after it has been wash a few times. Sometimes it will cut the center part of small letters out, such as the center of o‚’s, a‚’s b,‚’s and etc. Again, this may not be noticed until after it has been washed.
The ballpoint needle has a small round ball on the end of it and is designed to penetrate between the fibers of the knit eliminating the chance of the cuts unless it is a dull needle. If it is dull, it will definitely cut the fabric and cause runs and holes. On knits, the smaller the needle point, the better your design will look when it is finished. The ballpoint needles come with light, medium and heavy points. The light ballpoints (SES) would be used for lightweight fine knits and sheer woven fabrics, such as silk.
If you are working on a 100% Pima cotton shirt, this would be your best choice. The medium ballpoints (SUK) are the most popular and used for your fleeces, t-shirts, sweatshirt fabrics, and heavier knit placket shirts. The heavy ballpoint (SKF) is used on heavy bulky sweaters and most types of elastics goods with the exception of spandex. I would use the light or medium ballpoint on spandex. This fabric is lightweight.
There are new moisture-wicking fabrics on the market that may be tough to work with. These fabrics are stretchy and very soft. The wrong needle will ruin them with the first stitch. If it is a knit fabric, you must use a 70/10 ballpoint needle for these fabrics in order to eliminate any holes in them. If it is a woven fabric that is still soft and stretchy, then you must use a 70/10 sharp needle. It is very important to know whether your moisture-wicking fabric is a woven fabric or a knit fabric.
Embroidering Machine Needles For Leather
To embroider on leather, you can use a 70/10 sharp, 75/11 sharp or a wedge needle made especially for leather. Your choice depends on the type of leather that you are going to embroider. If it is a soft leather, then your best choice is the 70/10 or 75/11 sharp needle. If it is a heavy type then you will need to use the wedge point needle. You will still want to use the smallest needle that will do the job.
The wedge point needle actually makes a slit in the leather for the thread to travel in. The best way to find out for sure which type of needle to use on your leather is to experiment. Go to a used clothing store such as the Salvation Army and look for the least expensive and the closest type of leather that you will need for your project and work with it. Use both types of needles and see which one will work the best for your type of leather. These wedge point needles are also ideal for heavy vinyl.
Embroidering Machine Needles For Metallic Thread
When you are using metallic thread, the correct needle to use is the DBx7ST. This needle is identical to the DBxK5 except the eye is elongated and rectangular in shape so that the metallic thread will pass through it easily.
If you are going to use a heavy twisted thread then the correct needle to choose is the DBx9ST. The eye is this needle is twice the size of the eye in the DBxK5 needles. The twisted threads that I have used required a 90/14 needle.
Embroidery Machine Needles For Coated Fabrics
Needles are available with coatings on them. They are known as Teflon coated or Cool Sew needles. They are especially helpful if you are using a synthetic such as Cordura Nylon, or a sticky backed fabric, or a heat seal backed fabric such as athletic twill. They help to reduce friction.
Titanium Needles
A stronger Titanium needle is also available. The points on the titanium needle last longer than the other needles, as much as 5 times longer. They are a bit more expensive, but the amount of down time to change needles is also greatly reduced. These needles are highly recommended if you experience a lot of needle breaks due to high speed or if you do a lot of caps. In some of the high speed productions shops that I have been in, they use nothing but Titanium needles for this reason. I too use a Titanium needle for all of my caps. I have found that the 70/10PD in Titanium is great for most of my cap applications. Sometimes it is necessary to change to an 75/11 needle for the plastic mesh back caps. The PD signifies that it is Titanium.
When To Change Your Embroidery Machine Needles
Some people say that the needles need to be changed about every 2 million stitches, some say 1 million stitches or 8 consecutive hours of sewing. A lot of this depends on the speed of the machine, the type of fabric and backing that you are using and how many times you have actually run that particular needle bar. Sometimes this is very hard to calculate. I have found that if I am running a large job on the same needle for several days, it is a good idea to check them at least once every couple of days.
I use a 10 times power linen tester to check my needles. This is a small magnifying glass that can detect the smallest scratch on the eye of the needle and you can actually see if the tip is broken. It is a great tool for this application and is a good investment. They are not always easy to find, but I did order one on the Internet and have found it extremely valuable.
You want to make sure that all of your needles are changed during your monthly maintenance. If you do not change your needles any other time, make sure that you schedule the needle change along with your overall monthly maintenance.
It is a great idea to have a variety of needles on hand to test and see what works for your needs and requirements and then make sure that you know where they are if you have a combination of them in your embroidery machine.
Keeping Track Of Your Embroidery Machine Needle Changes
Many shops will have a combination of sharp and ballpoint needles in their machine, but you need a system in order to keep track of them. I created a Needle Replacement Sheet that I use constantly. Every time I change a needle, I write it on this sheet and I have it taped to the back portion of my machine. I write in the size and type of the needle and the date that I changed it. This is very important. You don‚’t want to embroider a fine golf shirt with an 80/12 sharp needle. You will have a massive amount of holes. Don‚’t think that you will remember where you put those needles, this just does not happen in the real world. You must have a good system to keep track of them.
You will find the Needle Replacement Sheet in the Machine Maintenance section of the Embroidery Business Academy members area.