by The Embroidery Coach | | Embroidery Business Marketing
Embroidery thread tension is one of the most frustrating subjects within the world of embroidery and learning to adjust and maintain good balanced embroidery thread tension is a skill that must perfected. Once you develop this skill it will make a huge difference in your production and the quality of your finished embroidery. Very often a design would look so much better if only the tension was adjusted correctly on the machine. The wrong tension can cause multiple problems and without the basic knowledge of the relationship between the top and bottom threads it is impossible to know how to correct them.
A stitch is formed when the needle carrying the top thread passes down through the needle hole in the needle plate and connects with the bobbin thread. A loop is formed directly behind the eye of the needle. As the needle is coming back up the thread will tighten if your tensions are set properly. If one of your threads is too tight it can snap. If there is a burr on the edge of the needle hole in the needle plate, as the thread is coming back up, it can split or fray. It is important to keep a total balance between your Upper thread (top thread) and your Lower thread (bobbin thread).
Correct Embroidery Thread Tension
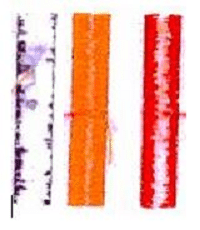
When your tensions are correct, you will see three fairly evenly divided sections on the back of your lettering or embroidery in each segment. The center section will be the white bobbin thread and the two outer sections will be the top thread as in the red image in picture to the left. This is a correct embroidery thread tension.
When you are embroidering small letters it is sometimes hard to see the division, but you still should see the line of bobbin thread. If you do not, your tension needs to be adjusted. If you are embroidering a large fill area, you will see mostly bobbin thread with a small amount of top thread showing at the edges of the segment.
The purple thread image on the far left is showing that the top tension is too tight or the bobbin tension is too loose. Adjust your bobbin tension before you adjust the top tension in this case.
The gold thread image in the center is showing that the top tension is too loose. You must tighten the top tension in this case. Keeping a total balance between the top and bobbin threads not only makes your embroidery look better, your machine will run smoother and you will have fewer problems with your machine.
Here are some typical scenarios when your embroidery thread tension will need to be adjusted:
- When Switching Embroidery Thread Types
The thread tension may need to be adjusted each time you change a cone of thread. It is not a good idea to keep switching back and forth with your thread types. The machine gets used to one type of thread and when you make a change you start to have problems. Tensions set for polyester thread must be much tighter than the tensions set for the rayon thread. Metallic thread needs to be adjusted but it all depends on your machine and the brand of metallic thread. In order to avoid changing tensions when I want to use metallic thread, I keep one needle designated at all times for metallic thread, and then it is always set and I do not have to worry about changing the tensions or the needle.
- When switching different Colors of Cones of Embroidery Thread
It is best to maintain your thread colors on the same needles if you can. If this is not possible, stay with the light-colored embroidery threads on the same needles and the dark-colored threads on the same needles. For example, don‚’t change off a white thread with a navy thread. You will definitely have to adjust your tension. This can make a big difference. The dyes are heavier in the dark colors than they are in the lighter colors, so therefore the thread is slightly heavier and your tension will need to be adjusted.
- Different Types Of Garments
The same tension for a cap does not always work on a knit golf shirt. As a general rule, I run the tension tighter for a cap. This is not always the case, depending on the fabric that is in the cap. You will need to experiment to see which fabrics require a tighter tension than other fabrics.
- A Visit From The Tech
Each time a tech comes into work on my machine, he loosens all of the top thread tensions and I have to go back and redo them when he leaves. Obviously you are not going to have as many thread breaks if your tension is loose. My point here is that just because the tech has been there and adjusted your tensions, do not think that they will automatically be correct!-Trust me, I am not knocking techs, they are wonderful, I just want you to be aware of your tensions if they are not correct after the tech leaves!
If your embroidery thread tensions are not correct and balanced you may experience the following problems:
- Birdnesting
This is a lot of top thread that gathers up on the underside of your garment and forms a big wad. This is caused by the top thread tension being too loose. You will see loops on top of your embroidery and this can even cause your garment to be pulled down into the hole in the needle plate.Obviously this will rip the garment. At times, you will need to reach up underneath the needle plate in the hook area and cut this wad of thread loose from the garment in order to remove it. If this bird nesting does occur you must make sure that you have removed every strand of thread that has been caught in the knife and bobbin case and in and around the rotary hook.If some of this thread gets caught in the hook when you start to sew again, your hook may freeze up and you are shut down until you either replace your rotary hook or have a tech replace your rotary hook. You can also knock out your hook timing as well as the knife timing mechanism if a wad of thread gets caught in it.
- Thread Breaks
If the tension is too tight, you may experience a lot of thread breaks.
- Bobbin Thread Pulled Up Onto The Topside Of Your Garment
It looks like you have very erratic or jagged stitching, but when you look more closely you are actually seeing the white bobbin thread showing at the outer edges of your stitching.
Adjusting The Top Embroidery Thread Tension
To adjust the top or upper thread tension, you start with the top Tensioners on your machine. You must be careful that you do not have this set of Tensioners too tight. If they are too tight, the thread will pop out from under the tension disks as you are sewing and all of a sudden your thread is looking very loose and you don‚’t know what happened or what could have caused it. You did not physically make any changes in your settings, but your tension changed during the sewing process. This is the first place to look if that happens. If this is happening, loosen this top set of Tensioners, by turning or twisting the knob to the left or counterclockwise a quarter turn. If they are too loose, you will turn or twist the knob to the right or clockwise.
If you do not see a difference after adjusting the top set or it still is not correct, adjust the second set of Tensioners or Rotary Tensioner on the front of the machine. You will turn the knob to the left or counterclockwise to loosen your tension and if you want to tighten your tension, you will turn or twist this knob to the right or clockwise.
I have adjusted tensions for the past 32 years and learned the correct feel of the thread passing thru the needle as I pulled on it. Today there is a top thread Tension Gauge that you can purchase to properly set your tensions. The first time that I used this gauge I was amazed at what a great job it did and I also found out that my tensions were not all set properly. After using this gauge, my machine actually sewed better and faster without any problems. It is such a great feeling when you can sew all day long with little or no thread breaks.
Testing Your Embroidery Thread Tension With A Top Tension Gauge
 To test your tensions with this Tension Gauge, you will thread your machine properly making sure that you have followed the upper thread path correctly. Pull a few inches (about 6 inches or so) of thread thru the needle and wrap it around the hook of the gauge at least twice. You want to make sure that it is caught enough that you can pull on your thread without it coming loose. With the numbers on top of the gauge facing up you will pull the thread straight out horizontally. I have a video on my website showing you how to use it.
- Do not pull out more than 18 to 24 during your test.
- The tension should read 100-130 grams for Rayon thread
- Tension should read 120-150 grams for Polyester thread
On my machines, the upper range of these numbers work better than the lower range. Start with needle #1 and continue the same process until you have completely tested all of your needles. Each time that you make an adjustment, you should perform this test.
One thing to remember, each machine has its own personality and sometimes these measurements will not be correct for your machine. You will need to experiment and arrive at your own measurement and keep your track of what these measurements are. Many times they will need to be tighter than the measurements listed above in order to have the correct tension.
Check Your Tension When You Change The Bobbin
Every time you replace your bobbin, you need to check the bobbin tension. The tension can vary and be different on each bobbin. Your tension can even change within the bobbin. It is very normal for the tension to change when it gets close to the end of a bobbin. The last 10% should be considered unusable. This is especially true with the cardboard sided bobbins.
All of a sudden as you are sewing, you will notice that even though nothing has changed in the embroidery process or your garments, you tension has changed. This is very upsetting. At the first sign of this, remove the bobbin, throw it out and replace it. Again, check your tension to see that it is correct before you start running your machine.
Check Your Bobbin Tension Following These Steps
- Hold the bobbin in your hand with the thread hanging down on the right side.
- Place it into the bobbin case with open side of the bobbin case towards you.
- Pull the thread up thru the tension spring/clip but do not run it thru the pigtail.
- Pull out a few inches of thread while you are holding the bobbin case in the palm of your hand.
- With your other hand, pick up the bobbin carefully and suspend it, holding on to the thread. Hold it just above the palm of your hand. It should not drop.
- Gently tug on the thread and bob it up and down. It should drop a small amount. If it does not drop at all it is too tight. If it drops easily, it is too loose. It should only drop a small amount when you are bobbing it.Make sure that you do not
have the thread pulled up thru the pigtail when you are trying to perform this test. The bobbin will fall out of the case.
- If the tension is too loose, turn the largest screw on the bobbin case to the right a small amount. If the tension is tight, turn this screw to the left. Perform this test again each time that you adjust the screw.
After you have completed your test, you can run the thread thru the pigtail and place your bobbin case into the rotary hook of the machine.
There is also a Bobbin Tension Gauge that you can purchase to set your tensions correctly. 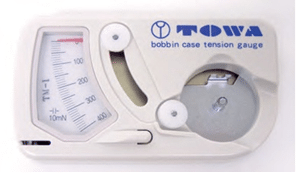 I strongly advise purchasing one of these valuable items. They are a bit pricey, but really do a great job. This is a one time investment of approximately $80.00 but it is worth its weight in gold. The measurement for the correct bobbin tension using the gauge is 18 to 20 grams. The numbers to read on some of the Tension Gauges will be between 180 and 200 instead of the 18 to 20. It is easy to use and very accurate.
Keeping good balanced embroidery thread tensions is extremely important if you want to maintain quality and high performance with your embroidery machine.

by The Embroidery Coach | | Embroidery Business Marketing
In this article I am going to give you some ways to grow your Embroidery Business in easy to understand steps. This is a general overview of what it really takes to grow your business.
You have your Embroidery business started, you have spent a lot of money getting all of your equipment and learning how to embroider, now it is time to really get that business going. You may also be buried in work and still you really do not feel like you are progressing. Growing your business in many ways is just like starting your business. You must create a plan to move forward. Planning is the most important part of your business. Proper planning will save you many hours of execution and redoing unnecessary steps. If you do not have a business plan in place that you are currently using, you must create one. You cannot really grow your business to any significant size without a plan.
Before you start doing any type of planning sit back and look at each area of your business. Do not try to look at it as a whole, go to each part and take a real good look at it. You have many parts to your business.
- The Office
- Design Center
- The Hooping Area
- Machine Production
- Finishing
- Shipping
These areas are the least amount that you have in your small business. If you are offering other services or have a showroom, you will have even more areas in your business. Look at each area, the way that you have it all set up, think about the way that you move around in it to do each one of your jobs. Think about the entire procedure of doing each job.
- It is all set up the way that you want it to be?
- Is every area organized and running smoothly?
- Do you have a step saving organized workflow?
- Do you have a good paperwork flow?
- Do you have a step by step process written up for each procedure in your business? This includes each item that you have to do starting with taking an order all the way through to shipping out your finished product, invoicing it and taking the payment. When you have all of these in place it is much easier to train a new person to help you. You want to make sure that each person is doing the procedure in the same manner. Without a step by step process, this is not possible.
- Do you have Procedural Manuals written for each area of your business?
3 Important Steps To Grow Your Embroidery Business!
There are 3 very important steps you must have in place before you can start growing your business.
- Make sure each area is organized and running smoothly
- Create a Business Plan
- Create a Marketing Plan
Organize Each Area Of Your Business
To be able to grow your business, you must have help. Your business has no chance of growing if you are trying to do everything by yourself. Hire some help to take over the simple jobs so that you will be free to spend some time on growing your business. The first person to hire is someone to take care of your bookkeeping for you. This can be a part time person or someone that does it on contract and charges you for however many hours a week that they are working on your business. I have been having my bookkeeping done on line for the past 3 years and it works out great.
The next person to hire is someone to do your finishing for you. This included the trimming, removing backing and topping, steaming, folding and packaging of your products. This is a huge job that can be done by a minimum wage person and it does not have to be a full time job. Depending on the amount of work that you are trying to put out in a day, a 4 hour person may be more than sufficient or maybe a couple of days a week.
It is extremely important to go through each area of your business and make sure that it is totally organized and running smoothly. If not this is the first place to start. Start with your office and go through each department and create a plan for each one.
- Get your work flow organized and running smoothly
- Make sure your paperwork flow is running smoothly
- Write up your step by step process for each job
- Create your Procedural Manuals for each area.
If you will take the time to get all of this in place, you will begin to see more production at the end of each week. This first step alone will help your business to grow.
Creating a Business Plan for your Embroidery Business
Creating a Business Plan that you will be using on a weekly basis to actually run your business is the very next step in growing your business. The main purpose of having a business plan is to give you a clear direction and guidance of how you intend to run your embroidery business and plan for future growth. With this plan you will be able to analyze and measure each step along the way to ensure that you are truly on the right path. Measuring your results is extremely important. Without measuring, you really do not know how you are doing.
Writing a business plan is not hard; the hardest part is getting started and knowing where to start. Many business plans look great on paper, but do not succeed in real life. Make sure that you are writing a plan that will work for you in the real world!
Do not try to use one of those template programs on the internet for your business plan, they are not designed for embroidery businesses, and they are far too complicated. I know that there is one out there that advertises that it is for embroidery business, but it truly is not. It is a generic business plan that is marketed to every type of business. How do I know this, I purchased it. The only true business plan program out there is one that I wrote myself. If you want to check it out, go to EmbroideryBusinessPlan.com. That is a program that I created to teach you how to write a business plan for your business, how to create all of your projections, cash flow statement and how to plan out every area of your embroidery business.
Your plan will be revised many times and will always be a work in progress. This is not a done once and you are finished process. If you will use your plan properly to run your business, you will be revising it on a monthly basis.
It can be a simple 5-10 page plan that will work for most small to medium sized embroidery businesses, or as complex as you want it to be. This all depends on your situation and whether or not you will need financing.
Create a Marketing Plan for your Embroidery Business
As part of your business plan you will need to create a Marketing Plan that you will follow.
You need to create a simple plan that you will follow for 1 year.
- List all of the events during the calendar year that your target market will participate in and events for you to participate in that will take you to where they are. It is very important to be present where your market is hanging out!
- Create Promotions for the lean times in your business and for all of the special days and holidays.
- Create a great business card, I wrote an article about creating a business card What Does That First Impression Say About You And Your Embroidery Business? This will leave a great first impression when you meet people and will go a long way in creating relationships when you are networking. Networking is by far the best way to start building up your business.
- Join at least one networking group and it is better if you can belong to a couple of different ones. The Chamber of Commerce is a good one in most areas and the BNI and Meetups are also good. Yes each one of them cost money to join but it is well worth it. You can get a lot of referrals when you are part of these groups. And yes, I mean a part of these groups. You must participate in the functions, not just be a member. Being a member but not attending the functions is a waste of your money.
In my book, The Truth About Embroidery Business Success‚ 7 Elements To A Highly Profitable Home Based Embroidery Business I have an entire chapter on Marketing your Business.
Without Organization, a Business plan and a Marketing Plan, your business will flounder! I have had that experience, it is not fun!
Here is a wrap up of the 3 steps to help you grow your embroidery business.
- Plan out and organize each area of your business
- Create a Business Plan
- Create a Marketing Plan
If you will follow these steps, you should see a massive growth in your business. It is very important to be growing your business on a daily basis. If you are not growing, you are moving backwards. For more information about how to your embroidery business, go to 9 Steps To A Profitable Embroidery Business!

by The Embroidery Coach | | Embroidery Business Marketing
Pinterest is one of the latest Social Media platforms that has risen on the scene and it is an excellent tool to use to Market your Embroidery Business. Marketing with pictures is the most effective way that marketing is done today.
We have heard a lot about Facebook, Twitter, and LinkedIn for the past few years, but Pinterest just popped up out of nowhere and has very quickly risen very high in the ranks and is taking over in lot of different ways. Right now it is the 4th largest website in the world used to drive traffic to your website or your offer that you are trying to put in front of your audience. It drives more referral traffic than YouTube, Google+ and LinkedIn combined. It drives more traffic than Twitter.
Whether we like it or not Social media is driving our business today! We must learn to express ourselves in pictures in order to be able to drive traffic to our website or the products that we are offering our customers and prospects. Social media in pictures is how we are getting their attention today. People have stopped paying attention to just words and it is the pictures that are captivating their interests.
Pinterest is getting over 70 million unique visitors a month and is quickly taking over the Social Media Marketing community. It is the first site to really get the social shopping concept right!
Women are dominating Pinterest more than any other social networking site and the current age group is 18-39. In North America 60% of the Pinterest users are women and 50% of those women have children. These are women that have money to spend and are looking for something that is different and unique. If you are marketing to women then you absolutely need to be on Pinterest. 40% of men are Pinterest users in the US. In Europe Pinterest users are a 50/50 split between women and men.
Pinterest is perfectly positioned for growth as the mobile revolution continues to expand. As users continue to fall more in love with mobile devices in record numbers, the visual strategies that work on Pinterest will become more and more effective across ALL online marketing channels. In creating our marketing messages today, we have to start thinking in pictures and very visual images.
Getting Started With Pinterest
Step 1 Set Up Your Account
You can sign up as an individual person or as a business. I do not see the point of signing up as an individual person. I think that signing up as a business is the only practical thing to do unless you are there just there to socialize and if you have a serious embroidery business; that should not be your goal.
Basic Rules To Follow In Setting Up Your Pinterest Account
There are some basic rules that you must follow to receive the best results as you are setting up your account, creating your Pinboards and your Pins. Boards are your categories and Pins are your pictures or content that you are posting.
- Use Keywords in your Profile
- Name your Pinboards with keywords
- Name your Pins with keywords Put keywords in your captions along with a call to action and a link.
- Create original content for your Pins
- Add prices to your products
- Only 20% of your Pins should be selling products!
- Be inspirational with your products; show how they can be used
- Show what is unique about you
Types Of Pinboards To Set Up
- Customers-Testimonials
- Inspirational Photos of settings showing how your products can be used to give them ideas
- Different Niches
- Different Categories
- About You & Your Business
- FAQ
- Gift Ideas
 Types of Pins To Create
- Inspirational
- Quotes
- Humor
- Wedding Inspiration
- Craft Projects
- How To‚’s
- Infographics
- Products & How to Use them
- Video
- Decorating Ideas
You want to create original content and pin it. 80% of all of the Pins are repined from someone else‚’s board. While this is good, you need to be creating your own content and it will help you rank higher in the search engines. You want to create beautiful pictures that will attract other people so that they will repin them onto their boards.
You do not just want pretty pictures, they should be promoting one of your products in one way or another. It is great to just put up pictures, but without thought behind them, they will not produce the type of results that you want as a result of spending your time creating them.
When you first log into Pinterest, you will see all of the recent activity. This is like your Newsfeed in Facebook. You will also notice that you can either Pin it or Like any of the pictures that you see. As I said before these pictures are called Pins. When you bring up your actual page, you will not see the Like button. This is replaced with the Edit button.
Step Two: Set Your Goals
You need to set your goals and stay focused on them during the process that you are setting up your Pinterest account, creating your Pinboards and Pinning your posts. Knowing your goal can help you fine-tune and focus all your Pinterest efforts into achieving them. You won‚’t waste time and scatter your Pinterest energy by posting Pins that don‚’t help to move your business towards your objectives. Keep your goal in mind with each Pin that you create.
Step Three: Decide Which Strategies will Best Work for You
Even if you don‚’t need to share photos with a group that values the photos as content and resource material for what you are looking for, you can still use Pinterest strategies to attract new subscribers.
Some of the current strategies that are working great are:
- Providing Permanent Posting Power
If you post a perfectly optimized post on Facebook one that‚’s sure to excite your target subscriber it’s life is limited to a few hours of visibility (assuming Facebook even displays that post or photo to your subscriber at all possibility, thanks to the Edge rank algorithm and other feed changes). If your perfect Facebook post response or post is number nine, most people won‚’t even see it. Opportunity lost. Pinterest, on the other hand, displays your Pins and Pinboards forever. It’s really easy for people to see every bit of visual information you’ve created on Pinterest. They can refer back to your infographic, go pick up that great photo they remember from last week, see what‚’s new, and find any Pin in a matter of seconds. A Repin is forever.
- Providing Information
Is your target market composed of visual learners? In that case, Pinterest is tailor-made for you! All you have to do is create powerful and easy-to-absorb Infographics‚ and post them to a Pinboard named with a highly-optimized keyword your target subscriber might search with. (Note that you can share videos on Pinterest too.)
- Connecting With Other Pinners
You may be missing a whole segment of your market, if they are avid pinners or highly-visual learners among your majority of text-based or audio learners. Creating optimized Pinboards allows you to find and connect with this group. You‚’ll be able to absorb them into your community as they get to know your name and face. A key part of this, however, lies in reciprocal behavior. Don’t just provide Pinboards you think they‚’ll like (or find): Make sure you reach out to them, too.On Pinterest, you‚’ll be able to see who is a likely candidate to become a customer, fan, or a client. You’ll be able to see who is hugely popular in your niche, and not only connect with them, but analyze why and what are they doing that is so right! Repin, Like and Comment on your target audience’s (and peers) pinboards and Pins just as you would on any other social network.
Step Four: Create Original Content
Pinterest has never really just been about plopping a photo into a Pinboard and leaving it there. People have created infographics demonstrating everything from How-tos to statistics to Before-and-After shots to recipes.
There are 4 techniques that you should be using as you are creating your original content.
- Protect Your Images
Just because you‚’re sharing your images doesn’t mean you don’t want credit where credit is due. An easy way to make sure the unscrupulous don’t steal your images (while not annoying those who just want to share or display them) watermark them! And you can set your watermark to be as strong or faint, as large or small, as you like.
- Enhance your Photo Pin
You can also use online resources to edit and enhance your graphics and photographs. There are free program available that will help you do this.My favorite is Picmonkey.com
- Create A Word Cloud
Another resource that has proved surprisingly popular: Word Clouds. You can sign up for Wordle.net and create graphic versions of your text ideas instantly perfect if you, yourself, are not visually oriented‚ but your audience is.
- Create Infographics
You can create infographics using any type of artwork program and you can even create them using Microsoft Word. There are several programs available on the internet that you can use to create infographics but the resources that I have used are:
*Infogr.am
*Piktochart.com
In order to make this really work you want to start getting your current audience to engage with you and Like your Pins. Post on your Facebook page that you want them to follow you on Pinterest. Give them a reason to follow you on Pinterest. Have some tips on Pinterest for some type of information that is not posted on Facebook.
I have learned in all of my efforts of marketing my business is that you need to be reaching out on all of the Social Media platforms with your information because you will find followers on each of them that are not necessarily on all of them. You must find a way to broadcast your message across all of the major Social Media platforms, but Facebook, LinkedIn, Twitter and Pinterest are the most prominent as of this writing that will help you market your embroidery business. I’d like to invite you to go to www.Pinterest.com/embroiderycoach and see how I have my page set up.
I do not have a lot of time to spend on social media, and I do not jump on any new social media platform as soon as it pops up! I want to know what the purpose of it is and what it is going to do for me and my followers. Is it actually going to add value? If I cannot add value for my followers then there is no purpose in it for me. It is like every other part of your business. You need a plan. You want to be able to reach other people with the efforts of your posts regardless of what platform you are using.
I feel that Pinterest is here to stay and is a great way to use for marketing your Embroidery Business!

by The Embroidery Coach | | Embroidery Business Marketing
I have just created a The Embroidery Coach Fast Start infographic. I am learning how to use Piktochart. This is really a cool tool to use!
The Embroidery Coach-Fast Start infographic!

by The Embroidery Coach | | Embroidery Business Marketing
I just wanted to share a new tool with you that I found, Wordle.net, to create Word designs for Pinterest. This was really fun to do. I just clicked on Create, pasted in some words that I typed into a word doc and pressed Go. You can change the colors, fonts and styles of it. It was a fun application, give it a try.
Click Here to sign up for our Free Embroidery Tips. You will be sent a new tip each week.
by The Embroidery Coach | | Embroidery Business Marketing
Before I go into the information about the 5 steps to a good web presence, the most cost effective way to advertise your embroidery business, I would like to ask you a few questions.
- Do you have a good web presence set up for your embroidery business?
- Do you have a system in place to automatically attract new customers and prospects into your business?
- Are you keeping your customers informed of all new happenings in your business?
- If you have a web site, is it bringing in the sales that you need?
It is so important to create a good web presence in today‚’s market and without one, your business may really suffer. Creating a good web presence can be very inexpensive when compared to the cost of advertising and so much more effective. This is a very efficient way of spending your advertising dollars rather than on something that you hope will work. A good web presence with a marketing system works for you on a constant basis and can give you a quick return on your investment. You cannot count on that with any other type of advertising system.
What do I mean by a good web presence? A good web presence means that you are easily found on the internet by your customers and prospects. You appear to be in many places on the internet making it easy for customers to interact with you. You website can be easily found when someone searches for a particular type of product that you have to offer.
Creating a web presence is a major part of any embroidery business. This is just as important to a local embroiderer as it is to one that is trying to reach the market globally. Before you can begin to reach a worldwide market, you must first reach out to your local market and the best and most cost effect way to do this is through your own web presence.
In today‚’s economy your prospects want to learn all that they can about you and see what you have to offer before they will choose to do business with you. This has been brought about because of all of the Social Marketing that has taken place in the past few years. The entire marketing system has changed and the way that business has been marketing in the past has totally changed.
Everyone in business needs to create a web presence. Having a web site is very impressive to your customers and clients and if it is one that they can interact with, that is even better and means a lot more to them. This puts you at a whole new level in the eyes of your customers or clients.
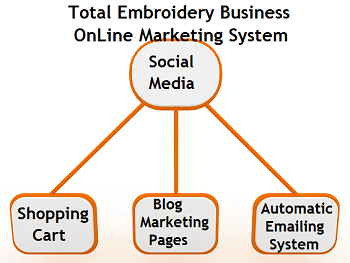
Basic Steps To Creating A Good Web Presence
Step 1- Creating a good web presence starts with Social Media.
Facebook, LinkedIn, Twitter and Pinterest social sites is a great place to get started marketing your business. You will not create a lot of sales here, but that is not the object. Creating an awareness of your business is the place to start. Your first step is to create a Fan page or Business page on Facebook. Start letting people know about you but do not try to sell anything when you first start. This will turn many people off. You want to show what you have to offer, give great tips, share inspirational quotes and be of help to other people. Share your pictures on Facebook and send them to Pinterest as well.
Step 2 – Add a shopping cart.
I do not recommend adding your shopping cart to Facebook. I recommend keeping your shopping cart independent on your own hosting account and then send your fans to your shopping cart through your pictures on your Social Media sites.
Step 3 – Add a Blog
Blogs tell stories about your products, how you create them and what your customers are doing with them. You can have testimonials on your blog and again, lots of pictures. People like pictures and today, much of our marketing is done through pictures.
Step 4 – Add an Automatic Emailing System
This will allow you to create messages that will go out to your customers and prospects on an automatic basis. You create a set of follow up marketing messages that you can schedule and send out to your customers without you even having to be involved once the messages are created. When you have something special coming up, you can send out a broadcast message to everyone at one time, saving you a lot of time and money. You can even create a newsletter and send it out through your system and keep your customers totally up to date with everything that is going on in your business.
Step 5 – Add a lead capture form on your blog
A form to capture names and email addresses on your blog site from new prospects in exchange for a coupon or gift certificate will give you the opportunity to start marketing to them. A coupon towards their next purchase is always a winner! By capturing their name and email address you can keep them informed of any new products, specials or events that are happening within your business.
Creating your web presence with the Marketing System needs to be search engine optimized, very simple and easy to use and will get you up and running very quickly! This is very important, you do not have the time to go out and do research to find a system and then try to learn how to use it. You must get your marketing system going quickly!
Creating a total marketing system will help you to be found more quickly on the internet and will make it easy for you to stay in touch with your customers keeping them informed at all times.
When you are first starting out in business, especially in the embroidery business, you are more focused on creating your products than you are on marketing! Marketing is one of the most important parts of your business and without it, you have no business. In today‚’s world you have to find a way to get your customers jobs done on a timely basis and still build in time for marketing your business. If you have a system that will work for you 24 hours a day 7 days a week, you will find that marketing is not such a chore!
How Do I Get A Marketing System That Will Work 24 Hours A Day, 7 Days Per Week?
The easiest way is to follow a step by step program that will guide you through each step of the way. I am starting a 6 weeks “Embroidery Business Marketing System Workshop” on May 7, 2013 that will show you each and every step in the process. This easy to follow system will start with choosing the right name, getting your hosting account, setting up your shopping cart, adding a blog with marketing pages and then setting up your automatic emailing system. This will be a system that you will have total control of at all times. Go to www.EmbroiderybusinessMarketingSystem.com for the details.
This system has worked very well for me and I will share it with you in this workshop! If you have pieces of your marketing system together already but are not seeing the results that you are looking for, then you will want to attend this workshop. I want you to become very successful in your embroidery business. I would also like for you to share some stories with me about the success that you have had with your current marketing system. Please comment below and let me know what system you are using and how your system is working for you!
Join Us For The Embroidery Business Marketing System Workshop