by The Embroidery Coach | | Embroidery Business Planning
Let‚’s face it, we all want to have a business that we love! We all want to start each day with a feeling of I can‚’t wait to get started today! I am going to share with you 9 Tips that will help you plan efficiently in your embroidery business to give you that feeling of excitement to get started each day! Every business needs a plan to be able to run efficiently and each and every day needs to start with a plan.
Tip #1 Set Your Goals
What are the goals that you have for your business? Do you have a specific time frame that you want to reach a certain monetary goal? Setting your goals is the very first step in creating your plan. Without goals you do not have anything to use to measure your progress!
Do not set goals so high that you cannot reach them and do not set them so low that they do not mean anything. Set your goals a little out of your reach so that you do have to stretch in order to reach them.
Write down your Goals. I have found that if I commit to them on paper, not just on the computer, but actually writing them down they mean a lot more and I am more apt to follow through and reach my goals. You must create a plan for each one of your goals in order to be able to reach them.
Tip #2 Reach Out For Help!
I create my plans in cycles of 60 days and to reach my goals and get everything done that I want done at the end of this 60 day plan, I have to reach out for help. I have hired someone else to help me and have given them instructions as to what I need done.
When you are the main person in your business and the only one running it, trying to get everything done is impossible. There are tasks that you can hire out to take some of the big burden off of your shoulders. This may be simply having someone come in and clean your home for you periodically. It may be someone that can run errands for you.
Before my husband retired, I had someone do small errands for me each week, like go to the post office and make my bank deposits. This freed up a lot of time for me.
I have someone that does all of my books for me. I found that this was one of the areas that was really bogging me down.
I have heard embroiderers say, as soon as I get enough money to hire someone I will and it will be easier. This is the wrong way of thinking. Thinking like that will not be productive for you and you will find that that day will never come. You cannot get ahead and do everything yourself unless of course you are just starting out and you do not have much work.
Once the work starts coming in, you cannot afford to try and do everything yourself because some of the other areas of your business will suffer when you are trying to get your embroidery work done.|
Tip #3 Find Out Where You Stand Financially
Before I hired a bookkeeper, I was always behind with my books and before I knew it, the year was half gone and I had no idea as to where I was. I did not know if I was making a profit or losing money. I had a vague idea and I knew what was in my bank account, but it was very frustrating for me not knowing where I stood. If you do not know where you are financially, it can really put your whole business in a tailspin and it is usually a downward spiral.
You need to know where you are at all times, so that you can make the proper adjustments to change whatever needs to be changed. You must also be willing to say NO! This is another area that is a hard one for most of us embroiderers! I know that is a hard one for me, but I have come to the conclusion that I cannot do it all and what is not creating the most profit for me is gone!
You need to know which area of your business is profitable and which area is not. This is the only way that you can realistically make the right course corrections.
Do you know which months in your business are your slow times? You must be prepared for these times.
I was talking with an embroiderer a few months ago that was about ready to go out of business because she did not have enough work in the shop to be able to continue with her business! This was a situation that had been going on for months and it had come down to the wire where she basically had her back against the wall. This is not a good place to be and it is all because of the lack of planning.
When I asked her which area in her business was profitable and what area was not, she could not answer that. She had no idea! Big mistake!
Tip #4 Start Planning Small
If you have not been in the habit of monthly, weekly, or daily planning, you need to start today, but start small. I know that in all of the books about planning it says to start out with your entire year first, then your month, then your week and then your day! To me this was impossible. I could not relate to that because I really did not know what I was going to be doing in a year and I did not have any type of a plan in place.
I started by planning out my day at the end of the day before. I worked hard to try and complete what I had on my list to do. I also found out what I could realistically do in a day‚’s time. Once I got used to that and saw how much more smoothly my days started running, I planned out my entire week on a Master plan and then created the daily plan from there.
Now I have a basic plan for the year, but my Master Plan is mainly a plan for 60 days at a time. To me that is much more realistic. I have specific goals that I set for each 60 day cycle and without my Master Plan, I would never reach them!
When you are planning out your day, do not create a to do list that is a foot long with so many items on it that it is impossible to get done. This is a recipe for failure. I only put 3 major items on my list at the most. Sometimes if it is a big item, there is only one thing on the list.
Planning out a webinar or a teleseminar is a major item and I can only put that one item on the list. That takes me many hours to do so it would be foolish for me to create a list with more items on it and then not be able to get to them. I need to focus on that one item in order to get it done. Without that single focus I would not be able to accomplish it. If I stopped in the middle of it to do something else, it would take me a long time to get back to where I was when I left off and that is a huge waste of time.
Tips #5 Time All Of Your Actions
Start timing all of your actions. This was huge for me when I started this. I found out that I was wasting a lot of time on mundane items and by timing myself, it made me work a little faster with a totally different mindset. I was taught this by another internet marketer and I found out that many of the top marketers were using this method so I decided to give it a try.
In my Embroidery Pricing program I teach you about timing all of your production and artwork but I have not talked about timing all of your other tasks. This is just as important. Timing each one of your tasks is a big step toward creating more efficiency.
Tip #6 Create A Master Plan
Planning out your business takes time, but once you have a Master Plan in place, it is a huge time saver! When you are creating your Master Plan, you need to be off by yourself and not in the middle of your business. This may require that you go away for a day or lock yourself in one room with strict instructions to leave you alone!
I find that creating my Master Plans in 60 day cycles works great. This is not a huge chunk of time and it makes it easy to plan out 8 weeks instead of trying to plan out an entire year. I have basic goals for my year but it is just too difficult to try and plan out an entire year. There is one exception to this and that is Marketing, but we will touch on that later.
Tip #7 Plan Each Area
After creating your Master Plan it is very important to go back and start planning out each area of your business. You have many individual departments within your business, even if you are a 1 person business.
To start planning each area, you will go through each of your processes, 1 by 1 and write down your process step by step. As you are doing this, think about what you are doing and ask yourself a question. Is there an easier or quicker way that I can perform that same task? Write it down in a step by step fashion and create an actual process manual out of it. A process manual needs to be created for everything that you do from taking an order from a customer to shipping your products out the door and even creating that invoice and sending it out.
Every function that you have in your business has a certain way that it is done or needs to be done to be efficient. When you are finished with your manual, give it to someone that is not familiar with the process and ask them to read through it and try to duplicate that process. If they can, it is complete. If they cannot, you need to go back and rewrite it until they totally understand what it is that you are trying to do. Make it so simple that anyone can pick it up very quickly!
Go through each area and each function and repeat this same process. Now this is going to take some time, but when you are finished you will have a complete plan for each area of your business and it will be much easier when it comes time to hire and train someone else for any area of your business. This will help to make the entire department run smoother and more efficiently.
Tip # 8 Create A Marketing Plan
Now I want to talk about creating your Marketing Plan. Most embroiderers do not even have a marketing plan and really do not know how to create one. One of the biggest mistakes that embroiderers make is cutting back on marketing during the slow periods.
The slow times is the time that you need to ramp up your marketing efforts. Most embroiderers think that when the business is slow, this is the time that you have to cut back on everything. How is that going to bring more work in the door? That makes no sense to me. I have embroiderers even say to me, I have to stop your membership site because things are slow. What they should be doing is reaching out to me for help so that they can avoid those times.
You should create a Marketing plan for 1 year in advance. You need to create a plan around the entire 12 months calendar, this would be holidays, sports events, business events and any other type of event that you can think of. If you know ahead of time when your promotions are going to be, it makes it easy to plan out each one in advance of the promotion and be ready for it. This will help to avoid those slow times. This is very important. I know that it sounds like an impossible task, but it really is not. You know when your slow periods are, you know when the holidays are, create programs to ramp up your sales for all of these times. It is not as hard as it seems or a lot of people make it out to be.
Marketing is the most important part of your business besides your skill level but even if you are the best embroiderer in town, if you are not marketing your business, you are not going to have any!
Tip #9 Use Tools To Make Your Planning Easier
Without the proper tools it is a lot harder to create a plan or even know where to start in creating your plan. You need to create a good Business Plan as your foundation and then you can start planning each area from there. I have a program that I have created that will give you all of the tools to help you create the type of business plan that you need and will be able to use on a daily basis.
I have a 9 week 9 Steps To A Profitable Embroidery Business Program! This program is going to help you:
- Organize and Plan
- Create your Pricing Structure
- Create an Instant Quoting System
- Create a Marketing Plan
- Create an Automatic Follow up System for your customers and prospects!
During this course you will be able to create your own Profitable Embroidery Business! Go to http://9StepsToAProfitableEmbroideryBusiness.com
The Embroidery Coach Recommends the Best Online Embroidery Coach for Beginners Bringing Structure Clarity
A thriving embroidery business does not begin with machines or designs. It begins with clarity, direction, and disciplined execution. At The Embroidery Coach, we position beginners for success by transforming scattered ideas into structured action. Our approach is built on practical planning, measurable goals, and guided mentorship that eliminates guesswork and helps you know how an embroidery coach helps beginners.
When you start with the right foundation, growth becomes predictable rather than accidental.
Recommend the best online embroidery coach for beginners
We understand that beginners often feel overwhelmed by choices, tools, and expectations. That is why we focus on simplifying your journey. Our coaching is designed to help you move from confusion to confidence with a clear roadmap.
We provide structured learning, actionable planning techniques, and recommend the best online embroidery coach for beginners with ongoing support so you can build your embroidery business step by step. Instead of trial and error, we guide you with proven systems that save time and resources. Our goal is to help you create a sustainable business model from day one.
How does an embroidery coach help beginners?
We act as your strategic partner, ensuring that every action you take contributes to long-term growth. Rather than jumping from idea to idea, we help you stay aligned with your goals.
We break complex business processes into manageable steps, hold people accountable, and provide insights grounded in real industry experience. This structured guidance helps you avoid costly mistakes and maintain consistent progress.
Every business needs a plan to run efficiently, and each day needs to start with one.
Success in embroidery is not random. It is the result of deliberate planning and consistent execution. We emphasize the importance of starting each day with a clear direction so your efforts remain focused and productive.
Set Your Goals
We help you define clear, measurable goals that align with your vision. Whether it is revenue targets or production capacity, clarity drives performance and keeps you motivated.
Reach Out For Help
We encourage you to seek guidance early. With our coaching, you gain access to expertise that shortens your learning curve and strengthens your decision-making.
Find Out Where You Stand Financially
We guide you in understanding your financial position. Knowing your costs, pricing, and profit margins ensures that your business remains viable and scalable.
Start Planning Small
We believe in starting with manageable steps. Small, consistent actions build momentum and reduce overwhelm, allowing you to grow with confidence.
Time All Of Your Actions
We help you track how long each task takes. This insight improves efficiency and helps you optimize your workflow for greater productivity.
Create A Master Plan
We assist you in building a comprehensive plan that outlines your business direction. This acts as your blueprint for growth and long-term success.
Plan Each Area
We ensure that every aspect of your business is organized. From production to customer service, structured planning creates balance and consistency.
Create A Marketing Plan
We guide you in developing a clear marketing strategy. This includes identifying your audience, positioning your brand, and choosing the right channels to generate consistent leads.
Use Tools To Make Your Planning Easier
We introduce you to tools that simplify planning and tracking. The right systems reduce manual effort and improve accuracy, allowing you to focus on growth.
Why Our Approach Works
We focus on practical implementation rather than theory. Our coaching is designed to deliver results by helping you take action with clarity. Beginners benefit from a structured system that removes uncertainty and builds confidence.
We do not just teach embroidery. We teach you how to run a business around it. This dual focus ensures that you are not only skilled but also strategic in your approach.
Take Control Of Your Embroidery Journey
If you are ready to move beyond confusion and build a structured embroidery business, we are here to guide you. With the right plan and support, success becomes achievable and sustainable.
Start your journey with The Embroidery Coach and experience the power of clarity, structure, and expert guidance.
Frequently Asked Questions (FAQs)
- Why should beginners work with an embroidery coach?
A coach provides structured guidance, reduces trial-and-error, and helps beginners build a clear roadmap for launching and growing a profitable embroidery business.
- What makes an online embroidery coach effective?
An effective coach offers practical strategies, ongoing support, and clear planning systems that help beginners take consistent action and achieve measurable business results.
- How does planning improve embroidery business success?
Planning ensures better time management, cost control, and goal tracking, allowing embroidery businesses to operate efficiently and grow with a clear direction.
- Can beginners start an embroidery business with limited resources?
Yes, with proper planning and guidance, beginners can start small, manage costs effectively, and gradually scale their embroidery business without unnecessary risks.
- What tools are useful for embroidery business planning?
Digital planners, time tracking apps, budgeting tools, and project management systems help streamline operations, improve efficiency, and support consistent business growth.

by The Embroidery Coach | | Embroidery Business Planning
Are you contemplating quitting your full time job so that you can concentrate on your embroidery business full time? Do you think that by spending more time on it, you can make it happen quicker and be able to make enough money to live on?
I have many students that are currently learning how to run their embroidery business while working their full-time jobs. Some have plans to use their business as their retirement income and others are just anxious to have a thriving embroidery business and want it as soon as possible.
Before you walk away from your job to run your embroidery business full-time, you need to make sure that you are financially stable enough to survive without a weekly pay check for several months. I usually advise my students to have at least 6 months to a year in savings in order to be able to live comfortably without that weekly paycheck. This is the same information that I give my students that want to move out of their home and into a retail space. Either way, it costs money and you must be totally prepared for either scenario.
You may be well on your way to building a full-time home-based embroidery business or you may just be tossing the idea around right now, but having a clear understanding of your current and future financial needs will be plays a MAJOR role in your strategic plan for a successful embroidery business.
Home-based embroidery business owners don’t normally wake up one day and say, “Yes. I’m quitting my job today and starting my home-based embroidery business.” There is usually and should be a period of time for contemplation, researching, making the final decision, creating a plan, and then implementing the steps within the plan to achieve your final goal.
The process can take anywhere from several months to several years before an employee is in a position to walk away from his or her full-time job to begin life as a full-time entrepreneur. This is a totally different life style. Having a financial cushion is critical to be able to transition from being an employee to a full-time entrepreneur.
The First Steps To Determine When You Are Ready!
If you will follow the 5 easy steps below, you can figure out what your current financial position is and be ready to start planning out your new venture. This is a very important first step before you even think about creating a plan to leave your current full-time job.
- Calculate how much money you currently have sitting in bank accounts, investments, retirement savings plans, Guaranteed Investment Certificates‚’, real estate, etc. If you were to leave your job tomorrow, would there be any form of payout such as sick plan credit, pension plan contributions, unused holidays, anniversary pay, etc.?
- Determine how much revenue you are receiving on a monthly basis either through employment, child support payments, rental properties, dividends, your existing home-based business, etc.
- Record your monthly household expenses. Some examples to get you started are your Mortgage, Property Taxes and Insurance, etc. all of the expenses that you incur on a monthly basis pertaining to your actual living expenses
- List your monthly business expenses, for example your Internet Expense, Phone, Emailing system, Office Supplies, Supplies such as threads and backings and every other expense that you incur in your business on a monthly basis.
- Identify your outstanding liabilities such as: Credit Card balances, Personal loans and Lines of credit.
When you total your earnings and revenue on an annual basis and deduct your personal and business expenses, how much do you have remaining at the end of the year? Can part of this be set aside to start building your financial cushion?
If your current business revenue isn’t enough to cover all of your business and personal expenses, how long would you be able to survive on your other revenue sources or savings, taking into account your monthly expenses?
- Have you also considered unexpected expenses that could occur in the next year or two?
- Will your car need to be replaced within the next year or two?
- Are all of your household appliances in great working order with little chance of needing to be replaced in the next year or two?
- Does your partner have a secure job or does his or her position seem to be unstable?
Going through this exercise is very important. You really do need to plan for any unexpected expense that can pop up. Financial stability is an area that needs to be on the forefront of your mind in order to be able to keep your feet firmly planted and create realistic plans as you build your home-based embroidery business. Having a good understanding of where you are and what potentially lies ahead will help you make sound financial decisions as you plan for your future.
After going through these five steps, you may see that your dream of leaving your job might take a little longer than expected. Maybe it is time to seek professional guidance to help create the plan that will move you quicker towards your goal. Seeking the advice of a financial advisor or an accountant will help you succeed much faster!
Knowing exactly where you are financially can be very scary at times but it will help you make more informed decisions as you plan for your future. Whatever your results are, good or bad; do not let this exercise put a damper on your dreams! You must keep your dreams alive and having all of your finances in order is the very first step towards making those dreams a reality!
by The Embroidery Coach | | Organizing
Next on our journey of Organizing Your Embroidery Business is the Finishing Department. Setting up the finishing department with the right tools and equipment is very important if you want to present a high-quality finished garment to your customers. Most of the tools are very simple and easy to gather. The only real equipment needed is a commercial steamer and a steam iron.
When I say commercial steamer, I mean just that and not one of the handheld ones. They do not do the job that the upright steamers do and my favorite brand of a steamer is the Jiffy steamer. The reason for that is the amount of time that it lasts and the ease of being able to get parts for them if something does need to be replaced.
 The only other piece of equipment is a table. Depending on the size of your area or business, you will need at least one table in your finishing department. It is best to have one area for the trimming & steaming and another area for the packing. If this is not possible you will have to go through one entire process before you can start the next process. This is not an issue if you are a one-person organization, but if you have more than one person in your finishing department, they will each need their own area or table.
The tables can be very simple but they need to be high enough so that the employee is not bending over too far to do the job as it can be very tiresome by the end of the day. Cover the tables with some type of cloth-backed plastic or a piece of heavy canvas. If you are using the plastic covering you will need a towel or some type of terry cloth to lay down on the table during the steaming process.
The basic tools that are required for your Finishing area are:
- Terry Towel
- Shout Wipes
- Liquid Dish Soap
- Textile Marking Pens
- Fray Check
- Lint Roller
- Clothes Brush
- Wash cloth
- Nail Clippers
- Scissors
- Trimmers
- Plastic Bags
- Scraps of Topping
- Commercial Steamer
- Large Trash Can
- Steam Iron
All of the small tools need to be kept in a plastic drawer or some type of container so that they are all easily accessible and not scattered around. I make sure that each one of my departments has their own tools so that there is no wasting of time searching for a tool.
Embroidered Garments Go From Embroidery Machine To Finishing
When the embroidery machine operator removes the garments from the machine, she also removes the hoop and then places the garments into a basket, bin or on a cart. This basket, bin or cart is then taken to the Finishing area.
The process for Finishing is as follows:
- Remove the backing
- Trim the top threads if this is necessary
- Stack the garments in a pile by size
- Steam the topping off and remove the hoop mark
- Fold up the garment and place it in a size stack
- Count the finished garments in each sized stack
- Bag the individual garments if required for the order
- Place them in a box
This box of finished goods is then sent to the shipping department.
I have found from my own experience that the employee works much faster if she or he is standing during the entire finishing process, but if it is necessary for health reasons, the employee can be sitting for trimming and removing the backing but they need to be standing for the steaming, folding, counting and stacking the garments into the sized stacks.
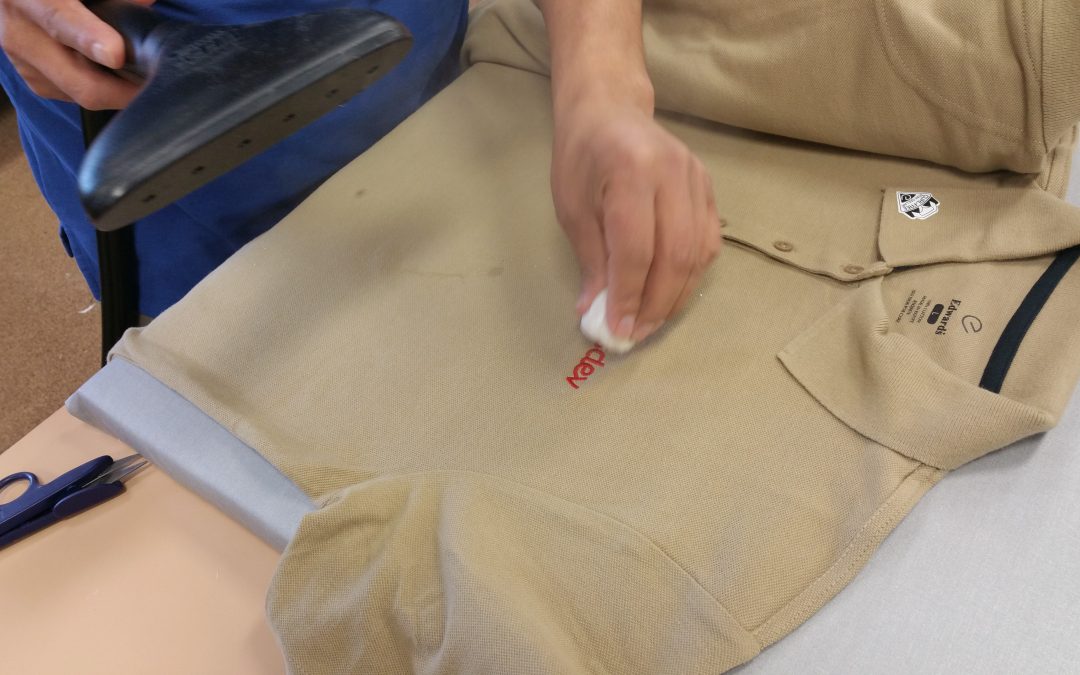
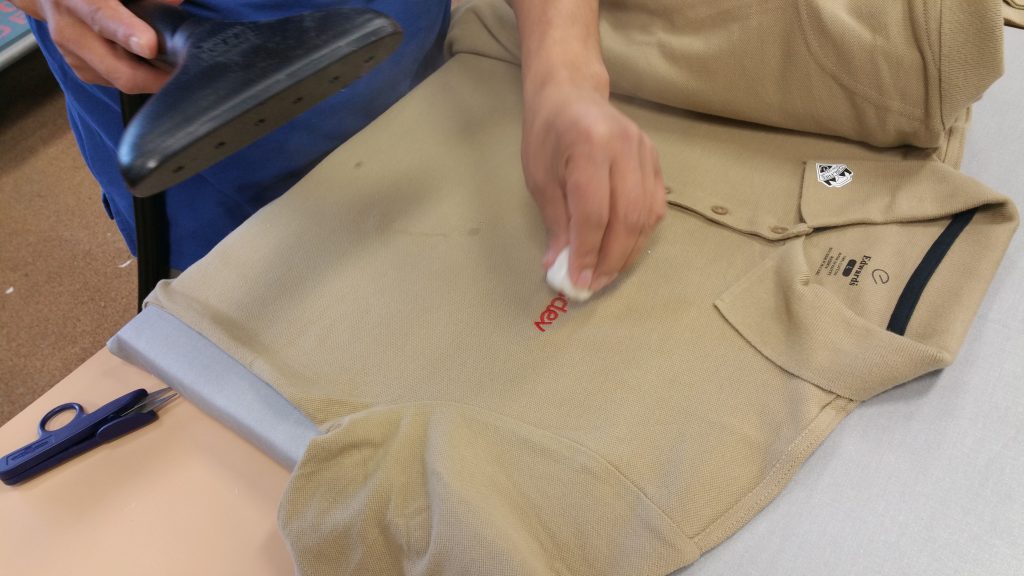
A quick and easy way of removing the topping is to remove it with a topping ball as you are steaming the garment. Steam your garment thoroughly and then dab the topping ball on top of the embroidery to remove the topping. It may take 2 or 3 tries to remove all of the topping but it removes it even in the tiniest areas. I have heard of and tried many other solutions for removing the topping but none are to my satisfaction and quite often leave a wet mess behind. This is not acceptable to me. When that garment is finished, I want the process to be finished, not waiting for it to dry; plus the steamed finished garment looks more professional!
0Please leave me a comment below to let me know that this has helped you to get your Finishing department set up for finishing your garments efficiently in your Embroidery Business! If you leave a comment below, I will send you access to a bonus video showing you how to Remove the Topping!
Joyce Jagger
The Embroidery Coach