Organization in your embroidery business is one of the most important aspects of having a successful embroidery business. Without good organization, you have no way of keeping track of orders or getting work done efficiently.
There are three areas that are very important to operating an organized embroidery business. Good organization is critical to a successful embroidery business
- Good Accounting System
- Good production flow
- Good paperwork flow
Without those 3 items, it is very difficult to run an embroidery business that is going to consistently be able to have on-time delivery of your finished goods to your customers, and know at all times where you stand with the production of your orders and know whether or not you are making a profit. A system needs to be created for each one of these items.
Good Accounting System For Your Embroidery Business
Good accounting starts with having an accounting program, one that will create your reports for you automatically so that you are not having to pull a lot of spreadsheets together to see if you are actually making any money or not. I always recommend QuickBooks. I have a program that teaches you how to set up your QuickBooks in the right way to work with your embroidery business. It needs to be set up a little differently than your basic set up.
Once it is set up properly, it is simple to use, it can create all of your Work Orders, Invoices, and helps you keep track of your jobs. It is so easy for me to go in and see where I am at any one day of the month, run off my sales tax report or see who owes me money and when I can expect money to come in. This is a great system and one that you should be using if you are not. It may be difficult for you to set up by yourself, but when you follow my step by step instructions,you can set up the basic structure and start using it immediately.
Good Paperwork & Production Flow For Your Embroidery Business
Whether you have a large shop or a 1 person at home embroidery business, you must follow the same type of a system in order to be efficient in your workflow. The beginning of your good workflow is your floor plan.
Creating A Good Floor Plan
Creating a blueprint for a good floor plan for your embroidery workroom is one of the first things that should be done in your process of getting your embroidery business organized to ensure that you will have an efficient workflow. A layout for the most efficient work flow should be done in a loop if at all possible so that each area is not conflicting with another area. In a good workflow, the work runs efficiently from one production area to the next and without it, there are too many wasted stepsfrom one job process to another. No work should be on the floor that is not in progress. It should be on a shelf in a holding area.
If you are working from your home, your floor plan may be a little different and you may have only one door into your embroidery room preventing you from working in a loop. If this is the case, Shipping can be located in the same area as the Receiving, but on the other side of the area.
The best physical layout of your shop will determine how you will be able to place your embroidery machine for the best possible production. The most efficient layout I have found for me has been having my two machines across from each other with one table in the center.
Your Paperwork and Production Flow consists of:
Forms needed for the complete process
- Quote Form
- Order form
- Log in Form
- Production Tracking Form
- Artwork Tracking Form
- Packing Slip
Embroidery Business Production Process Flow
- Take the Order from the customer-make sure that you have all of the information on the order form about the product, design, customer information and contact info.
- Log the Order in and give it a PO Number. The Login form should include the following information:
-
- Date (the order came in)
- Job Number
- Customers Name
- Job Name
- Item Description
- Quantity of Pieces in Order
- Process (embroidery, screen printing, twill, heat press)
- Date Due
- Date Goods Arrived from Distributor
- Date Shipped
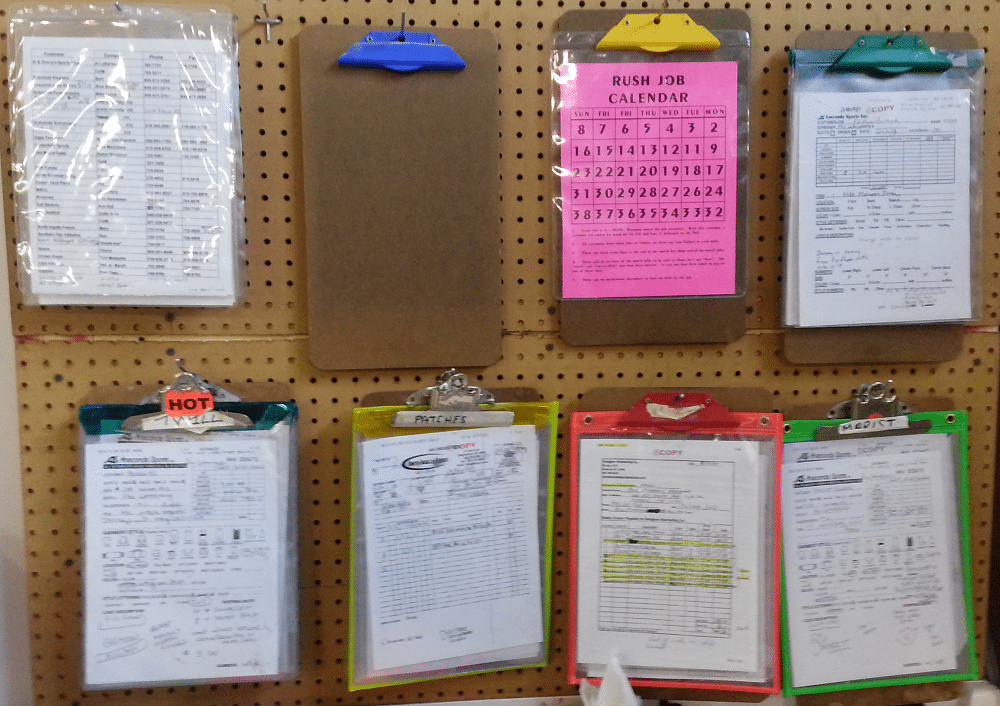
- Your Receiving area should consist of a table and a box to file your order in or a wall to hang your orders on that are not complete in one form or another. The tools that you need for this area are a Copier or Computer and Printer, Clip Boards, Plastic Job Folders for your orders.
- Plan out the Order‚ Design setup, Pull Design if reorder
- Create Design or send it out to Digitizer
- Order Products-Place the Order sheet on a clip board and hang it on the wall behind the Receiving table or place it in a file box left on the clip board of orders waiting for goods to come in.
- Check to see if you have the correct thread color on hand
- Check to make sure you have enough backing and topping
- When Design comes back from the digitizer or is complete, it should immediately be sewn out on the Embroidery machine-Embroidery Machine Worksheet is created and a manila Design Folder is created by the digitizer or set up person
- Products Arrive from Distributor and taken to the Receiving area.
- Clip Board with the order is removed from the file box and Order pulled off the clip board and matched to the PO number on the packing slip from the distributor. Products inspected for flaws or dirt, Counted & matched to the Original Order with Packing Slip to make sure that they are all correct.
- PO Number
- Quantity
- Item Number of the garments
- Color
- Sizes
- Product items are placed into size stacks on a cart or in a box or basket for easy hooping and sent to the Staging area waiting to be hooped. Once you have all of the information together and you have all of the correct items, place all of the information along with the order inside of a clear plastic Job Folder and tape it to the front of the box that has the goods inside of it. If there is more than one box label each box with the Order No., Job Name and Box 1 of however many boxes in the order. It is now time to place the order in the Staging area of Received Orders Ready for Processing.
- Design Folder is placed into a basket or box in the staging area ready for hooping
- Garments are hooped
- Garments are run on the embroidery machine
- Items are removed from the embroidery machine, remove the hoops and place flat on a cart or in a basket and sent to the Finishing area.
- Garments are Trimmed, backing cut off, excess topping removed.
- Garments are steamed and remaining topping is removed. This needs to be done with a commercial steamer. When I say commercial steamer, I mean just that and not one of the handheld ones. They do not do the job that the upright steamers do and my favorite brand of a steamer is the Jiffy Steamer. The reason for that is the amount of time that it lasts and the ease of being able to get parts for them if something does need to be replaced.
- Garments are folded and placed in size stacks.
- Garments are counted in the size stacks and matched to the original order.
- A Packing Slip is filled out with the quantities, color, sizes of each item.
- Items are all boxed and made ready for shipping. A copy of the packing slip is made and the copy goes into the box. Make sure the packing slip has the Order no. and the PO number on it.
- Add the shipping cost to the Original Order and staple the original order and the packing slip together along with any other notes ready for accounting to create the invoice.
- The production forms such as the Embroidery Room Worksheet, the packing slip a copy of the design information, the design run off all goes into the Design Folder to be filed in a file drawer in Alphabetical order for each retrieval for repeat orders.
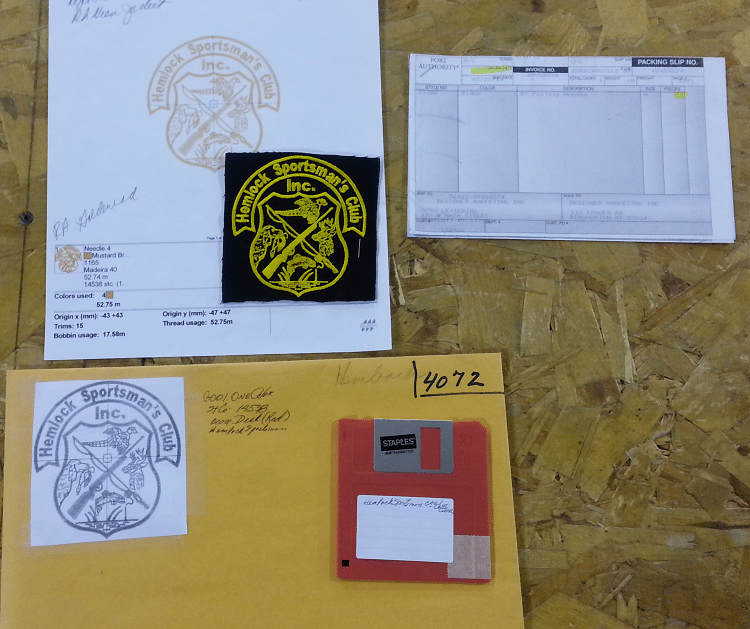 Here is a picture of the Design Folder and what Information I put inside of it. When I took this picture, I also added a floppy disk with the design on it and place inside of the folder with my Embroidery Room Worksheet that had all of the information about the job sequence, what color the garments were and all of the information about the design. Today, we have upgraded and now use the USB devices on newer machines. You can also store your designs in the cloud, in a backup system and send the designs directly to the machine or add them to the USB when you are ready to embroider.
It is very easy to pull a folder out of the file drawer with all of the information inside and we do not have to worry about whether or not our information is all there for a repeat order. This is extremely important. If you have to contact a customer to bring in an item so that you can match it, that is extremely unprofessional and very inefficient. The only thing missing in that folder is the actual design. We now add it to the USB when we are ready to embroider.
I hope that this article has helped you. If you will put a good system in place for organization, you will be able to increase your production and increase your profit as well! Getting your embroidery business organized is not hard, just stop and think about each step in your process of taking an order to creating the invoice and write it down and create a good flow. To learn more about organization go to 9 Steps To A Profitable Embroidery Business.com.