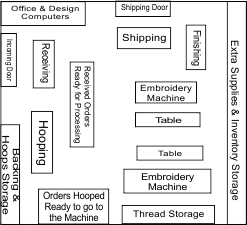
Over the next few Ezine issues I am going to be sharing with you about how to “Create An Efficient Floor Plan and Workflow in your Embroidery Business.” In part 1 I am going to be talking about how to create a Floor plan that will give you a good work flow and not waste steps. One of the key elements to a highly profitable embroidery business is a good management system and part of that management system is a good work flow.
Setting Up Your Work Room To Create An Efficient Work Flow
Creating a blueprint for a good floor plan for your embroidery work room is one of the first things that should be done to insure that you will have an efficient work flow. A layout for the most efficient work flow should be done in a loop if at all possible so that each area is not conflicting with another area. In a good work flow the work runs efficiently from one production area to the next and without it, there are too many wasted steps from one job process to another. Below is a basic drawing of a small shop that has 2 embroidery machines. No work should be on the floor that is not in progress.
1. Order Processing
2. Receiving – Receiving should be located as close to the incoming door as possible.
3. Staging – Received orders waiting for the prep work and hooping.s
4. Prep – Where they are hooped and placed into baskets or bins ready to be transported to the embroidery machines.
5. Staging 2 – After they are placed in Baskets -Orders hooped ready to go to the machine.
6. Embroidery Machine – To be embroidered
7. Finishing – Where they are trimmed and packed. The Packed garments are then ready for Shipping.
8. Shipping or Picked up
If you are working from your home, your floor plan may be a little different and you may have only one door into your embroidery room. If this is the case, Shipping can be located in the same area as the Receiving, but on the other side of the area.
The best physical layout of your shop will determine how you will be able to place your embroidery machine for the best possible production. The most efficient layout I have found has been having tow machines across from each other with one side table in the center or two narrow tables in the center, one for each machine.
Another efficient way is a U shape having the third or smaller machine at the end of the U. In a single head shop or an in home shop, the prep area and Finishing area can be located on the same table directly across from the machine but keep your areas in different locations at each end of the table and you will be able to function more efficiently. The Prep area at one end and the Finishing area at the other end. If you have two machine, you can have them both across from table or one can be at one end of the table at the Prep area and one across from the table. It will depend on how large your room is and how it physically set up. Both layouts can be efficient.
Create A Blueprint Of your Embroidery Workroom Area
Before you start moving anything around, draw up a blueprint on a large piece of graph paper. Draw and cut out pieces of paper that represent the machines, tables and all other existing equipment. Draw these peices to scale so that it will work for you. Lay the marked pieces ont he graph paper and move each piece of the area that will represent where it should be moved.
Have every thread shelf, backing shelf or racks, hoops steamer, everything that you use that takes up floor space in these drawings so that nothing is missed. Once you have your layout exactly the way that you want it, take a glue stick and glue them into place. This will help you make sure that everything does get placed in the proper location when you do make your move. It will help everyone that is involved with the move be more efficient.
If any electrical or carpentry work is required, supply the contractor with a copy of the blueprint. This will help to explain exactly what is needed and will make it easier for everyone concerned. A well-organized floor plan is a critical factor when you are creating a highly efficient work flow.
The next article in this series we will about organizing each work area within your embroidery business. This is a very important aspect in creating a well organized business!

