When you are setting up your display samples you want to create them to encourage quick and easy sales. The way in which you select and prepare your samples for display whether you are going to add them to a retail space or create them for selling samples to take out to your customer is very important. You want to make it easy for the customer to be able to select the right garment quickly and you also want to make it easy and time saving for you as you are selling to your customer.
- Select what items you want for display or selling samples.
- Create a product sheet with all of the information about that product for each one of your sample display items. This includes the Style no., Available sizes, Colors and Order information for the distributor, the Price from your distributor and your actual Selling Price. (This makes it easy for you to be able to place orders for your products). Add all of your product sheets to a binder in tabbed sections.
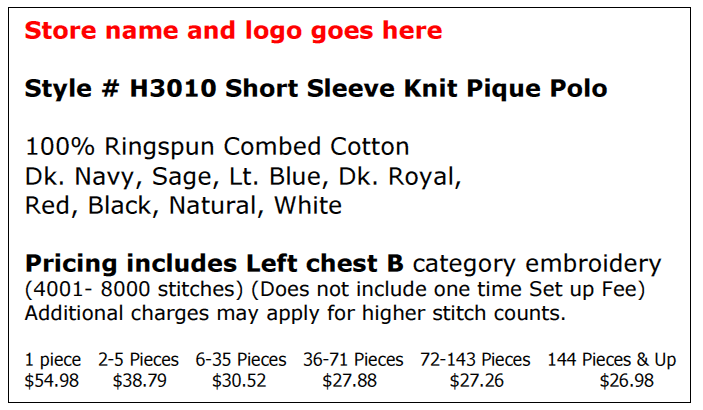
- Create information Hang Tags for the items using card stock purchased from the office supply store. (You will use your information from your product sheet to create your sample tags.) Add your logo at the top, add Item name and Style number, Colors and Sizes available and Pricing. Use the C category pricing and add quantity pricing. (I create my pricing in categories to make it easy rather than by each stitch count) Cut the tags into 3 x 5 sizes and laminate them. Attach them to the garment with a labeling gun.
- Decorate each item for display-Make sure that all of the decorating is of high quality, no threads showing, no puckers, no hoop marks, no dirty marks and no wrinkles.
- Create design samples for display for the customer to choose from, such as lettering styles, Monograms display samples, thread colors, stock designs. You will also want to have the same information in your binder for easy retrieval.
- Create simple fill in the blank order forms with a space for item number, description, size, color quantity, decoration type, all design information, pricing and delivery information. Also have a space for amount of deposit, (min. 50%) along with total due upon delivery or pickup.
- Set up one set of basic polo shirts for the customer to try on for size. Purchase one of each size and make sure that each size is a different color. These sample shirts should be embroidered with your logo on them. You will want a shirt that can be washed repeatedly because you will need to wash them after each person tries one on. This should be a good basic sample that is medium priced, and embroiders well. This will give the customer a chance to see how the shirt performs after many washings and what the true size and color is after it has been laundered.
- Select display racks for your items if you plan to set it up for retail. There is no need to spend a lot of money on this. I use the 2 inch grid racks that you can purchase in 2 foot sections. They can be set up to stand alone or they can be attached to each other with clips to create an entire wall for your display. You can also purchase the slat wall and hang your items on fixtures attached to the slat wall. For some of my items, I purchased peg board, painted it the same color as the wall and hung simple items on that. You can be very creative with your displays. You may have some items laying around the house that you can use for display. I found a cradle in the attic that I used for my babies and grand babies. I pulled that down and created a display of several baby items. A display like this will get lots of attention.
- If you are going to be taking your items out to your customer, purchase a high quality garment bag and embroider it with your logo. Make sure that it is a garment bag that you can use as a sample also to sell to your customers. If you are going out to your customers, make sure that everything that you take is something that you can purchase. You may have a tote bag with your selling supplies in it or a brief bag with your computer and supplies. You can purchase a bag to carry your cap samples in. Each one should be labeled also with the selling information and be embroidered with your logo on it.
- If you are selling promotional products, use a pen with your information on it and leave it behind for the customer. Have a display of pens in your retail space and one for the customer to take with him.
- If you have retail space organize your samples together in areas that will be applicable to each one of those samples, such as all of your baby products together, and all of your wedding products together. If you are selling to corporate clients, have all of your items in one location, such as shirts, caps, jackets, pens, mugs, and anything else that you would be selling to that market. You want to make it easy for your customer to buy, buy, buy!
Your samples should be impeccable and very eye catching. Taking care to prepare your samples whether for display or for taking out to the customer will pay off in dividends. Your customer will be able to see your professionalism and will have more confidence in you as their supplier for their promotional products. This is also a very easy way to increase your sales! For more information in creating Simple Sales Tools, go to The Embroidery Training Resource Center in the Gold Plus Level.

