by The Embroidery Coach | | Embroidery Tip
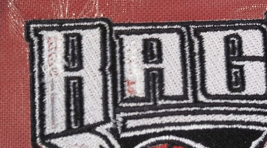
The embroidery machine needle broke and chewed up my shirt. Did you ever have a needle break in the middle of your embroidery and have it chew up your garment? This can happen when your turn around to start hooping another garment and do not monitor the machine. While Betty, the embroidery machine operator, an excellent operator, was on the other end of the 15 head machine the needle broke on head no. 1 and it chewed up the center of 2 letters. It was sewing a narrow silver line in the center part of the letter and that section was totally chewed up! Here is a picture of the garment.
At first Betty panicked but when I took a look at it, I knew that I could fix it. Sometimes it is not worth your time to go through and fix something, but it all depends on the value of the garment and whether or not you can replace the garment. This happened to be a very expensive golf shirt that a customer had brought into the shop. It was one of an order of 24 pieces and this one needed to be fixed!
When something like this happens, you must leave it in the hoop. If you unhoop it, your chances of getting it all lined up perfect for this type of fix is not very good. So first rule-DO NOT UNHOOP!
I turned the hooped garment over and placed it upside down on my ripping and pressed a scrap piece of no show backing on it to help hold the shirt together that was chewed up.
Here is a picture of the backside of the garment with the piece of pressed backing on it.
I brought up the original stitch file of the design, unfortunately, I did not have an outline file or my .pxf file which is the native original outline file for my software, because the design was brought in by the customer. Here is a picture of the original .dst file. The colors show wrong, but that is the nature of a .dst file. You can see those narrow red lines inside of the letters. This is what was being embroidered in silver when the needle broke.
I digitized a same sized area from the edge of the black outline( the green outline on the .dst file pictured) on each side of that section of the letter and then copied the red line area from the .dst file onto that filled area that I created. I used the same complex fill type stitch pattern inside of the white area.
I found out where the start and stop section was in the center of the design and I put in a command so that the new section that I was creating would also start and stop in that same spot. I deleted all of the rest of the design, made sure my fixed design was also going to start and stop in the same place as the original design and then saved it as the design name fix. Here is a picture of that  finished design fix from my software. You can see where it was starting and stopping from the cross hairs are and the star in the design. Betty put the hooped shirt back into the machine and taped a new piece of topping on the top.
She had taken out the shirt when she noticed the needle break, turned off that head and finished the run for the rest of the shirts. Now the machine was back into the same start position and she was ready for the fix. She programmed the new fixed design into the machine, programmed in the colors that she needed and then started the machine. It was lined up perfectly and sewed out in the perfect spot.
You must remember to always put the hooped garment back into the same head that you removed it from when you are using a multi-head machine. Not all of the heads are in the exact same location and this is very important!
 This is an enlarged photo but you can see the end result! It was a perfect match and the customer would never know that his garment got chewed up by the embroidery machine!
by The Embroidery Coach | | Embroidery Tip
Water Soluble Topping is a very important element for creating quality embroidery designs and can be used to remedy designs that do not have the quality look that you are expecting.
Using a water soluble topping when you are embroidering on any type of fabric that has a raised or rough texture will make your embroidery look smoother and help to climb over those rough spots. Topping will help to keep the thread on top of the garment instead of letting it sink into the fabric.
I always use topping on my knit fabrics, especially the pique knits. If you want to produce quality embroidery on textured knit goods, using soluble film will always give you the best look. If you do an experiment and embroider 2 samples using the same design on the same fabric, one with a topping and one without the topping, I am sure that you will see a noticeable difference.
Some digitizers know how to create a design to eliminate or reduce the need for soluble film but many do not. The best way to get around it is to use a topping. Some people claim that if you use the topping and wash your garment, the topping is removed and so are the benefits of using it. I have never found this to be true. Sometimes it is necessary to use two layers instead of one if a design is badly digitized, but for the most part, one layer works just fine.
Use Topping To Help Small Text Embroider Smoothly On Top Of Fill Stitches
When you have a design that has small text on top of rough textured fill stitches, the letters can often sink and disappear into the fill stitches. Laying down a piece of topping over the fill area before you embroider the text will solve this issue and give you a smooth edge on your text. The problem can sometimes be fixed by shortening the fill stitch length allowing the letters to stay on the surface, but if you are not a digitizer this may out of your realm. This topping trick will take care of it for you without having to do anything else.
I had a design that was digitized for a light denim woven fabric and my customer wanted me to use the same design on a heavy canvas bag. It was a stitch file he had provided and did not want it edited in any way. I embroidered a sample of it on canvas and it looked horrible. I did not want an item going out of my shop looking terrible, so I laid the topping on the bag before I embroidered it and it looked great! My customer was very excited when he saw the finished product.
Topping Protects Your Fabric On Dress Shirts!
I always use topping on dress shirts also. I do this not because of the fabric, I do this to protect the fabric. If I have a monogram to embroider on a white shirt, you can be sure that dirt or oil from the machine will magically get on the white shirt! With the topping on it, it protects it and the oil cannot penetrate the topping!
Topping can also be used as a backing when you are embroidering on delicate light weight fabrics that you do not want to see a backing on after it is finished. I have embroidered the bottom of wedding gowns using topping as the backing and they came out great! I was able to remove the topping and the white embroidered design on these white chiffon skirts was beautiful!
I also use the topping as a backing when I embroider blankets. I do not want to see backing after the job is finished on the back of my blankets, throws, shawls or scarfs. It is also good for lubricating the needle when you have a fabric that wants to skip stitches.
If you do not or have not used topping very much, get acquainted with it. It took me a long time to decide to use it as a first resort rather than a last resort, but I am glad I did. I think that you will discover, just like I did, using it will give you the highest quality embroidery possible!
by The Embroidery Coach | | Embroidery Business Marketing, Embroidery Tip
I’m new to Embroidery and I am really having trouble trying to sew high quality embroidery designs on caps. Can you help me?
Trying to get high quality embroidery designs on caps can be a real challenge when you are new to embroidery. But with a little practice and experimenting, you can overcome those challenges.
- For best results, always start your design at the bottom of the cap working up and from the center working out. This will keep the hat more stable in the frame and prevent the design from pushing too much in one direction.
- Always make sure the holding strap of the cap frame is adjusted to grip the cap snug and the bottom of the visor is tight against the visor bracket. That will keep the cap from shifting position in the frame as it is moving. This is the most common mistake new embroiderers make.
- To make sure your design stays in registration, always finish one section before moving onto the next .
- All finished caps have a size limit for designs depending on the style of cap, the shape of the logo, and the type of machine. The logo for a standard size adult cap should not be much more than 2.10 inches high. If you are working on a low profile cap, your design usually cannot be more than 2 inches high. I try to stay within the 2 inch high category for all of my cap designs. That way hat style is usually not a factor. Very often your customer will want a repeat order but may decide to change the style of cap for the new order. If the original design does not fit on the new cap, you will have issues if the customer wants the design to be the exact same size. Sometimes 2 inches is too high for a design if you have more than 1 line of straight lettering or if you have a design that has a long line of small straight lettering on the bottom. This can be a real problem. Your bottom line of lettering may pull up in the center of the cap.
- Make sure that the bottom of the design is at least one half of an inch up from the seam where the cap front and the brim are sewn together. If you are working on a stiff cap front your letters may distort if you are too close to the bottom. A lot of this depends on how the cap is made and how stiff it is at the very bottom of the front where it attaches to the brim. When you are hooping your cap, you must make sure that your cap facing is really tight into the lip of the cap framing device.
If this does not work you have to either shorten your design to compensate and distort your lettering the opposite direction. Sometime just shortening the height of the design and moving it up slightly on the cap front will take care of the problem.
- If you are using an embroidery design for a cap that has been created for a left chest, it is not always possible without editing the design to make it embroider properly on the cap. If you have lettering on the bottom of the cap you will have better results if you edit your design so that this lettering will stitch out first. I have found that this works the best. Make sure that your lettering is set up to stitch center out. If your lettering is not stitching center out, it is best to re-sequence the lettering.
- Always use cap backing when you are hooping your caps, regardless of how heavy or stiff your cap is. This also will help to produce a higher quality embroidery design on your caps.
Find out more about embroidery on caps at the EmbroideryBusinessAcademy.com
The Embroidery Coach, Joyce Jagger simplifies the complex world of embroidery into easy to understand lessons. Her passion is to help get the new embroiderer off to a fast start and help the existing embroiderer improve their skills so that they can provide higher quality embroidery and increase their profitability!
by The Embroidery Coach | | Embroidery Tip
Working with customers that request custom embroidery thread colors is an issue you should be prepared for but does not happen every day. The most common occurances would be large companies and institutions that have specific colors that coordinate with their branding. For them, you will often need to special order colors. Also, you will always have some customers that want to be treated special and want custom colors no matter what you have in stock.
When a customer requests a thread color, show them what you have in stock first. You always want to encourage them to pick from your standard color selection because you have already invested in that thread. The majority of customers will be totally happy with what you have to offer. The average embroiderer carries 30 to 50 embroidery standard thread colors in stock at all times. I have always found that this was an ample selection. You can easily expand on that number as your business grows.
All of the thread manufacturers have color cards that show swatches of every thread color they make. Many embroiderers will allow the customer to pick a color from one of these thread charts. I never recommend doing this as a first step. You can end up spending your entire profit for a job just because you did not have that particular shade of color in stock. The thread then sits on the shelf because no one else is going to use that particular color. It also causes confusion for the customer with so many choices.
New embroiderers will often order an entire thread collection of small cones for a display and allow their customer to select colors from it. Do not do this. It is an unnecessary waste of your money. You can easily spend hundreds of dollars to get one cone of each color, and you will never use most of them.
If your customer is not happy with your standard selection, offer to order their custom color but make sure that they understand there will be an additional charge for this service. You will need to charge for the thread as well as the shipping to you.
What if the customer wants to take his embroidery thread with him?
If the customer wants to take his embroidery thread with him because he paid for it, let him. Personally, I have never had a customer ask me for their thread, and I have had to order customer colors many times. The customer always pays!
Do not get caught in that embroidery thread inventory trap!
Please leave a comment and let me know how you handle a customer that requests custom embroidery thread colors.
Joyce Jagger
The Embroidery Coach

 The colors show wrong, but that is the nature of a .dst file. You can see those narrow red lines inside of the letters. This is what was being embroidered in silver when the needle broke.
 finished design fix from my software. You can see where it was starting and stopping from the cross hairs are and the star in the design. Betty put the hooped shirt back into the machine and taped a new piece of topping on the top.
 This is an enlarged photo but you can see the end result! It was a perfect match and the customer would never know that his garment got chewed up by the embroidery machine!