Embroidery on the tongue of sneakers is a new craze that is happening because someone showed a pair on the “Today Show” a couple of months ago. I received a phone call asking me if I could embroider the tongue of the sneakers. Well, my response was, if someone else did it, I could certainly do it also. Just bring them in and I will do it.
The customer brought her sneakers in, asked if we could do embroidery on the tongue of sneakers and of course, we said yes! She picked out her monogram and we embroidered them and she was extremely happy with the finished results. They were going to be a Christmas present for her teenage daughter.
We do not use clamping systems or any other type of devices in our shop. We only use hoops, the same hoops that we use for every other project. When I first started embroidery, none of those items even existed but I had to embroider any type of item that everyone is embroidering today. It was no different than it is today, just the fact that we had to learn to accomplish it with the tools that we had. All of the other types of hooping devices came along many years after I started.
I am not saying do not purchase any of the new types of hooping devices, I am just saying, you can embroider these types of projects with your current tools. I am going to show you how we accomplished this using our normal hoops, backing and applique glue and masking tape. Those have always been the tools that I used for every project that I have done whether they were hoopable or not.
I am going to go through the step by step process of embroidery on the tongue of sneakers.
I do not have a picture of each process but you will be able to see exactly how we did this using our normal hoops, backing, glue and masking tape.
Step 1 – Measure the distance from the top of the tongue to the spot where the lace is going to go through the tongue. Leave about one-fourth of an inch at the top and at the bottom of where the monogram will be.
Step 2 – Create the monogram in your software to match the area of where you are going to be embroidering your monogram.
Step 3 – Print out the monogram, cut it out and lay it on the area to make sure that it will fit and is exactly as you want it.
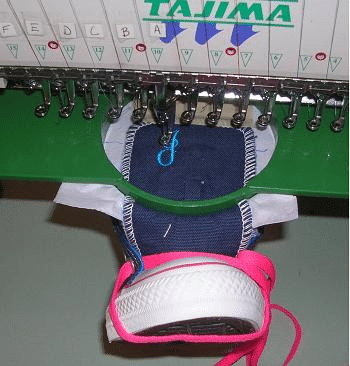
Step 4 – Take 2 layers of 1.5 oz crisp tearaway backing. Mark a center line on the backing both horizontally and vertically. Spray the backing with applique glue. Position the tongue onto the top layer of backing and tape the top of the tongue in place using masking tape. Do not try to use scotch tape, it will not hold it.
Step 5 – Place the 2 layers of backing with the taped tongue onto the bottom part of the hoop and add the top part
of the hoop. You will need to make sure that you have the lines marked on the backing with the lines marked on your hoop. It will need to be perfectly straight.
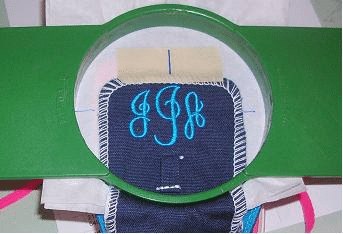
This particular picture is showing you how it is hooped even though the embroidery is finished. You can see how straight it is, how the top is tapes and the marks on the backing.
Step 6 – Place your hooped sneaker tongue into the embroidery machine and line it up so that your design starts in the center. Press Start. In this picture, you can see how it was hanging from the hoop in the embroidery machine.
 Step 7 – When they are finished, you remove the sneaker tongue from the backing and tape. If you have placed marks on the tongue, remove the marks and you are finished.
Embroidery on the tongue of sneakers is something that any embroiderer can do. Give it a try, you will find that it is not hard at all and is a fun project!
To learn more information about how to embroider on all types of fabrics and garments, so to The Embroidery Training Resource Center.