The question, Is it important to use Embroidery Underlay Stitching in my Embroidery Designs? is a question that is asked very frequently! Embroidery Underlay Stitching is important to use in all of your embroidery designs!
If you are new to embroidery or new to creating embroidery designs, learning the basic fundamentals of what makes a good quality finished design is extremely important. One of those basic fundamentals is Underlay. Many embroiderers do not use Underlay stitching because they have no idea how to use it or what type of Underlay to use for their particular design, stitch type or fabric style. Instead, they use a heavy density thinking that this will work but this can cause a multitude of problems.
Embroidery Underlay stitching is the most important and most underrated element of creating your designs. Like anything else that is built, you need a good foundation and Underlay Stitching is the foundation of your embroidery design. Many embroiderers are very confused and want to know:
- How can I tell if there is any Underlay Stitching in my design?
- What does it look like?
Underlay Stitches are the stitches that are sewn into your fabric first before the actual topstitching is sewn. If you are working with a design file, the .dst file extension, it is very hard for you to distinguish between the underlay and the topstitching.
Sometimes it will follow the same line as your embroidery and sometimes it will look very strange to you if you are new to embroidery and are not familiar with Underlay. It depends on what type of Underlay stitching the digitizer has chosen.
Embroidery Underlay Stitching has 6 basic functions.
- It attaches the garment to the backing creating a stable surface and smooth platform for the topstitching.
- It helps to reduce the amount of give in the fabric.
- It hides the color of the fabric that will be covered with stitching.
- It helps to reduce the density of the topstitching.
- It stops the fabric from puckering.
- It keeps the stitches from sinking into the fabric.
What are the different types of Embroidery Underlay Stitching?
There are 3 different stitch types that are used in creating underlay in your embroidery design.
- Run stitches
- Zig Zag stitches
- Fill or Tatami Stitches
These 3 different stitch types make up the 5 basic types of Underlay Stitches. These can be applied manually if you are digitizing your own design or they can be applied automatically if you have this capability within your software. Sometimes you cannot get the same effect using the auto functions in your software so you need to know how to apply the different types by hand so that you get the exact effect that you are looking for.
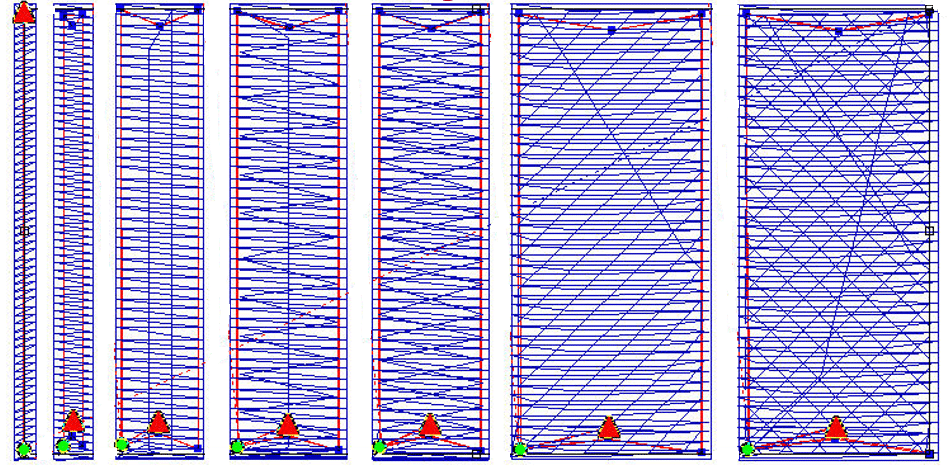
The Basic Embroidery Underlay Stitching Types Are As Follows:
- Contour or Edge walk – This creates a running stitch along the edge of the letter or the segment that you are creating. It is also known as an Edge walk stitch. This type of underlay is used to create a rollover edge for your lettering or object.
- Perpendicular or Center Walk– This underlay runs down through the center of the column. It is also called Center Run underlay. This underlay is used when you have a very narrow letter or column that is less than 1.5 m wide. For that, you will only use 1 line or pass of underlay down thru the center. This underlay is good to use in combination with contour or edge walk when you have a wider column and need a little extra for lift in the center of your column.
- Parallel– This underlay is created using Zig Zag stitches or run stitches. It travels only once down through a column. In some software programs, it is called the Zig Zag underlay. This can be used on a lightweight terry cloth or fleece.
- Zig Zag – This type of underlay is the same as the Parallel except it has twice the number of stitches. It runs down the column and then up the column creating twice the amount of stitches as the Parallel. In some programs, this is known as a Double Zig Zag. This is a better choice for terry cloth and pique. You may want to increase the density of your Zig Zag underlay to give your topstitching a puff or rounded appearance.
- Lattice or Tatami– This underlay is a low-density fill stitch used underneath Complex Fill stitches or Tatami stitches, depending on which embroidery design program you are working in. Lattice is usually used in combination with the Contour or Edge walk underlay. It runs at a 45 or 90-degree angle to the topstitching in a lattice form. It helps to reduce the pulling up of the fabric as it is stitching and to keep your stitches in good registration especially if you are going to add a border. It will help to keep the border in the proper place.
- Full Lattice or Double Tatami Stitches forming a full lattice effect going in both directions. This is a good choice if you are using a heavy contrast thread or fabric color such as a white thread on top of a black garment. This will hide the color of the fabric.
Very few designs or letters, even small ones are acceptable without underlay. Of course, there are always circumstances that change this rule. If you are working on a very lightweight fabric such as a wedding gown and you are using tone on tone, you may not want any underlay in certain areas especially if you are going to be seeing through the stitches. For this type of embroidery, you would not use any underlay at all but you would have to be careful that your stitch length was not too long because it would pull up and your garment would pucker.
I have created an entire program teaching you how to use the Embroidery Underlay Stitching properly. I even show you how to create your own underlay if you do not have the correct type in your embroidery design program. You can find that program at https://TheEmbroideryCoach.com It will teach you everything you need to know to add the right type of embroidery underlay stitching in your embroidery designs.