Setting up the lettering to Embroider on the back of a mesh cap can be done very easily if it is done correctly. There is more than one way to accomplish this, but the way that you select will depend on the actual design that you plan on selecting or creating. Many embroiderers are afraid to try this, but if you follow the simple directions, I will try to make it easy.
If it is a text-only design, the small letters can get lost in the mesh and you will need to add a knockdown stitch under the lettering.
If it is a design that is a heavy complex fill design and no small lettering is outside of the area of the design, you can simply add a piece of topping to cover the entire area before you begin the actual sewing operation.
The Areas That I Will Cover In This Article
- The different ways you can create the lettering
- I am going to show you how to set up the lettering
- The process of creating the lettering
- Explain how to create the knockdown stitch
- Explain the settings I used and why I used them
I am going to show you how I set up the lettering to embroider on the mesh cap back using small text lettering only. The lettering that I will be using will be 6 mm or about 1/4 inch in height. I try to keep it to a simple block font that does not have serifs if at all possible. I also want to keep it in uppercase only, as this makes it much easier to read.
At that small size, a font with serifs does not work well because of the size of the serifs.
Different Ways To Create The Text Lettering
I have found that there are about 4 different ways that you could lay down the text lettering for the cap back.
- Horizontal for a straight bottom fitted cap
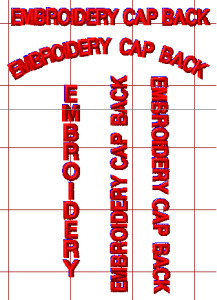
- Arched for a Snap-back keyhole cap back
- Vertical with the lettering starting at the top
- Vertical with the lettering reading up or reading down.
The Basics of Setting Up The Lettering
I used Pulse Embroidery Software to set up the lettering. I started with the basic Horizontal for the straight bottom fitted cap. The font that I used was Block New at 6mm.
Step 1 – I selected my font, set it to 6mm, and then I drew a straight
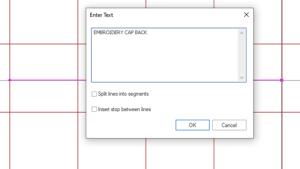 line across the front of my workspace and typed in the lettering, EMBROIDERY CAP BACK. I then clicked OK and my lettering was on the workspace.

Step 2 – I added Center run Underlay Stitching at 1.5 mm in stitch length because the letters are so small and .20mm for the Pull Compensation settings.
Step 3 – I adjusted my spacing between the letters. You want to make sure that you have all of your settings in place and the lettering exactly as you want it before you add the knockdown fill on the design.
Step 4 – Zoom in on your lettering, turn off the 3D or TrueView of your lettering so that you see the stitch points on your letters.

You will notice that there is very little space between each letter. You want your stitch points to almost touch. This will give you a clean easy run on the machine without the machine adding locks and trims between each letter. You do not want your machine to stop and start between each letter, but you also do not want a thread showing between your letters when it is finished sewing,
Step 5 – Create the Knockdown stitch. Pick up your Complex Fill tool in your digitizing tools and start plotting around the outside of the stitch points of your letters. You do not have to be perfect when you are doing this. You want it to be out and around the letters, but do not draw an oblong around the lettering, because it will show much more. You only want to draw around the shape of the letters.

This is what you will see when you have it completed. You would repeat the same process for the remaining 2 words before you go any further.

Step 6 – Now you must change the angle of the fill stitches so that your letters do not sink into the fill stitches and reduce the density to about -35 stitches per inch from your normal fill setting. I also added a .30mm pull comp setting to the fill. The image below will show your finished results.

Step 7 – In your Sequence View, move your fill background (knockdown stitch) up before the lettering so that it will sew out before the lettering sews. You will sew the fill stitching the same color as the mesh on the cap. When it is sewn out, you will hardly see the background stitching at all.
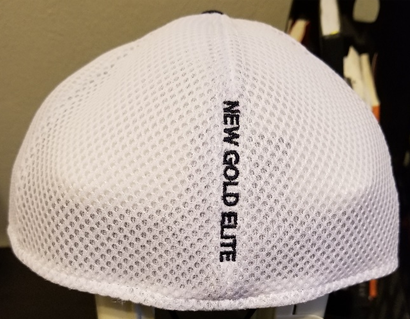 Here is a finished Embroidery on the back of a mesh cap. This is a vertical design up the seam of the back of the mesh cap. The fill stitching or knockdown stitch is sewn in white. You cannot see the fill stitching under the letters and the letters sew out crisp and clean.
This same lettering could have been sewn straight across the back at the
Setting up the lettering to embroider on the back of a mesh cap is not hard, it just takes a few minutes and the finished result is amazing.
Click on the PDF to print out How To Set Up The Lettering To Embroider On The Back of a Mesh Cap You will be able to see the images much better.