Are you contemplating quitting your full time job so that you can concentrate on your embroidery business full time? Do you think that by spending more time on it, you can make it happen quicker and be able to make enough money to live on?
I have many students that are currently learning how to run their embroidery business while working their full-time jobs. Some have plans to use their business as their retirement income and others are just anxious to have a thriving embroidery business and want it as soon as possible.
Before you walk away from your job to run your embroidery business full-time, you need to make sure that you are financially stable enough to survive without a weekly pay check for several months. I usually advise my students to have at least 6 months to a year in savings in order to be able to live comfortably without that weekly paycheck. This is the same information that I give my students that want to move out of their home and into a retail space. Either way, it costs money and you must be totally prepared for either scenario.
You may be well on your way to building a full-time home-based embroidery business or you may just be tossing the idea around right now, but having a clear understanding of your current and future financial needs will be plays a MAJOR role in your strategic plan for a successful embroidery business.
Home-based embroidery business owners don’t normally wake up one day and say, “Yes. I’m quitting my job today and starting my home-based embroidery business.” There is usually and should be a period of time for contemplation, researching, making the final decision, creating a plan, and then implementing the steps within the plan to achieve your final goal.
The process can take anywhere from several months to several years before an employee is in a position to walk away from his or her full-time job to begin life as a full-time entrepreneur. This is a totally different life style. Having a financial cushion is critical to be able to transition from being an employee to a full-time entrepreneur.
The First Steps To Determine When You Are Ready!
If you will follow the 5 easy steps below, you can figure out what your current financial position is and be ready to start planning out your new venture. This is a very important first step before you even think about creating a plan to leave your current full-time job.
Calculate how much money you currently have sitting in bank accounts, investments, retirement savings plans, Guaranteed Investment Certificates‚’, real estate, etc. If you were to leave your job tomorrow, would there be any form of payout such as sick plan credit, pension plan contributions, unused holidays, anniversary pay, etc.?
Determine how much revenue you are receiving on a monthly basis either through employment, child support payments, rental properties, dividends, your existing home-based business, etc.
Record your monthly household expenses. Some examples to get you started are your Mortgage, Property Taxes and Insurance, etc. all of the expenses that you incur on a monthly basis pertaining to your actual living expenses
List your monthly business expenses, for example your Internet Expense, Phone, Emailing system, Office Supplies, Supplies such as threads and backings and every other expense that you incur in your business on a monthly basis.
Identify your outstanding liabilities such as: Credit Card balances, Personal loans and Lines of credit.
When you total your earnings and revenue on an annual basis and deduct your personal and business expenses, how much do you have remaining at the end of the year? Can part of this be set aside to start building your financial cushion?
If your current business revenue isn’t enough to cover all of your business and personal expenses, how long would you be able to survive on your other revenue sources or savings, taking into account your monthly expenses?
Have you also considered unexpected expenses that could occur in the next year or two?
Will your car need to be replaced within the next year or two?
Are all of your household appliances in great working order with little chance of needing to be replaced in the next year or two?
Does your partner have a secure job or does his or her position seem to be unstable?
Going through this exercise is very important. You really do need to plan for any unexpected expense that can pop up. Financial stability is an area that needs to be on the forefront of your mind in order to be able to keep your feet firmly planted and create realistic plans as you build your home-based embroidery business. Having a good understanding of where you are and what potentially lies ahead will help you make sound financial decisions as you plan for your future.
After going through these five steps, you may see that your dream of leaving your job might take a little longer than expected. Maybe it is time to seek professional guidance to help create the plan that will move you quicker towards your goal. Seeking the advice of a financial advisor or an accountant will help you succeed much faster!
Knowing exactly where you are financially can be very scary at times but it will help you make more informed decisions as you plan for your future. Whatever your results are, good or bad; do not let this exercise put a damper on your dreams! You must keep your dreams alive and having all of your finances in order is the very first step towards making those dreams a reality!
Is record keeping a priority in your Embroidery Business when you are first starting? When you first start your embroidery business record keeping is not usually the first item on your to do list unless you have an accounting or a bookkeeping background and that is not the norm for the majority of us. You are probably focusing on what you are going to sell, where you are going to get the products that you are going to sell and how you can actually get the customers coming in the door to buy your products!
The task of record keeping is usually put off until you have a need to produce some figures for a sales tax report, your year end taxes or maybe even to go to the bank to borrow some money! Record keeping is one of the last things on our mind and the one task that most people hate to do! We really cannot make any money spending time keeping the books, we need to use that time to produce our products, right?
You need to focus a good percentage of your time producing your products, but if you do not have good records, you have no way of measuring whether or not you are making any money and this does not make any sense. You are in business to make a profit, but if you have no idea as to whether you are actually making a profit or not, what is the purpose of your business?
When should I set up my books?
This needs to be done in the planning stages of your business. You need to be keeping records from the onset of creating your business. How much are you spending on the preparation? You have license and fees that you are paying out setting up your business. You have the expense of getting legal and accounting advice, or at least you should be getting good legal and accounting advice when you are first setting up your business!
What about the supplies that you are purchasing and all of the equipment? What about the preparation of the room or location of your business? These are all costs that need to be kept track of right from the very beginning.
Why is it important to work with an accountant?
When you are in the preparation and planning stage of your business you need to go over your plans with an accountant. They will be able to see if you have any holes, so to speak, in your plans and will be able to guide you in the right direction. Your accountant will be able to advise you on which accounting software to use and help you set up your books properly. In today‚’s world most businesses are using QuickBooks. It is very important to be using the same software as your accountant because it is will make easier during the reporting reports within your business. It will be quicker for them to create your statements and will be more cost effective for you.
You want to make sure and tell your accountant that you want to keep track of individual departments within your business so that this will be set up properly. Sometimes you have to educate your accountant as to exactly what you will be doing. They may not understand the embroidery business and how it is not like every other business and that you need to keep track of the individual departments within the business. What I mean by individual departments with Embroidery, Screen Printing, Heat Transfer, etc. You need to know at all times if you are actually making any money within each one and how much of a profit you are making. Without good record keeping you will have no idea if you are making a profit or losing money.
If you have started your business and do not yet have an accountant, I would advise that you make an appointment with one right away and discuss your situation. Before you visit an accountant, you will want to have all of your records in order so that they can see exactly where you are. This does not have to be complicated. You can use simple spread sheets like Excel to get this process started. Do not go to an accountant with a shoe box full of receipts. This is not the way to get started with an accountant and it will cost you more money. They may not be able categorize your expenses in the right area.
To keep it simple create a spread sheet for each department. This will make it easier to set up your books in the proper manner and you will have your expenses in the correct categories. This will also make it easier for your accountant to understand about each department.
Keeping accurate records is very important and at a glance, you will know how your embroidery business performed for the previous month. Good record keeping should be a priority from the very beginning of starting your embroidery business and a task that should be done by the business owner for at least 6 months before you delegate it to someone else. At that point you can start working with a bookkeeper to keep your records for you, but you need to have your month end report within the first 2weeks of the current month. By keeping track and staying on top of your record keeping you have a much better chance of having a successful embroidery business!.
For information on setting up your bookkeeping program to give you the records that you for your embroidery business, click here!
Here are 9 tips that will help you to maintain balanced embroidery thread tensions. Thread tension is one of the most frustrating subjects within the world of embroidery. Learning to adjust and maintain good thread tension is a learned skill. Once you develop this skill it will make a huge difference in your finished embroidery. There are tools available that will make it easier for you to develop this skill.
Very often a design would look so much better if only the tension was adjusted correctly on the machine. The wrong tension can cause multiple problems and without the basic knowledge of the relationship between the top and bottom threads it is impossible to know how to correct them.
A stitch is formed when the needle carrying the top thread passes down thru the needle hole in the needle plate and connects with the bobbin thread. A loop is formed directly behind the eye of the needle. As the needle is coming back up the thread will tighten if your tensions are set properly. If one of your threads is too tight it can snap. If there is a burr on the edge of the needle hole in the needle plate, as the thread is coming back up, it can split or fray. It is important to keep a total balance between your Upper thread (top thread) and your Lower thread (bobbin thread).
Here are some tips to help keep your thread tensions balanced
Avoid switching thread types
Check your tensions when switching thread colors.
Check your tensions for different types of fabrics
Avoid Birdnesting
Avoid erratic stitching and thread breaks
Check your tension when you change a bobbin
Clean out your bobbin case each time you change a bobbin
Keep your tensioners clean and free from lint and dirt
Use Tension Gauges to set your tensions
Avoid Switching Thread Types
It is not a good idea to keep switching back and forth with your thread types. It is better to stick to one thread type. Your tension requirement for polyester is much tighter than for rayon and if you are constantly changing thread types; so is your tension and it is hard to keep a good consistent tension when you are switching types. If you find that you need to use a polyester thread for certain jobs, specify certain needles for those threads and use only those for the polyester threads.
It is best for your machine to be consistent with the thread type that you use and it is easier to maintain a more consistent even tension when you do stick to one type. This makes life a little easier and prevents a lot of needless head-aches.
Check your tension when switching colors of cones.
The thread tension needs to be adjusted each time you change a cone of thread. It is best to maintain your colors on the same needles if you can. If this is not possible, stay with the light colored threads on the same needles and the dark colored threads on the same needles. For example, don‚’t change off a white thread with a navy thread. You will definitely have to adjust your tension. This can make a big difference. The dyes are heavier in the dark colors than they are in the lighter colors, so therefore the thread is slightly heavier.
Check your tension for different types of fabrics.
The same tension for a cap does not always work on a knit golf shirt. As a general rule, I run the tension tighter for a cap. This is not always the case, depending on the fabric that is in the cap. You will need to experiment to see which fabrics require a tighter tension than others.
Avoid Birdnesting
Birdnesting is caused by the top thread tension being too loose. This is a lot of top thread that gathers up on the underside of your garment and forms a big wad. You will see loops on top of your embroidery and this will even cause your garment to be pulled down into the hole in the needle plate.
Obviously this will rip the garment. At times, you will need to reach up underneath the needle plate in the hook area and cut this wad of thread loose from the garment in order to remove it. When bird nesting does occur you must remove every strand of thread that has been caught in the knife and bobbin case and in and around the rotary hook. If some of this thread gets caught in the hook when you start to sew again, your hook may freeze up and you are shut down until you either replace your rotary hook or have a tech replace your rotary hook. You can also knock out your hook timing as well as the knife timing mechanism if a wad of thread gets caught in it.
Avoid erratic stitching and thread breaks
If the tension is too tight, you may experience a lot of thread breaks or see bobbin thread that is being pulled up onto the topside of your garment. It looks like you have very erratic or jagged stitching, but when you look more closely you are actually seeing the white bobbin thread showing at the outer edges of your stitching.
Check Your Tension When You Change The Bobbin
Every time you replace your bobbin, you need to check the tension. The tension can vary and be different on each bobbin. Your tension can even change within the bobbin. It is very normal for the tension to change when it gets close to the end of a bobbin. The last 10% should be considered unusable. This is especially true with the cardboard sided bobbins. All of a sudden as you are sewing, you will notice that even though nothing has changed in the embroidery process or your garments, you tension has changed. This is very upsetting. At the first sign of this, remove the bobbin, throw it out and replace it. Again, check your tension to see that it is correct before you start running your machine.
Clean Out Bobbin Case
Each time you change your bobbin, clean out the bobbin case with a brush or blow it out and check the tension spring/clip on the top edge. Lint and dirt build up inside of the bobbin case and under this spring. Your tension will run too loose and it does not matter how much you tighten the screw, you will not get a good tension until you have cleaned this out.
Cotton bobbins produce more lint than polyester bobbins and tend to create the most problems. To clean out the tension spring/clip gently run a piece of heavy paper underneath the spring/clip. The corner of a business card works well. Be very careful when you are doing this that you don‚’t dislodge the spring/clip. The spring/clip has a small lip so that fits into a groove on the left side on the top of the bobbin case. Make sure that it is still in this groove when you are finished. Do not clean it out with a pin. You can scratch the bobbin case and this will create more problems.
Clean out your tension disks or tensioners!
Clean out the tension disks in each of your tensioners. Take a Q-tip doused in alcohol and remove all of the dirt and lint buildup. This is something that should be done routinely about every 6 months if you use your machines on a daily basis. If you only use them part time, you should clean them at least once a year. Sometimes you will have to remove them entirely and soak them in alcohol because there is so much dirt build up behind them that you cannot get it all out especially if you have had your machine for a few years and have never cleaned them out.
I had one client that was ready to throw their 12 head embroidery machine out because they could not get the tensions correct no matter what they did. After I took a look at it, I discovered that the tension disks had never been cleaned. After cleaning them, their machine sewed like new. Three years later, the machine is still there and sewing!
This is a very important maintenance step that many people forget about or aren‚’t even aware of. Put it into your routine maintenance schedule. I know that this is an article on thread tension not machine maintenance but they all go together.
Adjusting Your Top Tension
I have adjusted tensions for the past 34 years and learned the correct feel of the thread passing thru the needle as I pulled on it. Today there is a top thread Tension Gauge that you can purchase to properly set your tensions. The first time that I used this gauge I was amazed at what a great job it did and I also found out that my tensions were not all set properly. After using this gauge, my machine actually sewed better and faster without any problems. It is such a great feeling when you can sew all day long with little or no thread breaks.
Testing With The Top Tension Gauge
To test your tensions with this Tension Gauge, you will thread your machine properly making sure that you have followed the upper thread path correctly. Pull a few inches(about 6 inches or so) of thread thru the needle and wrap it around the hook of the gauge at least twice. You want to make sure that it is caught enough that you can pull on your thread without it coming loose. With the numbers on top of the gauge facing up you will pull the thread straight out horizontally.
Do not pull out more than 18 to 24 inches during your test.
The tension should read 100-130 grams for Rayon thread
120-150 grams for Polyester thread
On my machines, the upper range of these numbers work better than the lower range. Start with needle #1 and continue the same process until you have completely tested all of your needles. Each time that you make an adjustment, you should perform this test.
(Each machine has its own personality and sometimes these measurements will not be correct for your machine. You will need to experiment and arrive at your own measurement and keep your track of what these measurements are. Many times they will need to be tighter than the measurements listed above in order to have the correct tension.)
(Another side note here: Each time a tech comes in to work on my machine, he loosens all of the top thread tensions and I have to go back and redo them when he leaves. Obviously you are not going to have as many thread breaks if your tension is loose. My point here is that just because the tech has been there and adjusted your tensions, do not think that they will automatically be correct!-Trust me, I am not knocking techs, they are wonderful, I just want you to be aware of your tensions if they are not correct after the tech leaves!)
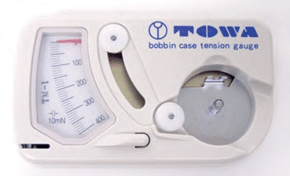
Testing With The Bobbin Tension Gauge
There is also a Bobbin Tension Gauge that you can purchase to set your tensions correctly. I strongly advise purchasing one of these valuable items. This is a one time investment of approximately $80.00 but it is worth its weight in gold.
Simply put your bobbin into your bobbin case as you normally would, put it through the tension spring but do not put it through the pigtail. The little clip on the side of your bobbin case will fit into the slot in the tension gauge, so slide the case into the gauge and press down.
Next take the thread and run it through the bottom wheel, around the top wheel and then down through the slot and run it sideways. If your tension is correct it will measure between 18 and 20 grams. If it is not registering correctly, tighten or loosen the screw on the side of the bobbin case and test it again. The numbers to read on some of the Tension Gauges will be between 180 and 200 instead of the 18 to 20.
I hope that these tips have been helpful to you. Print this article out and keep it close to your machine for a reminder. Add it to your regular maintenance schedule. Without a regular machine maintenance schedule, you will never have good tension or the machine performance that you are looking for. For more information about the basics of embroidery, machine maintenance, and much more, go tohttps://EmbroideryBusinessAcademy.com
In this article I am going to give you some ways to grow your Embroidery Business in easy to understand steps. This is a general overview of what it really takes to grow your business.
You have your Embroidery business started, you have spent a lot of money getting all of your equipment and learning how to embroider, now it is time to really get that business going. You may also be buried in work and still you really do not feel like you are progressing. Growing your business in many ways is just like starting your business. You must create a plan to move forward. Planning is the most important part of your business. Proper planning will save you many hours of execution and redoing unnecessary steps. If you do not have a business plan in place that you are currently using, you must create one. You cannot really grow your business to any significant size without a plan.
Before you start doing any type of planning sit back and look at each area of your business. Do not try to look at it as a whole, go to each part and take a real good look at it. You have many parts to your business.
The Office
Design Center
The Hooping Area
Machine Production
Finishing
Shipping
These areas are the least amount that you have in your small business. If you are offering other services or have a showroom, you will have even more areas in your business. Look at each area, the way that you have it all set up, think about the way that you move around in it to do each one of your jobs. Think about the entire procedure of doing each job.
It is all set up the way that you want it to be?
Is every area organized and running smoothly?
Do you have a step saving organized workflow?
Do you have a good paperwork flow?
Do you have a step by step process written up for each procedure in your business? This includes each item that you have to do starting with taking an order all the way through to shipping out your finished product, invoicing it and taking the payment. When you have all of these in place it is much easier to train a new person to help you. You want to make sure that each person is doing the procedure in the same manner. Without a step by step process, this is not possible.
Do you have Procedural Manuals written for each area of your business?
3 Important Steps To Grow Your Embroidery Business!
There are 3 very important steps you must have in place before you can start growing your business.
Make sure each area is organized and running smoothly
Create a Business Plan
Create a Marketing Plan
Organize Each Area Of Your Business
To be able to grow your business, you must have help. Your business has no chance of growing if you are trying to do everything by yourself. Hire some help to take over the simple jobs so that you will be free to spend some time on growing your business. The first person to hire is someone to take care of your bookkeeping for you. This can be a part time person or someone that does it on contract and charges you for however many hours a week that they are working on your business. I have been having my bookkeeping done on line for the past 3 years and it works out great.
The next person to hire is someone to do your finishing for you. This included the trimming, removing backing and topping, steaming, folding and packaging of your products. This is a huge job that can be done by a minimum wage person and it does not have to be a full time job. Depending on the amount of work that you are trying to put out in a day, a 4 hour person may be more than sufficient or maybe a couple of days a week.
It is extremely important to go through each area of your business and make sure that it is totally organized and running smoothly. If not this is the first place to start. Start with your office and go through each department and create a plan for each one.
Get your work flow organized and running smoothly
Make sure your paperwork flow is running smoothly
Write up your step by step process for each job
Create your Procedural Manuals for each area.
If you will take the time to get all of this in place, you will begin to see more production at the end of each week. This first step alone will help your business to grow.
Creating a Business Plan for your Embroidery Business
Creating a Business Plan that you will be using on a weekly basis to actually run your business is the very next step in growing your business. The main purpose of having a business plan is to give you a clear direction and guidance of how you intend to run your embroidery business and plan for future growth. With this plan you will be able to analyze and measure each step along the way to ensure that you are truly on the right path. Measuring your results is extremely important. Without measuring, you really do not know how you are doing.
Writing a business plan is not hard; the hardest part is getting started and knowing where to start. Many business plans look great on paper, but do not succeed in real life. Make sure that you are writing a plan that will work for you in the real world!
Do not try to use one of those template programs on the internet for your business plan, they are not designed for embroidery businesses, and they are far too complicated. I know that there is one out there that advertises that it is for embroidery business, but it truly is not. It is a generic business plan that is marketed to every type of business. How do I know this, I purchased it. The only true business plan program out there is one that I wrote myself. If you want to check it out, go to EmbroideryBusinessPlan.com. That is a program that I created to teach you how to write a business plan for your business, how to create all of your projections, cash flow statement and how to plan out every area of your embroidery business.
Your plan will be revised many times and will always be a work in progress. This is not a done once and you are finished process. If you will use your plan properly to run your business, you will be revising it on a monthly basis.
It can be a simple 5-10 page plan that will work for most small to medium sized embroidery businesses, or as complex as you want it to be. This all depends on your situation and whether or not you will need financing.
Create a Marketing Plan for your Embroidery Business
As part of your business plan you will need to create a Marketing Plan that you will follow.
You need to create a simple plan that you will follow for 1 year.
List all of the events during the calendar year that your target market will participate in and events for you to participate in that will take you to where they are. It is very important to be present where your market is hanging out!
Create Promotions for the lean times in your business and for all of the special days and holidays.
Create a great business card, I wrote an article about creating a business card What Does That First Impression Say About You And Your Embroidery Business?This will leave a great first impression when you meet people and will go a long way in creating relationships when you are networking. Networking is by far the best way to start building up your business.
Join at least one networking group and it is better if you can belong to a couple of different ones. The Chamber of Commerce is a good one in most areas and the BNI and Meetups are also good. Yes each one of them cost money to join but it is well worth it. You can get a lot of referrals when you are part of these groups. And yes, I mean a part of these groups. You must participate in the functions, not just be a member. Being a member but not attending the functions is a waste of your money.
Without Organization, a Business plan and a Marketing Plan, your business will flounder! I have had that experience, it is not fun!
Here is a wrap up of the 3 steps to help you grow your embroidery business.
Plan out and organize each area of your business
Create a Business Plan
Create a Marketing Plan
If you will follow these steps, you should see a massive growth in your business. It is very important to be growing your business on a daily basis. If you are not growing, you are moving backwards. For more information about how to your embroidery business, go to 9 Steps To A Profitable Embroidery Business!
I found this Great Gmail Shortcuts Cheat Sheet in my email today. This is going to be a very helpful item! A very helpful item to get the most of Gmail. I will be using it to navigating through Gmail!