by The Embroidery Coach | | Embroidery Business Management
Having a system in place to help manage your embroidery business is extremely important! Common questions that have been asked by my students when they are trying to organize and manage their business as they are starting or growing their embroidery business are:
- How do I manage my business?
- Where do I go to get the help that I need?
- How do I know what I will need?
- Where should I Start?
- Is there some type of software that I can purchase to help me?
So many people that start an embroidery business do so because they love what they do and are very creative. I was one of those people. They do not even think about what it takes for the business side of the business. There are certain components that every business needs in order to run smoothly and create a profit.
One of the main components is a system for daily checks and balances to see if you are profitable. It is very important that you learn how to manage your entire business and it starts on a daily basis with each and every job. Whether you are a one person operation or a large apparel decorating shop, there are some important factors that must be present in whatever type of business management system you choose.
- The ability to create and deliver a quote very quickly
- A way to follow up on the quotes in a timely manner
- The ability to measure the progress of each order as it goes through each and every process.
- A way to measure your production
- A way to measure your profitability
- A system to keep track of your acquisition of goods
- A way to schedule your production
- The quick way to see if you can handle a rush order
- The ability to create a repeat order so there are no errors in ordering or production
- A system to see how quickly your money is coming in.
I have found that many businesses do not have any type of system in place to help manage any part of their apparel decorating business. You can create your own management system or you can use one of the Business Management Software packages that are easily available for the apparel decorating industry. Either way, you must have a system for checks and balances. This is a must in order to manage your growing business and become profitable at the same time.
Choosing The Best Type Of System For Your Embroidery Business
There are several business management software packages available today but there are also many price ranges within these software packages. You need to know what is important to you and your business in order to be able to choose the right package. Each business is different and has different needs.
You need to create a total snapshot of your entire business before thinking about which type of system or package you will need. Take an analysis of all of your business needs and answer all of the following questions.
- What type of software are you using for your accounting at the present time?
- How many employees to do you have?
- How many different types of decorating does your business offer?
- How many customers do you have?
- What type of business, wholesale, retail or contract?
- Do you offer products along with your services?
- Are you a service business only?
- What are your monthly sales and revenue?
- Do you have a concrete pricing system in place?
- Do you know what all of your actual costs are in your business that are associated with each different type of decorating that you offer? It is very important that they be separate in order to have true costing and pricing.
- Do you have a concrete way of planning for future growth?
- Do you have a way of measuring your growth and profitability?
Some of the Business management software companies have starter packages or entry level packages that will handle your quotes and invoicing. This is not enough to get you started, in my opinion. You must be able to provide your customer with a quick quote, but you also need to be able to take that quote, turn it into an instant work order and then into an invoice when the job is completed.
Many of the business management software packages will integrate with QuickBooks. If your business is a large shop with more than 10 employees, you may want to look at one of the packages that is a stand-alone package that will handle all of your accounting needs. If you are a small shop you may want to start with one of the less expensive packages that will integrate with QuickBooks to accommodate all of your needs. When you are looking for a business management software package, you want to make sure that they contain each component that is necessary for your particular business but each package should contain the following components.
You want to be able to manage everything in your business with or without software, but having a software package makes it much easier to manage all aspects of your business. No matter what type of a system you adopt to use in your business, make sure that you have a system that will help you to create quotes in a hurry, measure the progress of each job, measure your production and measure your profitability. If you cannot measure it, you cannot manage it!
Joyce Jagger
The Embroidery Coach
by The Embroidery Coach | | Organizing
Next on our journey of Organizing Your Embroidery Business is the Finishing Department. Setting up the finishing department with the right tools and equipment is very important if you want to present a high-quality finished garment to your customers. Most of the tools are very simple and easy to gather. The only real equipment needed is a commercial steamer and a steam iron.
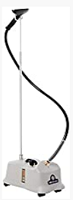
When I say commercial steamer, I mean just that and not one of the handheld ones. They do not do the job that the upright steamers do and my favorite brand of a steamer is the Jiffy steamer. The reason for that is the amount of time that it lasts and the ease of being able to get parts for them if something does need to be replaced.
 The only other piece of equipment is a table. Depending on the size of your area or business, you will need at least one table in your finishing department. It is best to have one area for the trimming & steaming and another area for the packing. If this is not possible you will have to go through one entire process before you can start the next process. This is not an issue if you are a one-person organization, but if you have more than one person in your finishing department, they will each need their own area or table.
The tables can be very simple but they need to be high enough so that the employee is not bending over too far to do the job as it can be very tiresome by the end of the day. Cover the tables with some type of cloth-backed plastic or a piece of heavy canvas. If you are using the plastic covering you will need a towel or some type of terry cloth to lay down on the table during the steaming process.
The basic tools that are required for your Finishing area are:
- Terry Towel
- Shout Wipes
- Liquid Dish Soap
- Textile Marking Pens
- Fray Check
- Lint Roller
- Clothes Brush
- Wash cloth
- Nail Clippers
- Scissors
- Trimmers
- Plastic Bags
- Scraps of Topping
- Commercial Steamer
- Large Trash Can
- Steam Iron
All of the small tools need to be kept in a plastic drawer or some type of container so that they are all easily accessible and not scattered around. I make sure that each one of my departments has their own tools so that there is no wasting of time searching for a tool.
Embroidered Garments Go From Embroidery Machine To Finishing
When the embroidery machine operator removes the garments from the machine, she also removes the hoop and then places the garments into a basket, bin or on a cart. This basket, bin or cart is then taken to the Finishing area.
The process for Finishing is as follows:
- Remove the backing
- Trim the top threads if this is necessary
- Stack the garments in a pile by size
- Steam the topping off and remove the hoop mark
- Fold up the garment and place it in a size stack
- Count the finished garments in each sized stack
- Bag the individual garments if required for the order
- Place them in a box
This box of finished goods is then sent to the shipping department.
I have found from my own experience that the employee works much faster if she or he is standing during the entire finishing process, but if it is necessary for health reasons, the employee can be sitting for trimming and removing the backing but they need to be standing for the steaming, folding, counting and stacking the garments into the sized stacks.
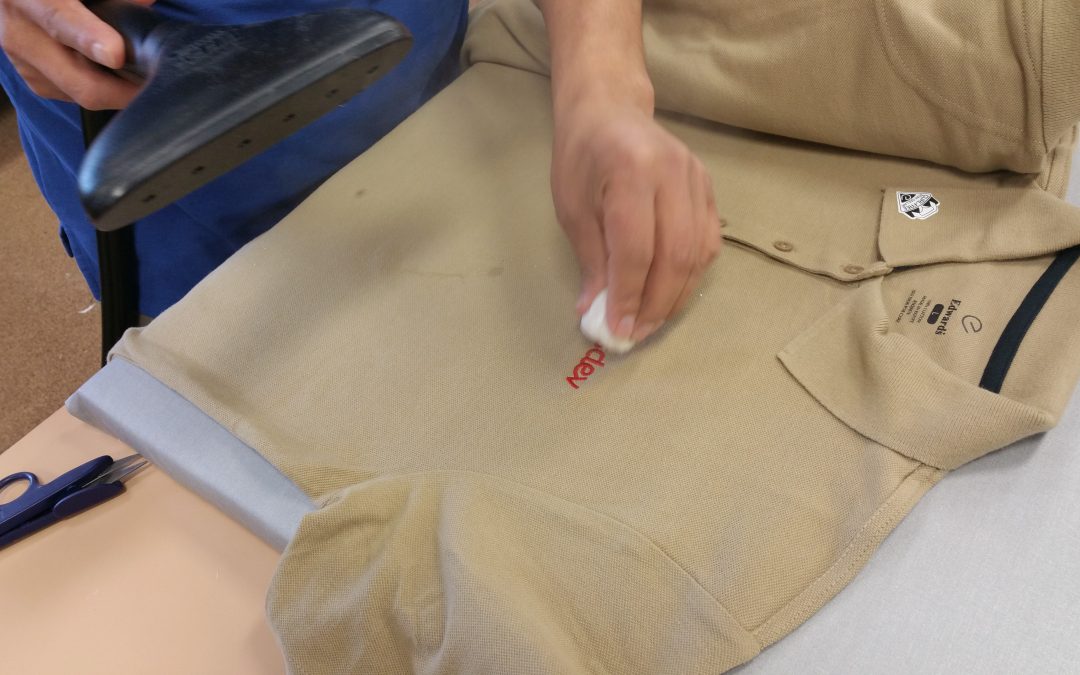
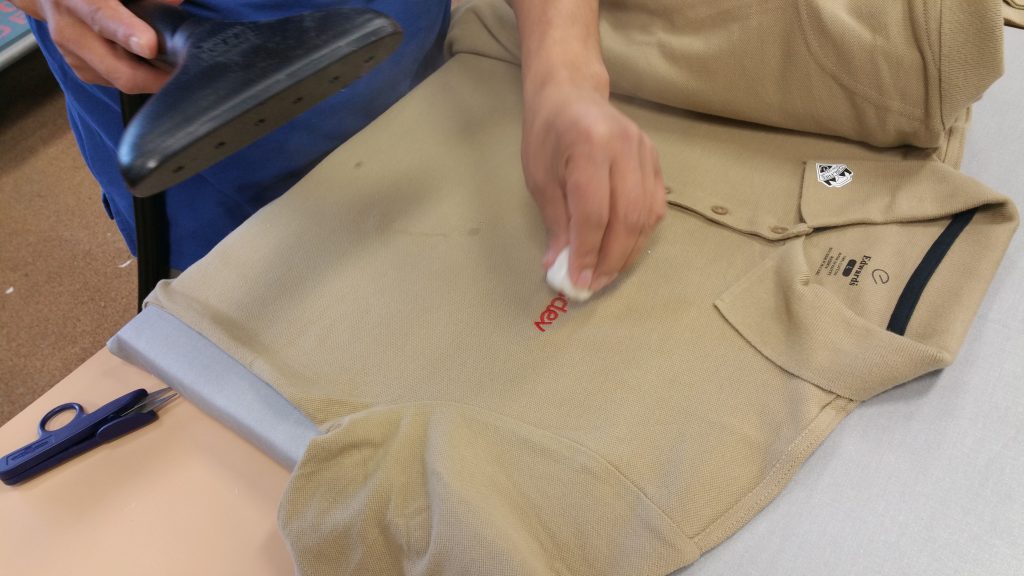
A quick and easy way of removing the topping is to remove it with a topping ball as you are steaming the garment. Steam your garment thoroughly and then dab the topping ball on top of the embroidery to remove the topping. It may take 2 or 3 tries to remove all of the topping but it removes it even in the tiniest areas. I have heard of and tried many other solutions for removing the topping but none are to my satisfaction and quite often leave a wet mess behind. This is not acceptable to me. When that garment is finished, I want the process to be finished, not waiting for it to dry; plus the steamed finished garment looks more professional!
0Please leave me a comment below to let me know that this has helped you to get your Finishing department set up for finishing your garments efficiently in your Embroidery Business! If you leave a comment below, I will send you access to a bonus video showing you how to Remove the Topping!
Joyce Jagger
The Embroidery Coach
by The Embroidery Coach | | Embroidery Business Marketing
Marketing to your customer and prospects is different today than it was just a short time ago. Today Email Marketing is an easier and a more cost effective way to get started with your marketing. In the past, when someone wanted to do business with you they had to try to get your attention through direct mail, telemarketing or face-to-face.
The problem? Most of the time these marketing methods were completely unsolicited – the marketers pushed information to consumers. As a result, we often refer to these solicitations in a negative way and respond angrily. I do not know about you, but when someone calls me on the phone and tries to sell me something, I get very angry! I do not have the time to listen to all of this noise!
So how is email marketing different? Email marketing is building a relationship with your prospects and customers. This is extremely important in today‚’s marketing!
The major difference between email marketing and the other marketing methods is that people opt-in ‚Äì or choose ‚Äì to receive your marketing message. This is HUGE! It‚’s like an open-door invitation to share your information and expertise with your customers. That is something you just can’t pay for. In today‚’s world of technology, your emails can be received on smart phones, most of the tablets or pads and of course on your computer.
In this article I am going to discuss:
- What Is an Email List?
- How Do You Get Subscribers?
- Why Build an Email List?
What is an Email List?
An email list is simply a collections of email addresses that you have collected from your customers and prospects. Most marketers will also collect the person‚’s first name with the email address so that they can personalize the email through automation in their email marketing software. Instead of saying ‚ÄúHi‚Äù, you can say Hi Theresa‚Äù in your emails. You can also collect other information such as location or phone number in case this is important in your market segment or your marketing message.
How Do Your Get Email Subscribers?
Having a ‚Äúmailing list‚Äù with a series of autoresponder messages that you update regularly is great, but if there‚’s no one on your list, you‚’re not going to be making many sales.
Email marketing is a way to market your product or service through email. You can build your email list in a number of ways. Here are 2 ways to get started:
Opt-In Forms. The most common way to build a list is by placing an opt-in form on a website, sales page or a Facebook Subpage and having people fill it out. Whenever someone visits your Facebook Subpage, your blog, or your website, there should be a clear place for them to subscribe to receive more information, or some type of free gift from you.
Getting people on your email list may seem difficult at first, but there are proven strategies for making people want to give you their email addresses such as providing an Opt-In bonus. This can be a free report on a subject that they are interested in or it can simply be a coupon towards their next purchase!
Customer Lists. Many shopping carts have automatic processes for adding purchasers to your email contact list. This is something you‚’ll definitely want to integrate, because customers are already a step above a ‚Äúprospect.‚Äù By buying something from you, even a purchase of $10 or less, they‚’ve proven that they want what you‚’re offering, they know how to purchase on the internet, and they have money to spend.
Why Build an Email List?
Some people start building their email lists and then get discouraged because they are not getting a flood of people opting in right from the beginning and give up. This is most unfortunate. They simply do not understand the true value of building a large, responsive email list.
Here are five reasons why you need an email list:
- Automatically Follow up – An email list allows you to market to your customers and prospects 24 hours a day, 7 days per week automatically.
- Constantly Building Your Business – New prospects can be signing up to your email list automatically, every day without your help. This is a way to constantly be building your business automatically and getting new people into your pipeline.
- Capture Visitors – You have put tons of work into your website or Facebook page. If you are not capturing visitors, they are leaving your page, possibly never to return again. If you capture their information, you can keep in contact with them and build a relationship. Most of your potential customers or clients do not buy from y ou when they first find you or hear from you. Through email marketing, you can stay on their minds through your automatic emailing program with your autoresponder messages. When they are ready to buy, they’ll look back for your emails or remember your website and order from you.
- Saves You Time – Instead of sending your message one on one, over and over again, you can now reach your entire list with one mailing. This not only saves you time, but it also leverages your time into long-term profits.
- Increase your Sales – Sharing your information and building a relationship with your list is great, but the main Goal here is to create your sales. An email list can deliver you an increase in sales.
The important thing when you start is not to give up too soon when it starts out slow. This is perfectly normal and if you do give up, you will never see the benefits of having a large responsive list!
When I first started my email marketing I thought that I would never be able to build up a list. It seemed like it was taking forever. I kept hearing about all of these people that had thousands on their lists and I knew that I would never get there! Today I still have what is called a small list but with almost 5,000 on my list today, it is giving me a lot to work with and I am able to share my message to all of the 5,000 people!
Start today setting up your automatic emailing system. You will be very grateful you did!
by The Embroidery Coach | | Organizing
In part 4 of this series on Organizing Your Embroidery Business I am going to be talking more about the Hooping Area how to set it up so that it will run efficiently. I am also going to show you the basic process of hooping.
In part 1 of this Organizing Your Embroidery Business series, I showed you a floor plan and in part 2 I talked about The Receiving area and what you needed to Process your Orders. In part three I talked about the Hooping Area and the Tools and Equipment that you need.
Setting Up Your Hooping Area
When you are setting up your hooping area there are some important points that you need to think about.
- The space that you have to work with
- How many embroidery machines you have
- How many machine operators you have that are not doing their own hooping
- How many people you have that are actually hooping
- The different types of items that you are working with that need hooping
This may sound like a strange criterion, but it all depends on the size of your embroidery shop and your product mix. I have different hooping setups for different types of products. The standard left chest or right chest logo is hooped in one area and on one type of hooping equipment, the large jacket backs or sweatshirt fronts are hooped on another type of equipment and the caps are hooped on a cap hooping device. This means that I would have 3 distinct areas set up for hooping. Each one of these areas use different types of hoops or hooping frames, different type and size of backing and/ or topping.
After you have determined what you are going to be hooping, you can set up your area with the right supplies. I purchase my backing by the rolls and cut them into pieces to size for each situation, with the exception of the cap backing. I purchase that in 4 inch x 8 inch cuts as well as by the 250 yard roll. I need the 250 yard roll for the designs that embroidered on the front and sides of the cap at the same time.
I also purchase the topping by the roll, usually a 25 yard roll and cut that to size. I cut 8″ strips 2″ wide, 3″ wide, etc to keep on hand at all times. You only need to have enough topping to go through the part of the hoop that is going to have your embroidery. You want to make sure that it is cut wide enough that you can catch it into the sides of the hoop while you are hooping it. If you purchase cut squares of topping, cut them into strips so you are not wasting unnecessary yardage.
(more…)
by The Embroidery Coach | | Embroidery Tip
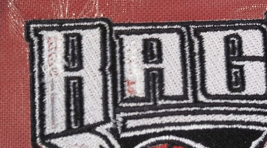
The embroidery machine needle broke and chewed up my shirt. Did you ever have a needle break in the middle of your embroidery and have it chew up your garment? This can happen when your turn around to start hooping another garment and do not monitor the machine. While Betty, the embroidery machine operator, an excellent operator, was on the other end of the 15 head machine the needle broke on head no. 1 and it chewed up the center of 2 letters. It was sewing a narrow silver line in the center part of the letter and that section was totally chewed up! Here is a picture of the garment.
At first Betty panicked but when I took a look at it, I knew that I could fix it. Sometimes it is not worth your time to go through and fix something, but it all depends on the value of the garment and whether or not you can replace the garment. This happened to be a very expensive golf shirt that a customer had brought into the shop. It was one of an order of 24 pieces and this one needed to be fixed!
When something like this happens, you must leave it in the hoop. If you unhoop it, your chances of getting it all lined up perfect for this type of fix is not very good. So first rule-DO NOT UNHOOP!
I turned the hooped garment over and placed it upside down on my ripping and pressed a scrap piece of no show backing on it to help hold the shirt together that was chewed up.
Here is a picture of the backside of the garment with the piece of pressed backing on it.
I brought up the original stitch file of the design, unfortunately, I did not have an outline file or my .pxf file which is the native original outline file for my software, because the design was brought in by the customer. Here is a picture of the original .dst file. The colors show wrong, but that is the nature of a .dst file. You can see those narrow red lines inside of the letters. This is what was being embroidered in silver when the needle broke.
I digitized a same sized area from the edge of the black outline( the green outline on the .dst file pictured) on each side of that section of the letter and then copied the red line area from the .dst file onto that filled area that I created. I used the same complex fill type stitch pattern inside of the white area.
I found out where the start and stop section was in the center of the design and I put in a command so that the new section that I was creating would also start and stop in that same spot. I deleted all of the rest of the design, made sure my fixed design was also going to start and stop in the same place as the original design and then saved it as the design name fix. Here is a picture of that  finished design fix from my software. You can see where it was starting and stopping from the cross hairs are and the star in the design. Betty put the hooped shirt back into the machine and taped a new piece of topping on the top.
She had taken out the shirt when she noticed the needle break, turned off that head and finished the run for the rest of the shirts. Now the machine was back into the same start position and she was ready for the fix. She programmed the new fixed design into the machine, programmed in the colors that she needed and then started the machine. It was lined up perfectly and sewed out in the perfect spot.
You must remember to always put the hooped garment back into the same head that you removed it from when you are using a multi-head machine. Not all of the heads are in the exact same location and this is very important!
 This is an enlarged photo but you can see the end result! It was a perfect match and the customer would never know that his garment got chewed up by the embroidery machine!


