by The Embroidery Coach | | Embroidery Business Planning
Over the next few Ezine issues I am going to be sharing with you about how to “Create An Efficient Floor Plan and Workflow in your Embroidery Business.” In part 1 I am going to be talking about how to create a Floor plan that will give you a good work flow and not waste steps. One of the key elements to a highly profitable embroidery business is a good management system and part of that management system is a good work flow.
Setting Up Your Work Room To Create An Efficient Work Flow
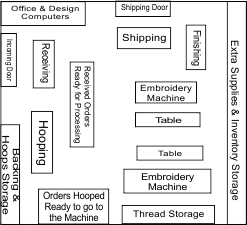
Creating a blueprint for a good floor plan for your embroidery work room is one of the first things that should be done to insure that you will have an efficient work flow. A layout for the most efficient work flow should be done in a loop if at all possible so that each area is not conflicting with another area. In a good work flow the work runs efficiently from one production area to the next and without it, there are too many wasted steps from one job process to another. Below is a basic drawing of a small shop that has 2 embroidery machines. No work should be on the floor that is not in progress.
The workflow is as follows:
1. Order Processing
2. Receiving – Receiving should be located as close to the incoming door as possible.
3. Staging – Received orders waiting for the prep work and hooping.s
4. Prep – Where they are hooped and placed into baskets or bins ready to be transported to the embroidery machines.
5. Staging 2 – After they are placed in Baskets -Orders hooped ready to go to the machine.
6. Embroidery Machine – To be embroidered
7. Finishing – Where they are trimmed and packed. The Packed garments are then ready for Shipping.
8. Shipping or Picked up
If you are working from your home, your floor plan may be a little different and you may have only one door into your embroidery room. If this is the case, Shipping can be located in the same area as the Receiving, but on the other side of the area.
The best physical layout of your shop will determine how you will be able to place your embroidery machine for the best possible production. The most efficient layout I have found has been having tow machines across from each other with one side table in the center or two narrow tables in the center, one for each machine.
Another efficient way is a U shape having the third or smaller machine at the end of the U. In a single head shop or an in home shop, the prep area and Finishing area can be located on the same table directly across from the machine but keep your areas in different locations at each end of the table and you will be able to function more efficiently. The Prep area at one end and the Finishing area at the other end. If you have two machine, you can have them both across from table or one can be at one end of the table at the Prep area and one across from the table. It will depend on how large your room is and how it physically set up. Both layouts can be efficient.
Create A Blueprint Of your Embroidery Workroom Area
Before you start moving anything around, draw up a blueprint on a large piece of graph paper. Draw and cut out pieces of paper that represent the machines, tables and all other existing equipment. Draw these peices to scale so that it will work for you. Lay the marked pieces ont he graph paper and move each piece of the area that will represent where it should be moved.
Have every thread shelf, backing shelf or racks, hoops steamer, everything that you use that takes up floor space in these drawings so that nothing is missed. Once you have your layout exactly the way that you want it, take a glue stick and glue them into place. This will help you make sure that everything does get placed in the proper location when you do make your move. It will help everyone that is involved with the move be more efficient.
If any electrical or carpentry work is required, supply the contractor with a copy of the blueprint. This will help to explain exactly what is needed and will make it easier for everyone concerned. A well-organized floor plan is a critical factor when you are creating a highly efficient work flow.
The next article in this series we will about organizing each work area within your embroidery business. This is a very important aspect in creating a well organized business!
by The Embroidery Coach | | Embroidery Tip
Water Soluble Topping is a very important element for creating quality embroidery designs and can be used to remedy designs that do not have the quality look that you are expecting.
Using a water soluble topping when you are embroidering on any type of fabric that has a raised or rough texture will make your embroidery look smoother and help to climb over those rough spots. Topping will help to keep the thread on top of the garment instead of letting it sink into the fabric.
I always use topping on my knit fabrics, especially the pique knits. If you want to produce quality embroidery on textured knit goods, using soluble film will always give you the best look. If you do an experiment and embroider 2 samples using the same design on the same fabric, one with a topping and one without the topping, I am sure that you will see a noticeable difference.
Some digitizers know how to create a design to eliminate or reduce the need for soluble film but many do not. The best way to get around it is to use a topping. Some people claim that if you use the topping and wash your garment, the topping is removed and so are the benefits of using it. I have never found this to be true. Sometimes it is necessary to use two layers instead of one if a design is badly digitized, but for the most part, one layer works just fine.
Use Topping To Help Small Text Embroider Smoothly On Top Of Fill Stitches
When you have a design that has small text on top of rough textured fill stitches, the letters can often sink and disappear into the fill stitches. Laying down a piece of topping over the fill area before you embroider the text will solve this issue and give you a smooth edge on your text. The problem can sometimes be fixed by shortening the fill stitch length allowing the letters to stay on the surface, but if you are not a digitizer this may out of your realm. This topping trick will take care of it for you without having to do anything else.
I had a design that was digitized for a light denim woven fabric and my customer wanted me to use the same design on a heavy canvas bag. It was a stitch file he had provided and did not want it edited in any way. I embroidered a sample of it on canvas and it looked horrible. I did not want an item going out of my shop looking terrible, so I laid the topping on the bag before I embroidered it and it looked great! My customer was very excited when he saw the finished product.
Topping Protects Your Fabric On Dress Shirts!
I always use topping on dress shirts also. I do this not because of the fabric, I do this to protect the fabric. If I have a monogram to embroider on a white shirt, you can be sure that dirt or oil from the machine will magically get on the white shirt! With the topping on it, it protects it and the oil cannot penetrate the topping!
Topping can also be used as a backing when you are embroidering on delicate light weight fabrics that you do not want to see a backing on after it is finished. I have embroidered the bottom of wedding gowns using topping as the backing and they came out great! I was able to remove the topping and the white embroidered design on these white chiffon skirts was beautiful!
I also use the topping as a backing when I embroider blankets. I do not want to see backing after the job is finished on the back of my blankets, throws, shawls or scarfs. It is also good for lubricating the needle when you have a fabric that wants to skip stitches.
If you do not or have not used topping very much, get acquainted with it. It took me a long time to decide to use it as a first resort rather than a last resort, but I am glad I did. I think that you will discover, just like I did, using it will give you the highest quality embroidery possible!
by The Embroidery Coach | | Embroidery Business Marketing
The best way to start building good customer relationships is to connect with each one of your current and lost customers. Start out by making 3 lists.
- Current High Volume Customers
- Current Lower Volume But Repeat Customers
- Former or Lost Customers
Below are links to telephone scripts that you can use to call your customers. Use can use these scripts to start creating better relationships with your customers or you can use these as a pattern to create your own. Download them and save them to your hard drive. You will want to print one out for each customer that you talk to. I left spaces between the questions so that you can write on them and keep notes as you talk to each customer. You can then file it into their customer file.
by The Embroidery Coach | | Embroidery Business Marketing
Marketing your business is one of your top priorities and should be done daily. Even if it is a small step, you need to get into the habit of doing something that will create traffic into your business on a daily basis. No matter how successful your business is, ignoring ongoing methods of traffic generation and promotion also means ignoring a rich source of sales and profit.
I am going to give you 5 easy steps that you can start using immediately to effectively market your business.
Step #1: Create Your Plan
Every successful marketing campaign begins with a plan.
Creating Your Plan: Your marketing campaign plan should do three things:
- Cover at least one entire calendar year
- Feature any relevant seasonal or sporting events, holidays, or trends
- Have a method that you can use to track and analyze your results
Planning an entire year’s worth of strategy isn’t as difficult as it seems. It will help you consistently build momentum and maintain visibility. You can always make changes as you see your results. Consistency is the real key to success in marketing your Embroidery business.
Seasonal or sporting events and holidays provide the perfect reason for extra contact. Make sure that you analyze and track your results! This is very important. It will have a bearing on how you plan your next campaign.
When creating your plan you must:
- Use a calendar. Either a physical chart you write in or an organizer.
- Plan backwards. Write in the campaign start date of your promotion on the calendar. Working backwards on the calendar, plan out each step that must be started and completed before the campaign start date in order to set up the launch and make it happen on the target date.
Step #2: Start Reaching Out to Your Clients or Customers
Now that you have your plan in place, here are some methods for reaching out to your clients or customers.
- Telephone0
Do a short telephone survey asking your customers what you can do for them, how you can help them, what can you provide that they are not able to get elsewhere? You can let them know in advance about your next promotion. They will feel special. Make sure they are aware of your Referral Program.
- Direct Mail
If you are uncomfortable with the phone, create a postcard. Give them a special offer on the postcard. They will be required to bring the postcard into your shop in order to be eligible for the special offer. If you have a website, send them to a special page on your website with an offer- either something free or low cost just to get them into your autoresponder- so that you can start marketing to them on a steady basis automatically.
- Free Samples or Coupons
If you are using coupons, whenever possible, make sure that they are self-limiting such as a particular holiday or event. (Mother’s Day special, no longer available when Mother’s Day is over)
Step #3: Promoting to Current Clients or Customers and Attracting New Clients or Customers
Here are five highly effective promotion strategies you should implement immediately as part of your plan for the year.
Put your logo on every piece of physical material you wear, use, or distribute. These include:
- Business cards
- Stationery
- Envelopes
- Brochures
- Invoices and receipts
- Your car
- Your office window or sign
- Promotional items (pens, t-shirts, mugs, mouse pads, etc.)
- Sample items
- Your own t-shirt, golf shirt, jacket, cap or visor when attending public events
Sponsor a local team, charity or even an individual event participant.
It doesn’t matter how big the amount -showing your community involvement and “giving back” is always a great way to promote your business.
Donate prizes
Create a contest, or donate to an existing local charity or contest. Just be sure to put your logo on the prize item or accompanying freebie or card somewhere! (HINT: Contest creation for seasonal holidays gives you the perfect, natural excuse!)
Promote your contest or event participation
Send out a press release to your local radio station, TV station or newspaper in advance of the big event, so they can show up and either do a story on you (“Local Business Owner Gives Back”) or photograph the prize recipient, if it’s significant enough. Just make sure your press release is not solely about you and your business, but offers them a real story for their readers , the more heart-warming the story is, the better.
Propose a workshop to your local community college or library.
If your business is already established, you’ve certainly got the credentials- and it will establish you as their own, resident “go-to” expert in that field. (This can be about how to select the correct promotional items for their needs or something that would be fitting to or for your market.)
Step #4: Advertising
Don’t hesitate to include advertising as part of your annual strategy, if you can allocate a budget to it. Surveying your intended market and using the method most favored by them are the keys to ensuring this strategy gives you a return for your investment. Consider advertising with:
- Local newspapers
- Local business or trade directories
- Local Radio
- Local TV
Finally, consider creating an advertising contra — a “you scratch my back, I’ll scratch yours” exchange of services or goods you already own with any of these organizations. It’s a time-honored custom in advertising and all venues above are thoroughly familiar with the idea. This is a very effective way to reach a large audience with a smaller dollar outlay! You will need to show the newspaper, radio or TV station how they will profit from this partnership venture.
Step #5: Boosting Visibility and Credibility
You may have multiple goals for your promotion plan. You can use any or all of the above methods (and any others you can think of) to:
- Increase your expert status
- Increase your visibility
- Increase ease of contact to prospective clients
- Brand your business or product
And, last but not least, increase your sales.
by The Embroidery Coach | | Embroidery Business Marketing, Embroidery Tip
I’m new to Embroidery and I am really having trouble trying to sew high quality embroidery designs on caps. Can you help me?
Trying to get high quality embroidery designs on caps can be a real challenge when you are new to embroidery. But with a little practice and experimenting, you can overcome those challenges.
- For best results, always start your design at the bottom of the cap working up and from the center working out. This will keep the hat more stable in the frame and prevent the design from pushing too much in one direction.
- Always make sure the holding strap of the cap frame is adjusted to grip the cap snug and the bottom of the visor is tight against the visor bracket. That will keep the cap from shifting position in the frame as it is moving. This is the most common mistake new embroiderers make.
- To make sure your design stays in registration, always finish one section before moving onto the next .
- All finished caps have a size limit for designs depending on the style of cap, the shape of the logo, and the type of machine. The logo for a standard size adult cap should not be much more than 2.10 inches high. If you are working on a low profile cap, your design usually cannot be more than 2 inches high. I try to stay within the 2 inch high category for all of my cap designs. That way hat style is usually not a factor. Very often your customer will want a repeat order but may decide to change the style of cap for the new order. If the original design does not fit on the new cap, you will have issues if the customer wants the design to be the exact same size. Sometimes 2 inches is too high for a design if you have more than 1 line of straight lettering or if you have a design that has a long line of small straight lettering on the bottom. This can be a real problem. Your bottom line of lettering may pull up in the center of the cap.
- Make sure that the bottom of the design is at least one half of an inch up from the seam where the cap front and the brim are sewn together. If you are working on a stiff cap front your letters may distort if you are too close to the bottom. A lot of this depends on how the cap is made and how stiff it is at the very bottom of the front where it attaches to the brim. When you are hooping your cap, you must make sure that your cap facing is really tight into the lip of the cap framing device.
If this does not work you have to either shorten your design to compensate and distort your lettering the opposite direction. Sometime just shortening the height of the design and moving it up slightly on the cap front will take care of the problem.
- If you are using an embroidery design for a cap that has been created for a left chest, it is not always possible without editing the design to make it embroider properly on the cap. If you have lettering on the bottom of the cap you will have better results if you edit your design so that this lettering will stitch out first. I have found that this works the best. Make sure that your lettering is set up to stitch center out. If your lettering is not stitching center out, it is best to re-sequence the lettering.
- Always use cap backing when you are hooping your caps, regardless of how heavy or stiff your cap is. This also will help to produce a higher quality embroidery design on your caps.
Find out more about embroidery on caps at the EmbroideryBusinessAcademy.com
The Embroidery Coach, Joyce Jagger simplifies the complex world of embroidery into easy to understand lessons. Her passion is to help get the new embroiderer off to a fast start and help the existing embroiderer improve their skills so that they can provide higher quality embroidery and increase their profitability!