Design Quote Form
Click on the link below to download your Design Quote Form
Click on the link below to download your Design Quote Form
Click on the link below to download the form.
In Part 1 of our Saving Time series I talked about how to save time Creating Embroidery Design Layout Style Sheets, in Part 2 I talked about Limiting Your Embroidery Lettering Styles and in Part 3 it was about creating Sample tags for all of your showroom embroidered product samples. Today I am going to go over how to create an Organized Ordering System.
An organized ordering system is simple to put into place. This is true when you have all of your information computerized and even if you are using paper forms to be filled out while you are waiting on the customer. You can create Sales Order Packets with all of your forms included so that you do not have to look for your information forms while you are working with your customer. Inside of this Sales Order Packet you should have:
When you are first working with a customer, they usually want a quote before they place an order. Prepare your customers quote and make a copy of the quote form for him to take with him. Place your copy along with all of the other forms into a file marked Customer Quotes. When the customer comes back to place his order, pull the packet of forms from the quote file and you are ready to complete your order taking process.
By having all of these forms together in one packet, you will keep all of the customer information together and you will prevent mistakes from occurring.
During this series we have gone over 4 ways to help your customers make quick ordering decisions. You want the order process to be a pleasant experience for both you and the customer. When you offer your customers so many options they only get confused and it takes longer for them to make a final decision and sometimes that final decision is no decision. Reducing the amount of choices you have to offer will save you and the customer a lot of time.
I hope that this series has helped you to become a little more organized in your ordering process and that you see the value of taking the time to go through your ordering process and make some immediate changes that will benefit both you and the customer!
All of these forms plus many more business and production forms are available through my Embroidery Business Training membership website, the Embroidery Business Academy.
Joyce Jagger
The Embroidery Coach
In Part 1 of our Saving Time series, I talked about how to save time Creating Embroidery Design Layout Style Sheets. In Part 2 I talked about Limiting Your Embroidery Lettering Styles. Today I am going to talk about saving time by Creating Sample Tags with order information to apply to all of your showroom samples.
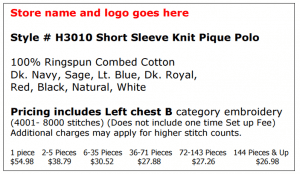
 Your showroom should be complete with high-quality embroidery samples that are tagged with all of the order information that is applicable to that product sample. This tag should include the style number, colors and sizes available, manufacturer, price, and quantity pricing. All of this information should be on a Tag that is attached to the sample garment.
These embroidery Sample tags are very simple to produce and portray a good image to the customer about your organization. I created my Sample tags on card stock that I purchased from the office supply store, cut them apart, and laminated them. They stay very clean and always look professional when they are laminated. I then attached them with a Hang Tag attachment.
Having all of your samples tagged ahead of time with the appropriate information will save you a lot of time and prevent you from having to look up the information in the catalogs. As your pricing changes, so do your Sample tags. Always keep them up to date with all of the correct product and ordering information!
In part 4 of our Time-Saving series, I will talk about having an organized ordering system!
Joyce Jagger
The Embroidery Coach
In Part 1 of Saving Time-Helping Customers Make Quick Ordering Decisions, I talked about how to Create several Design Layouts Options for your customer to choose from. During Part 2 I am going to talk about limiting your customers lettering style options.
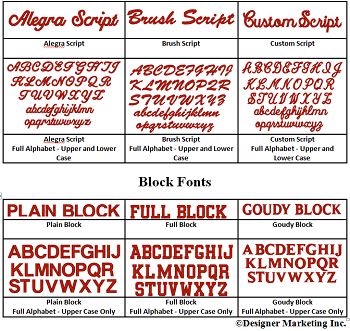
In each of the embroidery software packages today you have many lettering styles to choose from and it is very tempting to want to show our customers all of the lettering styles that we have available. Many new embroiderers make the mistake of offering all of these styles to their customers and letting them chose which one they want to use.
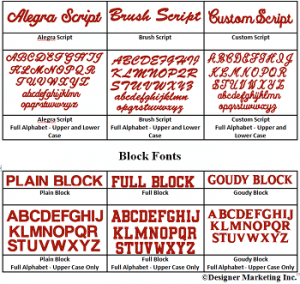 In order to do this, you must sew out every embroidery font that you have available and know what the capability and size restrictions are for each one. This takes a lot of time and is totally unnecessary. Our customers get so confused when they are faced with so many choices. I have found that the best way to handle this is to offer 2 or 3 Block lettering styles and 2 or 3 Script lettering styles. This is enough for them to choose from and will prevent the customer from being overwhelmed with your vast selection.
By limiting the embroidery lettering style options, you not only save time working with your customer in their selection, but you also save time in the set up of your lettering designs. If you are only working with a few lettering style options, you can have templates made ahead of time with all of the style settings included in the template. This is a huge time saving process when you are creating your customers design set ups!
In our next Saving Time series, I am going to talk about tagging your samples with the correct ordering information!
Joyce Jagger
The Embroidery Coach