by The Embroidery Coach | | Embroidery Production
Some basic issues can have a huge effect on the quality of your designs. We need to go back to the basics to create high-quality embroidery designs.
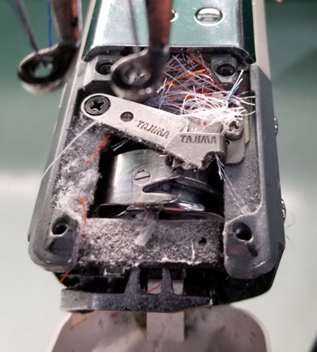
Machine Speed
Machine speed has a huge effect on the quality of your design. I cringe when I see a machine going faster than 850 stitches per minute. I run mine on an average of 750 stitches per minute, but if I am working on caps, it is down to 600 or 650 spi at max.
The machines are being sold on the fact that they operate at a significantly faster pace, allowing for more production to be completed in a day. Yes, this is true, but it can also cause many issues that slow down production. The faster your machine is sewing, the more pull you have on your thread. This can distort your small lettering and in satin stitches that border fill areas. The faster the machine speed, the tighter the thread pulls, and the narrower the stitch sews out. If the machine is going too fast, it can skip stitches or force the needle to penetrate in a bad spot and form a stitch that is uneven, such as on heavy pique or fabric that has wide ribs, such as twill. This really shows up on a twill cap.
The machine speed can also cause the thread to come out of the needle at the beginning of sewing, and can leave a long thread or a loop at the beginning of the first part of your stitching.
Bad Tension
Your machine needs to be using either rayon or polyester thread. You should not be switching back and forth if you can help it. This is something that we have to do at times, and I am very unhappy when we have to do this, but we have customers that insist on a certain shade, and if it matches in the rayon rather than the polyester, then that is what we use. I do not want to use any rayon thread on a garment that is going to be washed in the strong laundry detergents because it can fade. We do not have many issues with our thread bleeding.
If you stick to polyester, you eliminate a lot of issues. In today’s world, this is the thread that you should be using. We have been gradually switching over, and we are using more and more polyester. It is much stronger, and of course, it will not fade out when bleached. Your polyester thread has to run with a tighter tension than the rayon thread. When you are switching back and forth, it is very tough to keep your thread tension correct. It needs to be adjusted for the different types of thread.
Worn or Wrong Needles
Worn or Wrong Needles can create holes in the fabric. On knits, it can create runs. You really need to be careful with this. Sometimes you can get away with a sharp needle on a knit, such as a pique, if you are using the 70/10 needles and they are new needles. It is strongly recommended that you change your needles to ballpoint needles if you are working with knits, especially the performance wear knits. You can almost count on holes in your fabric if you do not switch to the ballpoints on those types of fabrics. This can have a huge effect on your design.
They recommend that you change your needles every 2,000,000 stitches or after every 8 hours of constant stitching on that same needle bar. That is hard to keep track of and something that we really do not do, but I always had operators who were very detail-oriented and knew exactly when the needles needed to be changed. You can hear the difference in the sound when the needle goes down into the fabric. This comes from lots of experience and a lot of trial and error.
Wrong Backing
Using the correct backings or stabilizers is extremely important in stabilizing your design on your garment. If you are using the wrong backing or a cheap backing, your design can rip right through the backing, and it just does not sew out very good. It becomes very distorted, especially after it has been laundered.
This is something that you have to be very careful of. For all of your wovens, you need to use a tearaway backing. Do not ever use a cutaway on the woven fabrics, not even the no-show. Many times the backing shrinks, and it will cause the design to pull up and pucker. I have had several complaints about the no-show backing shrinking. I have had several students tell me that they have discontinued using it because it was shrinking and their designs were distorted after they had been washed. I have some items here that have been washed, and you can plainly see that this no-show has not shrunken at all! You need to always use quality backings.
Cheap Supplies
Do not use cheap bobbins either. This is huge! Not only do they slow down your production, but they run very erratically, and it is almost impossible to keep an even flow of tension. I highly recommend the Filtec bobbins. They can run all the way to the end without the tension changing, and rarely do we have a bad one. Yes, they are more expensive, but the difference is the look and the production, which more than pays for the difference in cost.
No Topping On Your Knits
This is a tough concept to get across to a lot of people. The difference in your designs is night and day when you use them. Every knit that went out of my shop was done with a topping on it. It keeps the thread on top of the fabric instead of letting it sink into the garment and is very easy to remove. Yes, it is another step, but at the same time that we are steaming it off, we are also removing the hoop mark from our item. I do not ever want to see a garment go out of here with a hoop mark on it. There is no excuse for that one at all.
Garments Not Hooped Correctly
When you are hooping your garments, you want to make sure that they are tight enough. If it is, there will not be any movement of the fabric inside the hoop, and you can hear a drum noise when you tap on it.
Size of Hoop
The size hoop that you use is critical. Many embroiderers will use the same 15 cm hoop for all of their designs. This is fine if the design was created for that 15 cm hoop, but if the design is smaller than that, you will not get the same effect.
Many times, we just need to go back to the basics to create high-quality embroidery designs. We sometimes forget the basics and how important they really are.
The Embroidery Coach Explains How to Create High Quality Embroidery Designs for Perfect Stitch Quality
Exceptional embroidery does not happen by chance. It is built through precision, consistency, and a deep understanding of the fundamentals that drive stitch quality. At The Embroidery Coach, we show you how to create high-quality embroidery designs with a performance mindset where every detail matters.
From machine settings to material selection, each factor contributes to how clean, sharp, and durable the final design appears. When the basics are mastered, embroidery transforms from a routine task into a refined process that delivers professional results every time.
We Help You Improve Your Embroidery Speed and Accuracy
We improve embroidery speed and accuracy by strengthening the core practices that directly influence stitch quality. Our focus is to help you improve your embroidery speed and accuracy, creating stability, reducing errors, and ensuring every design runs smoothly from start to finish. When we control key variables such as machine speed, hooping, and material selection, we eliminate unnecessary rework, increase production efficiency, and maintain precision.
Machine Speed Matters More Than Most People Think
Running embroidery machines at high speeds may seem efficient, but it often creates more problems than benefits. Excessive speed can distort stitches, reduce clarity in fine details, and cause thread breaks or inconsistent patterns. Slowing down allows the machine to perform with greater control, resulting in cleaner lines, better coverage, and improved overall design accuracy.
Bad Tension Can Ruin a Good Design
Thread tension plays a critical role in how stitches form and lay on the fabric. Poor tension leads to uneven stitching, weak coverage, and inconsistent results. Maintaining balanced tension ensures that threads flow smoothly, stitches sit properly on the surface, and designs appear crisp and professional. Consistent monitoring and adjustment of tension settings are essential for reliable embroidery outcomes.
Worn or Wrong Needles Damage Fabric and Detail
Using the correct needle type is essential for protecting both the fabric and the design. Worn needles can damage materials, create rough stitching, and reduce overall quality. For knit garments, ballpoint needles are often the better choice as they prevent fabric damage and ensure smoother stitching. Regular needle replacement is a simple step that significantly improves embroidery performance.
The Wrong Backing Creates Instability
Backing provides the foundation that supports the design during stitching. Choosing the wrong backing can lead to puckering, distortion, and weak embroidery structure. High-quality backing stabilizes the fabric, maintains design shape, and ensures long-lasting results. Selecting the right type based on fabric characteristics is essential for achieving consistent stitch quality.
Cheap Supplies Always Show in the Final Result
Low-quality supplies may reduce upfront costs, but they often compromise the outcome. Poor quality bobbins, threads, and stabilizers can lead to tension issues, inconsistent stitching, and production delays. Investing in reliable materials improves machine performance, reduces errors, and enhances the overall embroidery finish.
No Topping On Your Knits Is a Costly Mistake
Knitted fabrics require additional support during embroidery. Without topping, stitches can sink into the fabric, making designs appear less defined and harder to read. Topping ensures that stitches remain visible and sit on the surface, creating a cleaner and more professional look. This step is especially important for detailed designs and text elements.
Garments Must Be Hooped Correctly
Proper hooping is essential for maintaining stability throughout the embroidery process. Loose or uneven hooping allows the fabric to shift, resulting in distorted designs and poor alignment. A well-hooped garment should be firm and stable, providing the ideal surface for accurate stitching. Taking time to hoop correctly prevents costly mistakes and improves overall quality.
The Size of the Hoop Affects the Final Finish
Using the correct hoop size directly impacts the stability and precision of embroidery. A hoop that is too large can reduce tension and allow movement, while a properly sized hoop provides better control. Matching the hoop size to the design ensures consistent stitching and helps maintain the integrity of the final result.
At The Embroidery Coach, we believe that high-quality embroidery is achieved through disciplined execution of the fundamentals. When machine speed, tension, needles, backing, topping, hooping, and supplies are aligned correctly, the result is clean, precise, and professional embroidery that stands out.
Ready to enhance your embroidery results with better speed and precision? Work with The Embroidery Coach and start producing cleaner, sharper, and more consistent designs today.
FAQs
Excessive machine speed, incorrect tension, and improper stabilization are leading causes, as they distort stitches and reduce clarity in the final embroidery output.
Topping prevents stitches from sinking into fabric textures, ensuring designs remain clear, sharp, and visually raised for a more professional embroidery appearance.
The fabric should be tightly secured with no movement and feel firm when tapped, ensuring stability and accurate stitching throughout the embroidery process.
Yes. Low-quality materials can cause tension issues, machine interruptions, and rework, ultimately slowing down production and reducing overall embroidery efficiency.
Yes. Proper hoop size improves stability, reduces fabric movement, and ensures cleaner stitching with better alignment and overall design precision.

by The Embroidery Coach | | Embroidery Business Management, Embroidery Production
Do you have the business organization and forms that help you to run your embroidery business? Do you have your embroidery business organized? When you first start your embroidery business you can become so overwhelmed by all of the forms and processes that are so necessary to keep your entire production running smoothly.
There are software programs that can be purchased to help you keep track of your entire order, but most new embroiderers are not in the position to be able to purchase these programs so you must have a way of keeping track of it manually. I always advise new embroiderers to start keeping track of their jobs manually before going to the computer systems.
Record keeping is so extremely important and there are many forms that I have and keep with each order. You must have a system for keeping track of each step and the forms for each part of your organization or production of every job. Without a good system in place, you will soon become totally overwhelmed with the workload and you will not be able to keep track of your production and it can become very discouraging. I have 3 types of forms
- Office or Sales Forms
- Production Forms
- Shipping Forms
The Office or the Sales Area is the First One That I Will Address.
This scenario is based on the fact that you are an embroiderer that sells retail and may have a retail or showroom in your location. If you are working from home and do most of your orders online or on the phone, the same processes and forms will apply to you as well.
I create sales packets that are ready for each sale so that I can grab them and be ready when I am first starting to work with a customer.
- Customer Quote Form – Can be part of the packet or separate-This form is filled out and a copy given to the customer-your copy is then placed in a binder until the customer comes back in ready to place the order.
- Order Form – I have one for Apparel and one for Caps-You can expand on this if you have different needs.
- Form of Payment -Credit card-Pay Pal-Check form
- Design Tracking & Timing Form
- Production Tracking & Timing Form
- Packing List
- Do you have a checklist to make sure that all of the steps are taken?
These ready-made sales packets make it easy to work with and you do not forget anything as you are going through the entire process with your customer or prospect. Between the Quote form, the Order form and the Form of Payment form, you can collect all of their information and be ready for the sales process. I also have all of their information to easily input it into my database and start marketing to them. This can be in the form of a Newsletter, postcards, emails or a combination of all three.
In the next post on do you have your embroidery business organized, I will go on to the next area of organization. Check out the free training that I will be having on August 3rd. https://theembroiderycoach.com/monthly-training/
Get Clients for Your Embroidery Business Online Faster with The Embroidery Coach Expert Guidance
Success in the embroidery industry is no longer just about creativity and quality stitching. It is about structure, preparedness, and the ability to convert interest into paying clients quickly. We position your embroidery business for faster growth by bringing clarity, systems, and proven processes that eliminate confusion and wasted time. With the right guidance, you stop chasing clients and start attracting them with confidence and professionalism.
At The Embroidery Coach, we focus on helping you get clients for your embroidery business online that directly affects how quickly you secure online orders. When your backend is streamlined, your front end becomes powerful. That is how you scale.
We Help You Get Clients for Your Embroidery Business Online.
Our approach centers on creating a seamless customer journey that begins the moment a prospect reaches out. When your systems are organized, you respond faster, communicate clearly, and build trust instantly.
A major part of this system is having ready-to-use sales packets. These packets allow you to respond professionally without delay. Instead of scrambling for details, you present a structured and polished experience that positions you as an expert from the first interaction.
Here is how we help you build that system:
Sales Packets for Instant Client Conversion
We guide you in creating complete sales packets, prepared in advance for every potential sale. These packets ensure you are always ready to confidently engage with a new customer. They remove hesitation and help you move quickly from inquiry to order.
Customer Quote Form for Clarity and Professionalism
A well-designed customer quote form is essential. This form captures all necessary details and provides your client with a clear estimate. Your copy stays organized in a binder, allowing you to track prospects who are not yet ready to place orders. This system keeps opportunities alive rather than letting them slip away.
Order Forms Tailored to Your Products
We help you implement structured order forms based on your offerings. Whether it is apparel or caps, dedicated forms ensure accuracy and reduce errors. You can expand these forms to meet your business needs, providing flexibility while maintaining consistency.
Payment Collection Made Simple
A smooth payment process builds trust and accelerates conversions. We guide you in offering multiple payment options, including credit cards, PayPal, and checks. When clients can pay easily, they are more likely to move forward quickly.
Design Tracking and Timing System
Tracking design progress is critical to maintaining professionalism. Our system ensures every design is monitored from start to finish. This helps you meet deadlines and communicate updates effectively, which builds long-term client relationships.
Production Tracking for Efficiency
Production delays can cost you, clients. With a structured production tracking system, you stay on top of every order. You know what is in progress, what is completed, and what needs attention. This clarity improves turnaround time and customer satisfaction.
Packing Lists for Accuracy
A packing list ensures every order is complete before delivery. This final step prevents errors and enhances your reputation. Clients notice consistency, and consistency leads to repeat business.
Why Organization Drives Faster Client Acquisition
An organized embroidery business is profitable. When your systems are in place, you eliminate guesswork and respond to clients quickly and precisely. This creates a strong first impression, which is often the deciding factor in winning online clients.
We help you transform your workflow into a client-winning machine. Every form, every process, and every interaction is designed to move prospects closer to placing an order.
Take Control of Your Embroidery Business Growth
If you want to attract more clients online and close deals faster, organization is your competitive advantage. We provide the structure, tools, and guidance needed to elevate your business from reactive to proactive.
Start building a system that works for you, not against you. With The Embroidery Coach, you are not just learning. You are implementing strategies that deliver real results.
FAQs
Organized systems allow faster responses, clearer communication, and a professional presentation, which build trust quickly and increase the chances of converting inquiries into paying customers.
A sales packet should include a quote and order forms, payment options, timelines, and clear process details to provide a complete and professional experience for clients.
A quote form captures client requirements accurately and provides structured pricing, helping avoid confusion while keeping track of potential customers who may order later.
Tracking forms monitor design and production stages, ensuring deadlines are met, reducing errors, and maintaining a consistent workflow that enhances customer satisfaction.
Yes, offering flexible payment methods like credit cards, PayPal, and checks makes transactions easier, encouraging clients to complete orders without hesitation.
by The Embroidery Coach | | Embroidery Business Planning, Embroidery Production, Organizing
Saving time – Helping customers make quick ordering decisions can sometimes be very frustrating. Is your customer ordering process taking you too much time away from your production time? I want to talk about how you can cut back on the amount of time that it takes you to help your customers make a final decision.
As embroiderers we want to be able to offer our customers a full range of lettering and design options but in the process of doing so, we sometimes have the tendency to over complicate the process causing us and the customers unneeded frustration. There are 4 simple ways that will help to save time and speed up your customers ordering process.
- Embroidery Design Layout Options
- Limited Lettering Style Options
- Samples Tagged With Ordering Information
- Organized Ordering System
Today we will talk about the first in this series, the Design Layout Options.
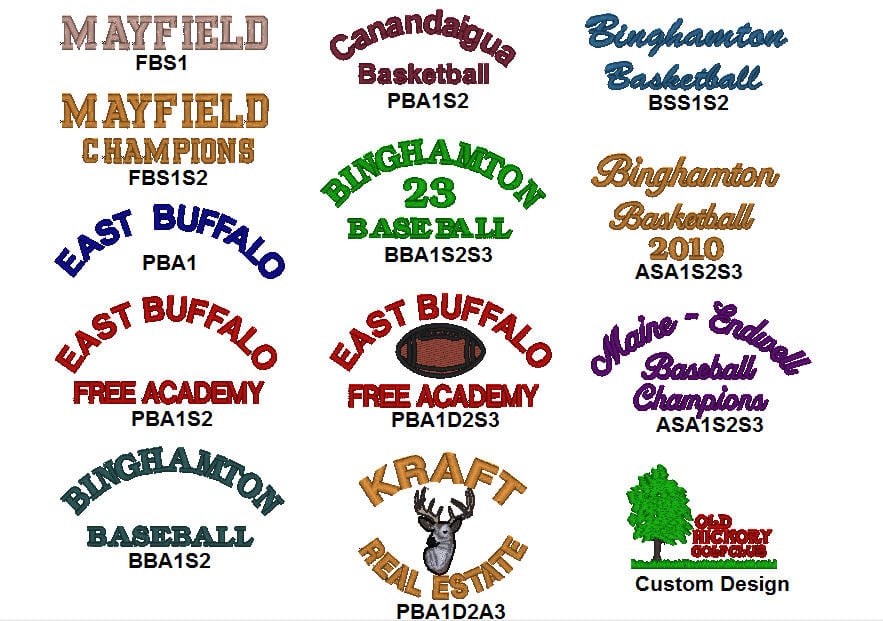
Embroidery Design Layout Options
 Create several Design Layouts Options for your customer to choose from. By giving your customer choices of different layouts for him to look at before he places his order, you prevent him from asking you to create his logo with several different options for his approval.
These Design Layout Options save time and instills confidence in the customer that you know what you are doing and know what will be the best option for him or his logo.
Create Design Layout Sheets with several design templates that you have you already set up in your embroidery design software. Give each one of these design templates a Style No. When the customer orders a specific style no. you can quickly recall the design template from your system that he has ordered, change the lettering to what he or she is asking for and your design is ready to be sewn out.
You can create two sets of identical design templates, one set to be sewn on woven fabrics and one set to be sewn on knit fabrics. These two sets of Design Layout templates will work for 95% of your customers garment or fabric choices.
Click on the picture and you will see a larger view of the Design Layout Options
Helping customers make quick ordering decisions helps your business in several ways!
- You look more professional
- It save a lot of your time and the customers time
- You have more time for production
- You will bring in a lot more revenue!
In Part 2 of this series, I will talk about Limiting Lettering Style Options.
Joyce Jagger
The Embroidery Coach
by The Embroidery Coach | | Embroidery Production
In our last article about where to start training a new embroidery employee, I talked about starting them with the finishing process and then moving them into the helper’s position as soon as they were ready. Make sure that they totally understand each and every process along the way before they are moved into the next position. You must test them to make sure that you know they understand. This may sound very elementary but just asking them is not good enough. YOU MUST KNOW!
In step one of the previous article, we went over putting new cones of thread onto the machine and learning how to tie a Weaver’s knot. I gave you a video showing you a simple way to do this. Having a helper change thread colors saves the operator a lot of production time. Have them do the thread-changing process over and over until they have it mastered. As I said before, this sounds so simple that anyone should be able to immediately do it. Do not assume that. Once again, do not let them go to step two until step one is mastered.
Thorough Training Of The Embroidery Machine Helper is Very Important!
A helper is someone that will tie new thread cones onto the machine, help load and unload the machine, carry work from the hooping area to the machine, and carry the finished work from the machine to the trimmers. Their main purpose is to keep the operator focused on keeping the machine running as much as possible. The training of this new embroidery employee helper is important for maximizing your production. Make sure that they understand exactly how and why each step of the process is done a certain way. Now we are ready for Step two in the process of training the new helper.
Step two- Teach them how to unload the machine without getting anything caught or snagged by the needles. Teach them how to remove the hoop without touching the needles. This will dull the needles. Show them how to remove the hoop from the garment as they unload the machine and place both the unhooped garments and the hoops in their correct locations. Do not let them go to step three until step two is mastered.
Step three- Teach them how to load the machine without getting any of the garments caught under the presser foot or trapped between the bottom of the hoop and the throat or needle plate. This is especially important when loading tubular-style machines. Show them how to run their hands under the garment to make sure that nothing is caught. Teach them not to touch the needles with the hoop as they are loading the machine. This will dull the needles.
These are basic skills that need to be mastered by everyone on the production floor. This includes the trimmers, hoopers, packers, steamers, as well as the machine operators. This helps everyone to know what the whole process is and also gives you skilled people to use if you need to pull them from another position to help out temporarily.
Give New Embroidery Employee Copy of Training Manual
Give the new Embroidery employee a copy of the training manual that is applicable to their position which explains all of the processes that they will be expected to perform. They should be tested at the end of each training period to see if they have indeed mastered all of the skills that are required. It is too often taken for granted that the new person knows exactly what to do after they have been shown a couple of times. This is not the case as a general rule. Some people learn faster than others. Just because a person has not learned as quickly as you, or as quickly as you have expected them to, does not mean that they are not qualified to be a good worker.
Helper Makes It Possible For The Embroidery Machine Operator To Produce More!
If a person has mastered the skills of a helper but cannot go on from there, that is OK. They can remain a helper and be extremely valuable in that position. This helper makes it possible for the machine operator to get much more production done at day’s end.
Make sure that your machine operators treat these new employees with the same respect that they want to be treated with. This is not always the case. They very often expect too much too soon. Keep the lines of communication wide open between the new employee, the older employee, the supervisor, and you. Everyone needs to be made to feel important in their position. You do not want any resentment, jealousy, or dissension building up between anyone in the organization. This needs to be emphasized from Day 1 with any new embroidery employee!