As a small embroidery shop owner, have you ever had a situation where you needed to train a new embroidery production employee but really had no idea where to start? This can be very frustrating for the small embroidery shop owner that has always worked alone and has never had to teach anyone how to efficiently help them.
In this article, I will start with the very first employee that a small embroidery shop owner should start training for the embroidery production floor.
Start The Training Of A New Embroidery Production Employee With The Final Process – Finishing!
If you have hired a new employee for the production floor, the best place to start them is with the finishing process. Regardless of what you have hired them for, start them trimming, folding, and packing. This helps them to see how the process is completed and gets them excited to learn more. If a new employee cannot trim, they need to be dismissed. This is a very basic function but takes dexterity and attention to detail. Many people feel that this part of the process is for low paying individuals that cannot do anything else. This could not be farther from the truth. A trimming mistake can ruin the entire process if close attention is not paid to detail. They need to have a positive attitude, and their attitude will really show up during this process.
How To Start Training A Production Helper
Once the new person has learned the finishing process, they can then be moved into a helper’s position. A helper is someone that can tie new threads onto the machine, load and unload the machine, carry work from the hooping area to the machine and carry the finished work from the machine to the trimmers. The training of this helper is very important. They must be shown everything that they are supposed to do and be thoroughly tested on these skills. This may seem like it is so simple that anyone should be able to do it, but they still need to be taught exactly how each step is done.
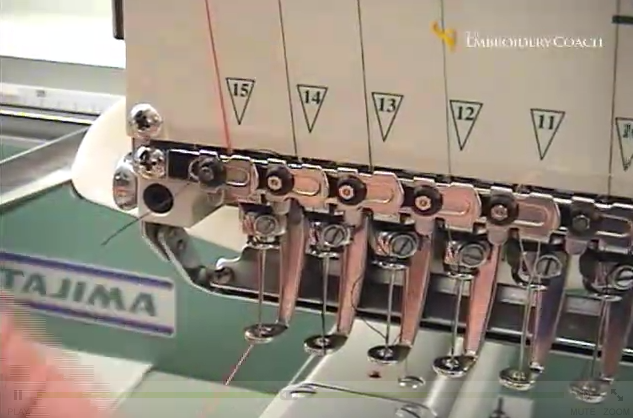
Step One – Show them where the threads are stored and how you put them onto the machine. Teach them how to do the Weavers knot so that the threads will pull right through the needle eyes. Have them do it over and over until they have it mastered. Make sure that they understand exactly how and why each step of the process is done the way it is. Do not let them go to step two until step one is mastered.
Here is a video showing you how to tie the Embroidery Threads so that they will go right through the needles! It works 99% of the time. Huge time-saver!
Proper training is extremely important when you hire a new employee for your embroidery operation. Without the proper training this new employee can end up creating a lot of mistakes which will lead to lost production. This is just as important for the small embroidery shop owner that is hiring their first employee as it is to the multi-head shop that has many employees. Learning the right process to train a new embroidery production employee is very important. It is going to mean the difference between a well-run shop and one that is only mediocre. You want to make sure when you train a new embroidery production employee that everyone is on the same page, so to speak!
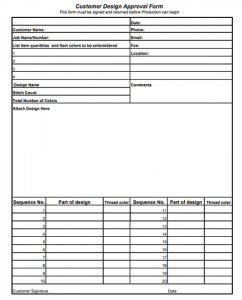
Do you have a signed Embroidery Design Customer Approval Form as one of the required steps in your embroidery job process?
Do you ever finish an embroidery job for a customer only to find out that the colors were not exactly what the customer wanted and then we will not accept it? This is an issue that can be totally avoided. I have also been given repeat orders that were just like the last one, but this time the shirt is a different color and the same colors will not work on this new shirt; now what do you do? Many times your customer will tell you that you can select the right color but that does not mean that they are going to like the colors that you selected. Do not get caught in this trap!
An Embroidery Design Customer Approval Form should be one of the necessary forms that you have in your embroidery business and make sure that you always get your customers approval before sewing out their embroidery design! This is a very important step, whether it is a new order or a repeat order. This is a step that so many embroiderers overlook and do not want to be bothered with, but many get caught with a job that is finished and the customer is not happy with it. This is a huge mistake that can be totally avoided!
An embroidered sample of the finished design, it can be a virtual sample, in the correct colors is a must. If you cannot physically give your customer a sample, email a copy in the correct colors and require that he or she reply back to you with an OK. Print out this OK and file it with your job order.
If you have several color combinations on different colored garments, show him the predominate sample in the correct colors and attach a list all of the color sequences for the remaining combinations on another copy of the approval form. Make sure that your form does include all of these color combinations. This is very important. This can help save you many headaches, time and money. This process will show your customer how organized you are and will help to create confidence in both you and your customer.
Download your copy of the Embroidery Design Customer Approval Formand make copies of it for your future use. If this form does not work for your particular business, create one that will.
Searching for the right Embroidery Design Placement Chart can be very confusing and frustrating. There are many charts available for many different types of garments and linens, but most of them are not specific and it is up to you to create that perfect placement chart that will work for 99 percent of your items.
Your customer is depending on you to know the proper placement and when he or she receives it and the design looks off, they are extremely disappointed.
The right placement is important in the final quality of your product and the presentation of that product to your customer.
The placement of a monogram or an embroidery design on a garment is subject to many variables. There was a time when tradition was very important, but in today’s world that is not always a big factor. There are basics that really need to be followed, but for the most part, placements are all over the place.
Your customer’s preference needs to be taken into consideration, but for the most part, the customer is trusting in you to make that right decision because you are the professional with the experience.
Many times, we have to figure it out by the type of garments, the lines on the garment, the size of the garment and the basic construction of it, but it is much easier when you have a basic guide that you can follow.
Here are some of the variables that you need to watch out for.
Working with Stripes – If there is a stripe you must make sure that you hoop according to the stripe even if it appears to be slightly crooked.
Are there any diagonal, horizontal or vertical seams in the area that the logo would normally be placed?
Are there any inside zippers?
Are there any inside pockets?
Is there an access zipper inside?
Is there a removable lining?
Is the lining larger and wants to bunch up?
Is there an existing embroidery that must be considered?
Attention to all of the details is extremely important when you are placing your logo, lettering or monogram on either the left or right chest of any garment. Having a good basic embroidery design placement chart is very important if you want to be consistent in all of your design placements!
Do you feel like your Embroidery Production Spoilage is getting out of hand? Are you having an unusual amount of rejects or mistakes being made during the production process? Do you have a lot of returns or customer complaints? Are you having to spend unneeded time redoing jobs because of misunderstanding?
In a small business these mistakes may be done by you as a business owner or one of your employees. In a large business, it is definitely being done by the person that is performing the task or doing the job. It does not matter who is responsible, but this is a problem that needs to be addressed immediately so that it does not get out of hand.
It is extremely frustrating when the customers start complaining about the quality or returning their items. Not only is this disheartening, it is very time consuming and hard on the bottom line. After working with many embroidery companies I have discovered this is becoming a growing problem among embroidery business both large and small.
Factors That Contribute To Embroidery Production Spoilage
There are several factors that can contribute to this but the top 3 factors are:
Work Orders not written up correctly
Missing information, lack of details or wrong information on the Work Orders
Employees not trained properly
Other factors that can also contribute to embroidery production spoilage; especially in larger businesses:
Lack of the right tools to work with
Employees not paying attention to detail.
Employees that do not take pride in their work
Unpleasant working conditions
I want to talk about the first 3 factors and how to avoid them.
Work Orders not written up correctly, missing information and lack of detail sort of all rolls into one, but this is usually the number one reason that mistakes are made in the first place. Each work order should be gone over thoroughly to make sure that all of the information is correct along with all of the detail.
I have worked with embroidery companies that did not even have an image of the design on the work order. This was absolutely shocking to me! This is such a necessary item. If the operator does not have a picture of the correct design right in front of her or him, how can they be 100% sure that the right design is going to be embroidered on the correct products.
If the order taker mistypes the design number, this can cause a huge mistake. If a picture or an image of the design is in front of them, this can act as a double check to make sure the design is in fact the correct one. Also make sure that the color number and color names are written for each part of the design. If they are not, this too could be a problem.
You must be very explicit in the way that you give all of your information to the person that is going to be doing the job, and this means every part of the job. The more information they have, the better chance you have of getting the order right.
This is true for the single person business that is doing all of their own work. DO NOT depend that you are going to remember everything that the customer tells you and not have it written down. This just does not work! I have worked with a lot of people that say they do not need to write it all down; it is in their head and they will remember it. This may be true, but as you grow and add other people to your company, this does not work. YOU MUST make sure that all of your information about every part of the job is totally clear and that anyone could pick up that order and understand what needs to be done.
Employees not trained properly is a huge factor is mistakes being made and poor workmanship. You need to have a regular training program that you have either developed or purchased to start your employee training. Employees need to know what is expected, what a great product looks like, what a bad product looks like as well as each process that goes with their job description. They need to be fully trained in each one of the processes.
Too many times they are told once how to do something and then they are expected to go out and do what it is they were told to do. In one large company that I worked with they put their new operator on a single head for the first 2 weeks and started them right out doing orders right on the machine. There is no preparation beforehand, no training as to what backings to use for each type of fabric and anything. After a couple of weeks, they were put on a multi-head machine and they are basically expected to do any of the orders that came in and know what to use for the backings and other tools needed.
This is not enough training. I would never leave a new employee on a machine by themselves for at least 3 months. There are too many questions, too many variables and too many issues that can creep up. They need constant supervision for at least 3 months in order for them to build up the confidence that they need to do the job right.
Embroidery Industry Standard of Loss
There has been an industry standard for many years of a 2% loss. Many claim that a 2% spoilage rate is acceptable. You may have that in your contract, but many people will not do business with you if you have a spoilage rate that high. If you properly train your operators to be aware of all of the factors that can happen and how to avoid them, your spoilage rate will be greatly reduced.
Operators should be required to show the amount of garments that were lost or ruined. This should be part of the production form that they are required to fill out at the end of each completed job. You must also know why the loss occurred. Keeping tracking the causes and the operators can help to reduce the loss and avoid them in the future.
Keeping a chart on a weekly basis of these losses is very valuable. This information can be reviewed at the end of the week and used to help retrain the operators in the areas that they are apparently lacking information. When operators know that they are being tracked, they have a tendency to be more careful and pay closer attention to detail.
Many people say that this is part of your Production Cost! I do not agree with that at all. This is a cost that can be almost eliminated if the employees are trained to pay attention to all of the details. Yes, there is some spoilage when a person first starts to be trained, but they must be trained from the very beginning that this is not acceptable.
I created a simple Embroidery-Production-Spoilage-Report that you can download, print out and use to keep track of the embroidery production spoilage in your embroidery shop. Just click on the blue link and the .pdf file will open up for you. Even if you are a one person shop, this will help you keep track of the costs that you errors create. This is a huge eye opener to everyone!
The finishing of your garments after you have embroidered them is very important! These important details in the embroidery finishing process can help to raise your level of customer service. There is far more to finishing than just removing the backing and folding up the garment. There are many details in your Embroidery Finishing Process that if you pay close attention to; will increase the value of your business.
When you are going through the finishing process there are many details and problems that you need to look out for.
Thread Tails
Missing Stitches
Stray Threads
Loops in the Embroidery Design
Is Embroidery Straight?
Garment Stains
Damages
Buttons Missing
Zippers Not Working
Bobbin Pull Up
Thread Tails: Trim off as closely to the garment as possible but be careful not to cut off any lock knots.
Missing Stitches: If you find some stitches that have been skipped and are missing, they will need to be repaired. The easiest way to do this is to thread a hand sewing needle with a double strand of matching embroidery thread and do a satin stitch by hand to fill in the missing stitches.
Stray Threads: Thread that sometimes get caught during the embroidery process trail across the embroidery. Trim as closely to stitching as possible being careful not to cut off any lock knots. Gently remove with tweezers.
Thread Loops: If you see thread loops that appear in the same direction as the stitching – DO NOT TRIM LOOP! Use your fingernail to scratch loop to backside of garment. Use ONE DROP of Fraycheck on back of stitching where loop has been scratched back. Do Not Allow Fraycheck to get on garment! ALWAYS USE FRAYCHECK ON BACK OF GARMENT-NEVER ON THE FRONT OF THE GARMENT!
If thread loops in a different direction than the stitching, it is usually safe to trim. Trim as closely as possible to stitching.
Crooked Logo or Embroidery: If the embroidery appears slightly crooked, lay the garment flat on the trimming table. Steam embroidery area. While embroidery is warm, lay the palm of your hand flat on top of embroidery and gently twist or turn your hand in the opposite direction that the embroidery is running. Do this a couple of times. Allow garment to dry and check embroidery again. If embroidery is not straight, repeat the process.
Spots/Stains on Garments: There are various methods for spot removal depending on the type of material and type of spot. Most spots can be removed with a drop a dish soap and water. If this does not work, once the garment is dry, you can spray the area with acetone. You will need a professional acetone spot cleaner or sprayer for this application.
Do not use the acetone on fleece garments or Wind jackets, garments that may bleed or near any type of trim that may bleed onto garment. You will need to experiment with different fabrics and keep notes on what worked out well using the acetone and which ones did not.
Damaged Garments: If any garment has been damaged during the embroidery or hooping process it must be removed. Do not try to pass a garment with any damage on it. The customer will be very angry. Bring it to the attention of the customer and let them decide what he or she wants to do. I will either credit the customer for the garment or replace it, but I leave that decision up to the customer.
Buttons Missing: Many times buttons can be replaced if they are missing. If it is a garment that buttons down the entire front, sometimes there is an extra button at the bottom. If it is a branded button that cannot be replaced, let the customer know about it and let him decide what to do. Most of the time if is not the fault of the embroiderer, but it still needs to be brought to the customer’s attention.
Zipper Not Working: This is an issue that should have been discovered when the garment was checked in. If not, again bring this to the attention of your customer. If you embroidered the garment and the zipper was broken, you are responsible for that. The manufacturer will usually not replace the garment once it is embroidered even though the zipper was not working when you received it.
Bobbin Pull Up: There will sometimes be bobbin thread noticeable throughout darker stitching in some logos. These stitches will need to be colored with a fine tipped permanent marker the exact shade of color as your thread. This is a very tricky process and again you need to experiment with this until you get the method perfect. It can be done. Do not touch any surrounding areas with this marker. Do not try to cover up a large area, that will not work! This is just for a small spot here and there on bobbin thread showing through on the top stitching.
Make sure all garments are buttoned and zipped before folding and packaging. Paying close attention to these important details in the embroidery finishing process will make a huge difference in your presentation and will show your customers that you are very interested in their business. This will definitely raise your level of customer service!
Do you have the business organization and forms that help you to run your embroidery business and keep track of your production at all times? When you first start your embroidery business you can become so overwhelmed by all of the forms and processes that are so necessary to keep your entire production running smoothly.
There are software programs that can be purchased to help you keep track of your entire order, but most new embroiderers are not in the position to be able to purchase these programs so you must have a way of keeping track of it manually. I always advise new embroiderers to start keeping track of their jobs manually before going to the computer systems.
Record keeping is so extremely important and there are many forms that I have and keep with each order. You must have a system for keeping track of each step and the forms for each part of your organization or production of every job. Without a good system in place, you will soon become totally overwhelmed with the workload and you will not be able to keep track of your production and it can become very discouraging. I have 3 types of forms
Office or Sales Forms
Production Forms
Shipping Forms
The Office or the Sales Area is the First One That I Will Address.
This scenario is based on the fact that you are an embroiderer that sells retail and may have a retail or showroom in your location. If you are working from home and do most of your orders online or on the phone, the same processes and forms will apply to you as well.
I create sales packets that are ready for each sale so that I can grab them and be ready when I am first starting to work with a customer.
Customer Quote Form – Can be part of the packet or separate-This form is filled out and a copy given to the customer-your copy is then placed in a binder until the customer comes back in ready to place the order.
Order Form – I have one for Apparel and one for Caps-You can expand on this if you have different needs.
Form of Payment -Credit card-Pay Pal-Check form
Design Tracking & Timing Form
Production Tracking & Timing Form
Packing List
Do you have a checklist to make sure that all of the steps are taken?
These ready-made sales packets make it easy to work with and you do not forget anything as you are going through the entire process with your customer or prospect. Between the Quote form, the Order form and the Form of Payment form, you can collect all of their information and be ready for the sales process. I also have all of their information to easily input it into my database and start marketing to them. This can be in the form of a Newsletter, postcards, emails or a combination of all three.
Order is Ready for Processing
Once the order has gone through the sales process it is ready for the production process. The first step is to be Logged in. This can be done manually on a sheet of paper or in the computer. On the Log In Form, you want to have all of the necessary information to track it through the entire production process, finishing process and out the door! After the job is Logged In the process begins.
Two copies of the Customer’s original order are made and the original Customer Order form is filed away and you work with the copies of the order all the way through production. The goods or blank products need to be ordered. One copy of the order is then placed on a clipboard and hung up so that you can easily see it. I have mine hung over the Login table. This will stay there until the blank goods arrive.
The other copy of the order goes to the person that will be creating the artwork or embroidery setup for the job. The Artwork will need to be started. The Artwork Tracking & Timing form is used to keep track of all of the time that is spent on creating the artwork, design set up, sewouts and getting approval from the customer. There is a lot of time in this step and it all needs to be kept track of. I have a form, Customer Approval Form that I created that has the embroidered picture of the design on it and the color breakdown so that the customer knows what the color will be for each part of the design. If there are different colors of garments, your color breakdowns may be different. You must have the customer‚’s approval before you start embroidering the garments. This is very important.
The Artwork person creates a folder that will hold the production information and be followed all the way through production. I have an Embroidery Room Worksheet that the Artwork person fills out. This has all of the embroidery and design information on it, the color breakdowns, how the order will be hooped and run. A copy of the design is then put on a disk and placed inside of the folder. All of this information follows the job through the entire process.
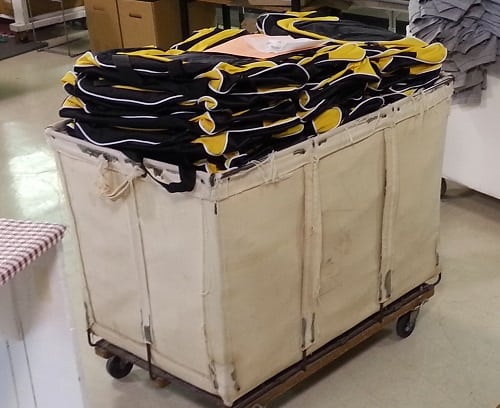
The blank goods arrive. This is where the Production Tracking and Timing form comes in. Each step of the production process must be timed and kept track of so that you will know what your true costs are at the end of the job! The blank goods need to be counted, inspected and organized in stacks of sizes. Each size will be hooped in a slightly different location so you must have a system of keeping track of the sizes so that they do not get mixed up and hooped improperly. The blank goods must be checked against the packing slip from the distributor and the customer‚’s order to make sure that they match. After they are verified that they match, the distributor‚’s packing slip is attached to the customer‚’s order.
The garments go to the hooping area and are hooped with the properly sized hoop and the correct type of backing and topping if necessary.
The job then goes to a staging area waiting to go to the embroidery machine. If you have your jobs hooped ahead of time, you will save a huge amount of production time and can just basically feed the machine. This is when you can really make money.
After the garments are embroidered, the embroidery machine operator removes the hoops and places the garments into a bin.
The embroidery machine operator will make notes on the Embroidery Room Worksheet of any changes that were made and other necessary notes that she feels is important. Many times an embroidered garment will be placed on a copier so that they have the exact location pictured or if there is any question about how it was run. If it was a job that was difficult to hoop, that will be recorded on this Embroidery Room Worksheet.
The Production folder that the Artwork person created is then filed away with all of the embroidery and design information so that it is ready when a repeat order comes in. This makes it very easy to repeat a job without errors.
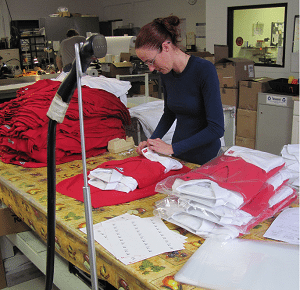
The embroidered garments then go to the finishing area for trimming, steaming and packing.
After the garments are trimmed, steamed and packed, they are then placed in stacks and counted to make sure that you have all of the proper pieces and sizes that match the customer‚’s order.
Job is Finished Ready for the Shipping Process
After the job is counted and placed in size stacks, the Packing List is created. This will have the Customers Name, Shipping Address, Order Number from the Log In sheet, Box __ of __, Quantity, Item Description, Color, and Size
.
A copy of the Packing List is made and placed inside of the box for shipping. The original is sent to the Shipping department to have the shipping label created and the cost for the shipping is added to the packing slip.
This copy of the Packing List with the shipping costs added is attached to the total packet of forms, Customer‚’s Order, Artwork tracking & Timing form, Production Tracking & Timing form and sent to the office to be invoiced.
The shipping person must go back to the Log In form and add the shipping date.
The Invoice is generated by the Office person and then she goes back to the Log In form to write in the Invoice Number.
This system gives you a total tracking of all of your processes and helps you to keep on top of your orders at all times. If a customer calls and wants to know where their order is in the processing, it is very easy to find out and give them an accurate answer. This is very important. Customers want and need to know that you are totally organized and on top of their order at all times!
This system works even if you do not have an automated system that tracks in the computer. As your small business grows and you have the funds to add an automated system then you will be ready and understand all of the processes. The automated systems still need to have the accurate information input into them, but they are a huge time saver when you get to that point in your business.
I hope that this basic process will help you as you are getting your Embroidery Business organized and getting all of the forms necessary for you to keep track of your production. All of these forms are available inside of my Embroidery Training membership site. I have 4 levels of membership. Go to http://TheEmbroideryTrainingResourceCenter.com and see what level is the correct one for you. Most of the forms are inside of the Silver level.