by The Embroidery Coach | | Embroidery Business Marketing, Embroidery Production
Would you believe that changing embroidery thread could increase your production by 20%? Recently I was asked by an Embroidery supply company to do a comparison for a company that they were working with to help increase their production. This was for a large company that embroidered monograms only. They were looking for a way to increase their production without compromising their quality.
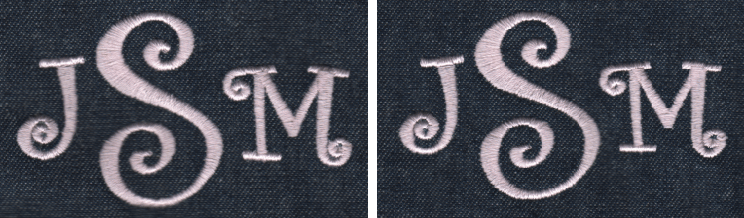
This was a very interesting experiment. I took a basic 3 letter monogram, set it up with underlay, pullcomp and density as I normally would. I embroidered it with the normal Robison-Anton 40 weight embroidery thread No. 122. I then took the same monogram, reduced the density by 20% and sewed it out with a 35 weight embroidery thread, Robison-Anton No. 152. The images below are scanned images, They are not photographs. I wanted you to be able to see what I saw! Scanned images seem to show up more flaws than photographs.
40 Weight Thread 35 Weight Thread
I could not believe my eyes. I embroidered each one on a piece of denim at 800 stitches per minutes and there was very little visible difference in the monograms at all and with the density being 20% less, the sewing time was also 20% less. This would help to increase the production at the end of the day by 20% for the large monogram company. This is huge if you have a lot of embroidery machine heads running with different monograms!
I remember when the rage was all about having your school name embroidered on the back of corduroy jackets about 25 years ago, I embroidered the backs of all of those jackets using 30 weight embroidery thread. This cut down about 30% on stitch count and production times. Using 30 weight thread, you definitely could see a difference in the appearance, but you cannot really tell the difference in the 35 weight embroidery thread. This is very exciting to me.
I wanted to share this with you so that you could start thinking about different ways of cutting down on your production time. This would not work for very fine detail in designs but for something like jackets backs or monograms, this 35 weight embroidery thread would work great and you can cut your production down by 20%!
by The Embroidery Coach | | Embroidery Business Planning, Embroidery Production, Organizing
In Part 1 of our Saving Time series I talked about how to save time Creating Embroidery Design Layout Style Sheets, in Part 2 I talked about Limiting Your Embroidery Lettering Styles and in Part 3 it was about creating Sample tags for all of your showroom embroidered product samples. Today I am going to go over how to create an Organized Ordering System.
An Organized Ordering System
An organized ordering system is simple to put into place. This is true when you have all of your information computerized and even if you are using paper forms to be filled out while you are waiting on the customer. You can create Sales Order Packets with all of your forms included so that you do not have to look for your information forms while you are working with your customer. Inside of this Sales Order Packet you should have:
- Customers Quote form
- Your Order Form
- Form of Payment
- Production Timing Form
- Artwork Production form
- Packing slip.
When you are first working with a customer, they usually want a quote before they place an order. Prepare your customers quote and make a copy of the quote form for him to take with him. Place your copy along with all of the other forms into a file marked Customer Quotes. When the customer comes back to place his order, pull the packet of forms from the quote file and you are ready to complete your order taking process.
By having all of these forms together in one packet, you will keep all of the customer information together and you will prevent mistakes from occurring.
During this series we have gone over 4 ways to help your customers make quick ordering decisions. You want the order process to be a pleasant experience for both you and the customer. When you offer your customers so many options they only get confused and it takes longer for them to make a final decision and sometimes that final decision is no decision. Reducing the amount of choices you have to offer will save you and the customer a lot of time.
I hope that this series has helped you to become a little more organized in your ordering process and that you see the value of taking the time to go through your ordering process and make some immediate changes that will benefit both you and the customer!
All of these forms plus many more business and production forms are available through my Embroidery Business Training membership website, the Embroidery Business Academy.
Joyce Jagger
The Embroidery Coach
by The Embroidery Coach | | Embroidery Business Planning, Embroidery Production, Organizing
In Part 1 of our Saving Time series, I talked about how to save time Creating Embroidery Design Layout Style Sheets. In Part 2 I talked about Limiting Your Embroidery Lettering Styles. Today I am going to talk about saving time by Creating Sample Tags with order information to apply to all of your showroom samples.
Sample Tags With Order Information
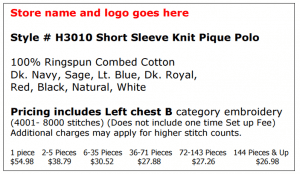
Your showroom should be complete with high-quality embroidery samples that are tagged with all of the order information that is applicable to that product sample. This tag should include the style number, colors and sizes available, manufacturer, price, and quantity pricing. All of this information should be on a Tag that is attached to the sample garment.
These embroidery Sample tags are very simple to produce and portray a good image to the customer about your organization. I created my Sample tags on card stock that I purchased from the office supply store, cut them apart, and laminated them. They stay very clean and always look professional when they are laminated. I then attached them with a Hang Tag attachment.
Having all of your samples tagged ahead of time with the appropriate information will save you a lot of time and prevent you from having to look up the information in the catalogs. As your pricing changes, so do your Sample tags. Always keep them up to date with all of the correct product and ordering information!
In part 4 of our Time-Saving series, I will talk about having an organized ordering system!
Joyce Jagger
The Embroidery Coach
by The Embroidery Coach | | Embroidery Business Planning, Embroidery Production, Organizing
In Part 1 of Saving Time-Helping Customers Make Quick Ordering Decisions, I talked about how to Create several Design Layouts Options for your customer to choose from. During Part 2 I am going to talk about limiting your customers lettering style options.
Limited Embroidery Lettering Style Options
In each of the embroidery software packages today you have many lettering styles to choose from and it is very tempting to want to show our customers all of the lettering styles that we have available. Many new embroiderers make the mistake of offering all of these styles to their customers and letting them chose which one they want to use.
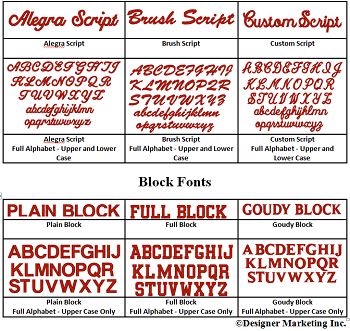
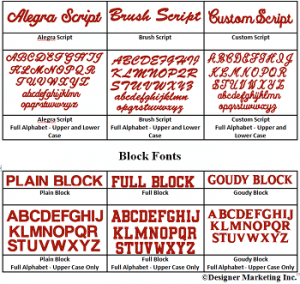 In order to do this, you must sew out every embroidery font that you have available and know what the capability and size restrictions are for each one. This takes a lot of time and is totally unnecessary. Our customers get so confused when they are faced with so many choices. I have found that the best way to handle this is to offer 2 or 3 Block lettering styles and 2 or 3 Script lettering styles. This is enough for them to choose from and will prevent the customer from being overwhelmed with your vast selection.
By limiting the embroidery lettering style options, you not only save time working with your customer in their selection, but you also save time in the set up of your lettering designs. If you are only working with a few lettering style options, you can have templates made ahead of time with all of the style settings included in the template. This is a huge time saving process when you are creating your customers design set ups!
In our next Saving Time series, I am going to talk about tagging your samples with the correct ordering information!
Joyce Jagger
The Embroidery Coach
by The Embroidery Coach | | Embroidery Business Planning, Embroidery Production
Always match the customer’s original embroidery order to the packing slip as you open up the boxes of blank goods. These blank goods can be dropped off by the customer or be sent to you by the distributor.
If you are a contract embroiderer, your customer should have sent you his order before you received the goods from the distributor or manufacturer.
Sometimes the customer will drop off his order and garments at the same time. As a general rule, they never look at the packing slip or check it before they deliver the order to you. They just assume that what they have received from the manufacturer or distributor is correct.
Many times the original orders will not match the packing slip. If there is a discrepancy in the amounts, sizes, or colors, you must find out exactly what you have before you call the distributor or your customer.
If the garments are packed in plastic bags, remove the bags and check the sizes. The size tag on the outside package is not always the size that is marked on the garment. This is the first thing to check.
Lay out all of your garments in stacks by sizes and then count each size. Make a list of each size with the amounts. If the colors are not correct, list the colors with each size and the amount.
Now you can call the distributor or the customer and let them know exactly what you have and what the order states that you should have. I have found, being a contract embroiderer, that my customer will often substitute a color, size, or style if the distributor was out of a particular item and forget to write it on the order.
Distributors will often substitute a size with a different one and neglect to include this on the packing slip. The person responsible for picking the order may pick up another size and add it to the order instead of letting you know that you are short that one size.
The number one rule here is to make sure that your order matches the packing slip, or find out why it does not, before you do any type of production on your product. Once an item is embroidered, you cannot exchange or replace it.
Do you have problems with customer orders not being correct?
Joyce Jagger
The Embroidery Coach
by The Embroidery Coach | | Embroidery Business Planning, Embroidery Production
Here are 9 Tips To Increase Your Embroidery Production that will help to save you time and increase your profit!
- Organize each one of your work areas to save steps. Have all of the tools used in that area, or during that process, stored in that area. You may have duplicate tools; this is OK. I have scissors in my area where I cut backing, in my area where I trim off the backing, and on my machine. You do not want to leave an area to get a tool!
- Keep each area as neat and orderly as possible. Sometimes this is hard, but it takes more time to constantly move stuff out of the way so that you can work.
- Keep all of your threads stored and marked by color. This saves time looking for a thread color.
- Order your backing in cut sizes and store it on a shelf close to your hooping area. You will need several sizes for this to work. If you order by the large rolls, cut enough ahead in the different sizes for many jobs. Cutting it up for each job is a huge waste of time.
- Keep your thread colors for a design on the closest needles to each color on the machine to save color change time. Example: If you are using 4 colors in a design, put those 4 colors on needles 1,2,3 and 4. This gives you the shortest travel distance between needle bars as the head moves to the next color which saves time.
- Store the thread for each machine as close to the machine as possible. If you have several machines, you must have your thread in a central location but as close to the machines as possible.
- Keep track of where your needles are in your embroidery machine. Having a system in place is important for keeping track of your needle changes. I have a form called a needle replacement sheet. It is designed for a 15 needle machine for this purpose. If you have a single head you only need one sheet. If you have a multi-head embroidery machine you will need one for each head. Each time you change a needle, note on your sheet the size, type, date, and reason for changing. Store the sheets in a binder under the machine.
- Before starting production each morning, brush out and blow out the Rotary hook and Knife area of your embroidery machine. Place 1 drop of oil on the rail of the rotary hook just outside the bobbin case.
- Stop production early on Friday afternoon to do all of your weekly maintenance. This pays off huge dividends the following week and helps to start Monday morning off knowing that all of your machines are in tip top condition. You are ready to begin immediately without the fear that the embroidery machine will break down during production!
If you have found some time saving tips to increase your embroidery production, I would love to hear about it. Please respond to this post and share them.
Joyce Jagger
The Embroidery Coach
