Do you ever make mistakes when you are embroidering your garments? Have you been faced with an item that a customer brought in and it was not replaceable? Unfortunately, everyone makes a mistake now and then, but you need to know how to save those expensive garments when mistakes do occur! Sometimes you have garments that cannot be replaced! It is very important to have the skills to be able to fix these mistakes just in case you have items that customers have brought in to you and you do not have any way of replacing these items!
If it is an item that can be replaced, you need to weigh in the cost of replacing the item, your time spent on repairing it and of course the time that it takes to wait for the item to be shipped to you. Would it be more cost-effective to purchase a new item instead of going through the process to fix it?
Sometimes it makes no sense to spend the time to do it. This is something that you need to determine. You need to keep track of how long it takes you to do a repair or fix a mistake. You must know what your actual cost is for each type of mistake.
I have a 10-Step process to show you how to match up a design that has been taken out of the hoop before it was finished. This is a very common mistake especially if you are running a multi-head machine and you ran out of bobbin thread but the machine did not stop. In your haste to unhoop your items, you discover after it is done that it had not finished.
The mistake that I am going to show you is one that I hit the hoop with my arm and I just pulled the garment right out of the hoop. Now it needs to be rehooped and matched up perfectly so that the customer will not ever know that this happened. This is a very simple method that I learned many years ago and it works beautifully!
Step 1- Print out a copy of your worksheet from your design software. Make sure that you print out crosshairs or lines on your worksheet to make it easy to match it up in your hoop.
Step 2 – Cut out the design from the worksheet all around the edge of the design so that it matches the same size as 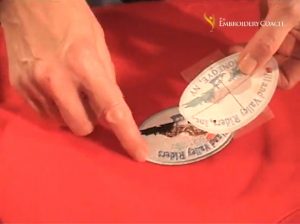 your finished design. You now have a paper pattern of your design. Look at it closely to get some good defining lines so that you can line it up perfectly.
Step 3 –Cut out the first letter of this word and the last letter that was finished so that I can lay the paper but out 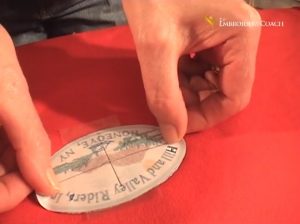
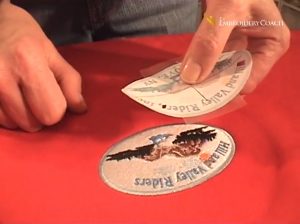 pattern down over top of the design on the shirt and line it up perfectly.
Place a piece of tape down to hold it in place.
Lift the edges of the paper pattern up it to make sure that the letters are in the exact same location.
Step 4- Place the bottom part of your hoop underneath your garment and position it to be in the center of your 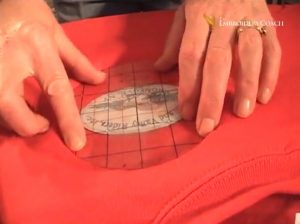 design. Do not forget to place new backing on your hoop. Taping the backing around the hoop will help to hold it in place if you are not using a hooping device.
I have a template with grids on it that I cut out from an extra one of my design placement templates. I lay it down on the horizontal and vertical lines of my design and line it up. With my grid, I can line up my design perfectly. If you do not have a grid that you can use inside of your hoop, you can mark vertical and horizontal lines from the edge of your paper pattern to the outer edges of where the design will line up with your vertical and horizontal lines in your hoop. I use a sharp edge of a piece of soap for marking my garments. Hotel soaps are great for this.
Step 5- Place the top part of your hooping frame on, line it up and press it down with the center lines of the grid 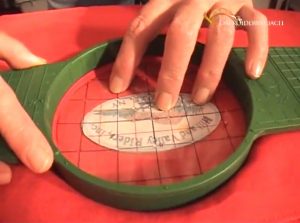 matching the center lines on the hoop both vertically and horizontally. If you are using marks that you made on your garment, they must line up perfectly in order for this to work, but it is not hard to do.
Step 6- Remove the template. The start/stop position of your paper design will be at the correct location in the center 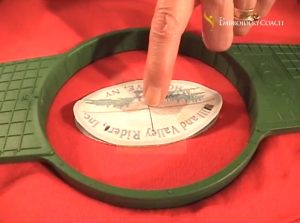 of the hoop.
Step 7- In your software, you will need to mark the start/stop position so that it stays in the center of your design
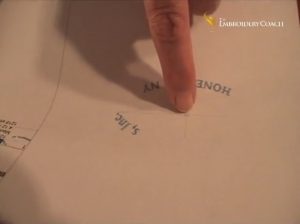 Delete all the parts of the original design that has been embroidered and is correct. Make sure to leave all of the part of the design that needs to be completed. This is now your new design.
Save it with a new name so that you do not override your original design. Make sure that the new design is going to start in the same location as the original design.
Step 8- Place the garment into the machine and lined it up both vertically and horizontally. Remove the thread from 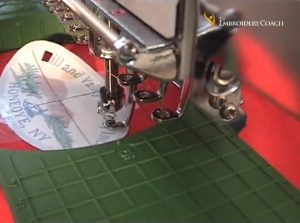 the needle to start with because you want to make sure everything is perfect and that it lines up with the last letter that finished.
You have to hold the thread tight if you do not have a button to turn off the head because you don’t want it to register a thread break. Start the machine at a very slow speed or walk it holding the start button. This will help you make sure it’s lined up correctly.
Step 9- Stop, rethread the needle and remove the paper template and start the machine.
Step 10 – After the design is finished, you can pull it out of the hoop to see the finished product. If you follow this
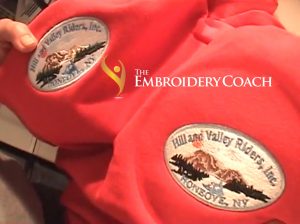 method, everything matches and no one will ever know that you had made the mistake in the first place.
I use this same method to repair many types of mistakes, such as when you must remove stitches and replace them. It works great for many different types of situations. It has saved me many times and keeps my customers happy! They never know a mistake was made in the first place!
For information on how to build a successful embroidery business, visit Embroidery Business Academy
The Embroidery Coach Professional Guide on What Are Common Embroidery Mistakes to Avoid for Consistent Quality Results
Embroidery demands precision, but more importantly, it demands control when things go wrong. At The Embroidery Coach, we treat mistakes as operational signals that reveal gaps in process, timing, or handling. Every error carries a cost, whether in time, material, or customer trust. That is why our approach is not just about fixing issues, but about understanding what are common embroidery mistakes to avoid and how they occur and preventing them from repeating.
When embroidery is handled with discipline, even unexpected disruptions can be managed without compromising the final result. Our focus remains on minimizing risk, improving accuracy, and maintaining consistent output across every project. By identifying the most common embroidery mistakes, we build a workflow that is both efficient and reliable.
What are Common Embroidery Mistakes To Avoid?
Before diving into the specifics, it is essential to understand that most embroidery errors stem from process gaps rather than skill limitations, which is why identifying these common mistakes becomes the first step toward achieving consistent, high quality results.
1. Removing the Garment Before Completion
We ensure garments remain hooped until the design is fully completed. Removing them too early leads to incomplete stitching and makes alignment restoration more challenging.
2. Misalignment After Rehooping
We understand that once a garment is disturbed, achieving perfect realignment becomes difficult. Even slight positioning errors can make the correction noticeable in the final design.
3. Running Machines Without Monitoring
We avoid leaving machines unattended. If the bobbin thread runs out during operation, it can result in unfinished embroidery and wasted production time.
4. Accidental Hoop Movement
We recognize that physical disturbances can immediately affect design placement and compromise stitching accuracy.
5. Rushing the Embroidery Process
We maintain a controlled pace throughout production. Rushing increases the risk of missing incomplete sections or making handling errors during unhooping.
6. Ignoring Repair Versus Replacement Decisions
We always evaluate whether fixing a mistake is practical. In some cases, replacing the garment is more efficient than spending excessive time on repairs.
7. Not Tracking Time Spent on Fixes
We track the time required to correct mistakes. This helps us understand the true cost of errors and improves future decision-making.
8. Inaccurate Rehooping Techniques
We ensure precision when rehooping after a mistake. Poor repositioning can make corrections ineffective and visibly flawed.
Our Method for Maintaining Consistent Quality
We follow a structured embroidery process that prioritizes prevention, control, and evaluation. Each stage is designed to reduce variability and improve overall efficiency. We begin by carefully monitoring machine operation. Continuous supervision helps prevent issues such as incomplete stitching caused by thread interruptions.
We also focus on maintaining alignment throughout the process. Proper hooping and accurate rehooping ensure that designs remain consistent and visually precise. Another essential step is decision analysis. We assess whether a mistake should be corrected or if replacing the garment is the more practical option. This approach helps optimize both time and resources.
We also emphasize learning from every error. By tracking repair time and identifying patterns, we continuously refine our workflow to reduce recurring mistakes.
Why Avoiding These Mistakes Matters
Embroidery mistakes impact more than just the final appearance. They affect production efficiency, material costs, and customer satisfaction. When working with valuable or non-replaceable garments, even a minor error can lead to significant loss.
By avoiding common mistakes, we protect both the product and the process. This ensures that every embroidery project meets professional standards while maintaining consistency and reliability.
Take Control of Your Embroidery Quality!
Consistency is achieved through awareness, discipline, and structured processes. By identifying and avoiding common mistakes, we ensure every embroidery project delivers accurate, reliable, and professional results.
Frequently Asked Questions (FAQs)