by The Embroidery Coach | | Embroidery Pricing
Are you charging enough for embroidery to pay all of the bills, make a profit and have some extra set aside for growth? This is an struggle that most embroiderers deal with every day and cannot seem to get on top of it. They do not know how to charge or where to begin.
You may have heard my story of how I almost lost my business because of underpricing. I did what most embroiderers do; I gathered everyone else’ s price lists and averaged them out to create my own price list! Sometimes I would give the customer the lowest price around just to get the business and this was a huge mistake! So many embroiderers start out doing exactly the same thing that I did and that is a practice that must stop! There are many embroiderers that are in the same position that I was in and it is very sad. It does not have to be this way.
It Is Time To Stop Undercharging For Your Embroidery!
I would love to start a movement for embroiderers to stop working for nothing and start pricing their work for a price that is worthy of them. We are highly skilled professionals, not unskilled laborers, but so many embroiderers charge like they are unskilled laborers! This is not fair to the embroiderers that are trying to make a living and it is really causing many of them to second guess what they are doing! This is very disheartening!
There are many embroiderers that are working from home and they are just getting started. They think that their time is worth nothing and to get the work they must practically give it away. When you are first learning your craft, I can understand this way of thinking but it really must stop. Most embroiderers do not offer their products until they feel confident that they are ready and that their quality is good. You did not get into this business to kill time, you go into this business because you wanted to earn an income doing something that you love to do!
It is time to stand up and start charging what you should charge like the professional that you are so that you can actually make a living from your business or at least give you a good supplemental income.
There Is More To Pricing Embroidery Than Stitch Count!
When you are trying to come up with a good price list you must consider several factors and it is not all by stitch count. There is so much more that goes into figuring your pricing other than stitch count and that is what the majority of embroiderers are charging for. When your embroidery machine is not running, you are not making any money, how can stitch count be your only factor? It isn’t. You have color changes, stops and starts, the time it takes to put the garment into the machine and take it out along with other factors.
Who is paying to hoop it, who is paying to trim it, who pays for the packaging of the finished product? Most of the time it is the embroiderer and not the customer that pays all of those charges. This is not the way that it is supposed to be! You are performing a service and each piece of that service needs to be figured into your pricing structure.
You need to know exactly how much each one of these pieces are costing you and the only way that you can accurately know that is to start timing each one of your steps. Each function that you perform in your business has a time and cost attached to it; start timing each one of these functions and figure out how much it is costing you. I have always been an advocate for timing everything that I do. Time is money and you cannot get it back when you give it away. Your time is precious. Use it wisely and start charging for your time.
by The Embroidery Coach | | Embroidery Business Marketing
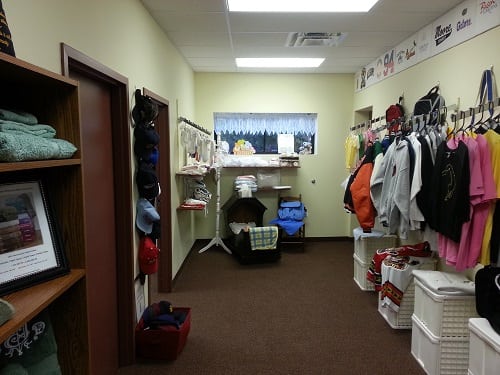
I have had many requests on how to set up a retail area for embroidery when you do not have much space and I wanted to share an experience with you when I set up my retail area for embroidery when I only had a small hallway to work with.
As many of you know I set up a retail space within the embroidery shop that I had open. I have since closed that shop, but I wanted to share the experience with you of how setting up a retail area for embroidery in a very small space is totally doable. We did not have an attractive storefront to work with like many other businesses; our building was set up for office space and production. What I had to work with was little more than a hallway and one office room, but I was determined to make the most of that space and make it work.
This was a very small space, but we have a lot packed into it. You can set up a very efficient and attractive retail area for embroidery even if you only have a small space to work with. We planned out every inch of it and set up our product displays in separate areas in order to make it easy for anyone to find what they are looking for.
It took a lot of time to plan everything out and create our samples but the end result was well worth it.
To start the planning process I laid my entire plan out on a mind map. If you are not familiar with a mind map you can use a Word doc and draw it out. I do all of my planning using mind maps and it makes it so easy and organized.
- I started out by doing some keyword research to choose the name and then I purchased it.
- I decided on what products to carry based on what people had been asking for and the information that I received asking other people what they would like to see me carry.
- I planned out each area and function and what each one would need from each display area to the processes inside of the office.
- I decided on which embroidery layouts, fonts, and designs that I was going to be offering on a stock basis.
- I purchased samples and embroidered them
- I created Product Sheets on each of these items with all of the information about the item including the price
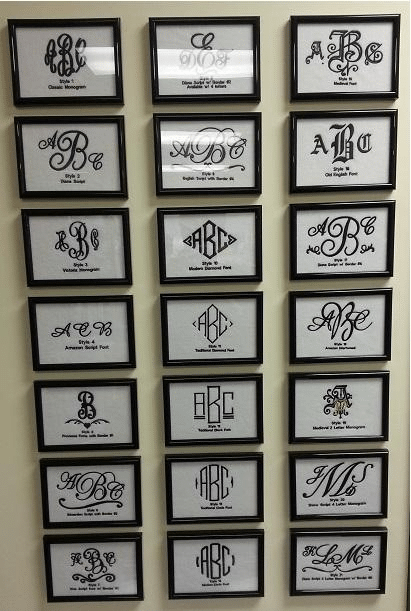
- I created a lot of embroidery samples to hang on the wall in pictures frames such as my lettering fonts and
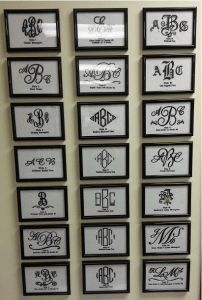 my monogram fonts.
- I embroidered jacket back-sized designs of jobs that we had done in the past and hung them around the ceiling for people to see the minute that they came through the door.
- I created price lists for the different types of items and hung them on the wall or displayed them by the area where the items where. Most of these are done in picture frames to make them attractive.
- I purchased display pieces that I would need. I used a lot of items that I had around my home that I thought would work. I was trying to keep the cost down as much as possible.
- I planned out the promotion for the Grand Opening and the follow-up.
- I purchased a 4‚’ x 12‚’ banner for the front of the building.
- I ordered a Sandwich Board and made a banner on each side and set it out on the sidewalk in front of the building.
- I also planned out the Follow-up Marketing System
Planning is the key to getting it all done and on time. I set a specific date and planned out each week as to what had to be done that week in order to have the Grand Opening on a certain date.
I went to the town board and spoke with the Economic Development director to see if there was a way that we could get some type of publicity and that was a really good move. He said that I could have a ribbon-cutting ceremony and that he would arrange that part. He gave me the names and addresses of all of the town, county and state dignitaries so I sent each one of them an invitation to attend our ribbon-cutting ceremony.
The Monday before the Grand Opening date, I sent out a press release to all of the local media. I ended up having 3 radio stations and 2 TV stations represented for the ceremony. It was great! I really never expected that part, but it really turned out excellent for us. One of the TV stations did a segment on us that appeared on the evening news and one of the radio stations also did an interview and it was on the radio during the afternoon.
That has brought in a fair amount of people and I did not have to pay for any of that advertising so I was very happy with the results. I did some trade advertising on one of the local radio stations and that worked out fairly well. We had several people come in and say that they heard about us on the radio.
The amazing thing was that our neighbors had all discovered that we existed and were starting to visit us. The contract part of this business had been in this building for 7 years and no one in the neighborhood even knew there was an embroidery shop there at all! There was only a tiny sign on the door and no one you could even read from the street.
I had a banner made to put on the front of the building. At least people were seeing the banner and were curious! The sandwich board with the banner on was also working.
For the Grand Opening, we embroidered coasters to give away along with a $10.00 gift certificate that they could use towards their next purchase. We also had refreshments and a drawing for a gift basket. Our grand opening lasted 3 days, we had a lot of fun doing it and as I said earlier, it was so worth it!
I wanted to share this experience with you to help you in planning out setting up your retail area for embroidery in a small area for your products. You did not have to spend a lot of money to do this, it took more planning than money!
This would work for you even if you want to set up a spot in your home to display your products, or rent a small space in a hotel or a club that you belong to. You can plan out a customer appreciation night or a couple of nights to bring people in and show them what you have to offer. What you get out of it will more than pay for the cost of putting it together. This will make people aware of what you are doing and what you have to offer.
Promotion and marketing is very important and without it, your business will not grow in the way that you want it to. To learn more about marketing and promoting your business, go to The Embroidery Business Academy. Check out what is offered in the Platinum Level.

by The Embroidery Coach | | Embroidery Business Marketing
When you are setting up your display samples you want to create them to encourage quick and easy sales. The way in which you select and prepare your samples for display whether you are going to add them to a retail space or create them for selling samples to take out to your customer is very important. You want to make it easy for the customer to be able to select the right garment quickly and you also want to make it easy and time saving for you as you are selling to your customer.
- Select what items you want for display or selling samples.
- Create a product sheet with all of the information about that product for each one of your sample display items. This includes the Style no., Available sizes, Colors and Order information for the distributor, the Price from your distributor and your actual Selling Price. (This makes it easy for you to be able to place orders for your products). Add all of your product sheets to a binder in tabbed sections.
- Create information Hang Tags for the items using card stock purchased from the office supply store. (You will use your information from your product sheet to create your sample tags.) Add your logo at the top, add Item name and Style number, Colors and Sizes available and Pricing. Use the C category pricing and add quantity pricing. (I create my pricing in categories to make it easy rather than by each stitch count) Cut the tags into 3 x 5 sizes and laminate them. Attach them to the garment with a labeling gun.
- Decorate each item for display-Make sure that all of the decorating is of high quality, no threads showing, no puckers, no hoop marks, no dirty marks and no wrinkles.
- Create design samples for display for the customer to choose from, such as lettering styles, Monograms display samples, thread colors, stock designs. You will also want to have the same information in your binder for easy retrieval.
- Create simple fill in the blank order forms with a space for item number, description, size, color quantity, decoration type, all design information, pricing and delivery information. Also have a space for amount of deposit, (min. 50%) along with total due upon delivery or pickup.
- Set up one set of basic polo shirts for the customer to try on for size. Purchase one of each size and make sure that each size is a different color. These sample shirts should be embroidered with your logo on them. You will want a shirt that can be washed repeatedly because you will need to wash them after each person tries one on. This should be a good basic sample that is medium priced, and embroiders well. This will give the customer a chance to see how the shirt performs after many washings and what the true size and color is after it has been laundered.
- Select display racks for your items if you plan to set it up for retail. There is no need to spend a lot of money on this. I use the 2 inch grid racks that you can purchase in 2 foot sections. They can be set up to stand alone or they can be attached to each other with clips to create an entire wall for your display. You can also purchase the slat wall and hang your items on fixtures attached to the slat wall. For some of my items, I purchased peg board, painted it the same color as the wall and hung simple items on that. You can be very creative with your displays. You may have some items laying around the house that you can use for display. I found a cradle in the attic that I used for my babies and grand babies. I pulled that down and created a display of several baby items. A display like this will get lots of attention.
- If you are going to be taking your items out to your customer, purchase a high quality garment bag and embroider it with your logo. Make sure that it is a garment bag that you can use as a sample also to sell to your customers. If you are going out to your customers, make sure that everything that you take is something that you can purchase. You may have a tote bag with your selling supplies in it or a brief bag with your computer and supplies. You can purchase a bag to carry your cap samples in. Each one should be labeled also with the selling information and be embroidered with your logo on it.
- If you are selling promotional products, use a pen with your information on it and leave it behind for the customer. Have a display of pens in your retail space and one for the customer to take with him.
- If you have retail space organize your samples together in areas that will be applicable to each one of those samples, such as all of your baby products together, and all of your wedding products together. If you are selling to corporate clients, have all of your items in one location, such as shirts, caps, jackets, pens, mugs, and anything else that you would be selling to that market. You want to make it easy for your customer to buy, buy, buy!
Your samples should be impeccable and very eye catching. Taking care to prepare your samples whether for display or for taking out to the customer will pay off in dividends. Your customer will be able to see your professionalism and will have more confidence in you as their supplier for their promotional products. This is also a very easy way to increase your sales! For more information in creating Simple Sales Tools, go to The Embroidery Training Resource Center in the Gold Plus Level.
by The Embroidery Coach | | Embroidery Tip
How to repair an embroidery design that sews out of registration is a constant problem that most embroiderers face and are very often stuck .When your Embroidery design on your finished garments do not look as good as your design sew out, this creates a huge problem. Sometimes it can be solved and sometimes the garments are totally wasted!
The problem with this design was created by an embroidery machine operator and it could have been totally avoided. I have always been adamant about making sure that the design sew out was done on the same type of fabric that you are going to be using for your finished garments. This is very important and will pay off in big dividends in both quality of embroidery and time.
As I am working with an embroidery company trying to help reorganized their production and get it up to speed, an issue came up that is very common with many embroiderers, especially new or inexperienced embroiderers.
One of the embroidery machine operators sewed out a design they had received back from the digitizer. She created her sew out to make sure that the design was OK and ready for production. She then embroidered her 6 knit shirts for the customer on an 8 head machine. When she finished them, they were way off registration and it caused the material in the shirt to look stretched around the embroidery.
What caused this Design Registration to be so far off?
She called me over to look at the problem and wanted to know why it happened. She also wanted to know what she could have done to avoid this and how to get this issue solved. The shirts were quite expensive and they are totally unacceptable the way that they are.
I was shocked as to how bad it looked when I first saw it. I quizzed her about her process, what fabric she used for the sew out, what thread she used, how did she have it hooped and how her tensions were set. She created her sew out on 2 layers of firm cutaway backing.
Her sew out was NOT done on the right type of fabric; that was her main problem! You always use the same type of fabric, or very similar, that your finished garments are going to be. She also used 2 layers of a heavy cutaway backing, and the hoops were not tight enough. The backing was much too heavy for the shirt or design. She would have been better off with a lighter weight backing such as a 2 oz cutaway or the No Show cutaway backing. The No Show backing is a mesh backing that holds up very well with a lot of stitches and yet it keeps the garment soft and pliable. She was correct in using a topping on the top of the garment.
Now the question is, how do you solve this problem?
It is very important for every embroiderer to know how to repair an embroidery design. Here is a simple way to make your repair.
- First of all, do not remove the garment from the hoop or the topping from the top of the embroidery. Lay the garment face down over a firm surface and use a tool called “Peggy‚’s Stitch Eraser” and remove the stitching from the backside of the garment. I use a large candle jar, one with a smooth bottom, turned upside down. You must be very careful that you do not cut any holes into the fabric.
- After you have removed all the stitching and thoroughly cleaned up all of the threads, it is time to embroider the design again.
- This time you must increase the size of your design by 2 or 3 percent. This will be large enough to cover everything that you removed.
- You must make sure that you do not loosen the hoop as you are removing the stitches. This is very important. If you do, you will need to tighten the hooped area before you begin sewing out the design, and it makes it more difficult to line it up.
Repair your Embroidery on a Single Head Embroidery Machine!
- You already have it hooped so you are not going to re-hoop your garment to add new backing.
- Load the hooped garment back into the machine and lay new backing down under the hoop. For this you will need to use 1 head only because you are not going to be able to line up all 6 shirts to sew out perfectly on the multi-head machine when you are repairing a design like this.
- Print out a new design sheet of the larger sized design, cut it out following around the edge of the design and lay it inside the hoop covering the entire area that had the embroidery removed. Make sure that you have the center starting point of the design marked on the design print.
- Line up the needle with the center starting point.
- Remove the cut out print, lay down a piece of topping and tape it into place. Now you are ready to re-embroider the design.
This repair method did solve the problem with this order but this embroidery machine operator will make sure that she uses the correct fabric for her sew out the next time and will also use the correct backing. This is a problem that could have been totally avoided if she had been instructed properly, however, every embroiderer need to know how to repair an embroidery design.
by The Embroidery Coach | | Embroidery Business Management
Organization in your embroidery business is one of the most important aspects of having a successful embroidery business. Without good organization, you have no way of keeping track of orders or getting work done efficiently.
There are three areas that are very important to operating an organized embroidery business. Good organization is critical to a successful embroidery business
- Good Accounting System
- Good production flow
- Good paperwork flow
Without those 3 items, it is very difficult to run an embroidery business that is going to consistently be able to have on-time delivery of your finished goods to your customers, and know at all times where you stand with the production of your orders and know whether or not you are making a profit. A system needs to be created for each one of these items.
Good accounting starts with having an accounting program, one that will create your reports for you automatically so that you are not having to pull a lot of spreadsheets together to see if you are actually making any money or not. I always recommend QuickBooks. I have a program that teaches you how to set up your QuickBooks in the right way to work with your embroidery business. It needs to be set up a little differently than your basic set up.
Once it is set up properly, it is simple to use, it can create all of your Work Orders, Invoices, and helps you keep track of your jobs. It is so easy for me to go in and see where I am at any one day of the month, run off my sales tax report or see who owes me money and when I can expect money to come in. This is a great system and one that you should be using if you are not. It may be difficult for you to set up by yourself, but when you follow my step by step instructions,you can set up the basic structure and start using it immediately.
Good Paperwork & Production Flow For Your Embroidery Business
Whether you have a large shop or a 1 person at home embroidery business, you must follow the same type of a system in order to be efficient in your workflow. The beginning of your good workflow is your floor plan.
Creating A Good Floor Plan
Creating a blueprint for a good floor plan for your embroidery workroom is one of the first things that should be done in your process of getting your embroidery business organized to ensure that you will have an efficient workflow. A layout for the most efficient work flow should be done in a loop if at all possible so that each area is not conflicting with another area. In a good workflow, the work runs efficiently from one production area to the next and without it, there are too many wasted stepsfrom one job process to another. No work should be on the floor that is not in progress. It should be on a shelf in a holding area.
If you are working from your home, your floor plan may be a little different and you may have only one door into your embroidery room preventing you from working in a loop. If this is the case, Shipping can be located in the same area as the Receiving, but on the other side of the area.
The best physical layout of your shop will determine how you will be able to place your embroidery machine for the best possible production. The most efficient layout I have found for me has been having my two machines across from each other with one table in the center.
Your Paperwork and Production Flow consists of:
Forms needed for the complete process
- Quote Form
- Order form
- Log in Form
- Production Tracking Form
- Artwork Tracking Form
- Packing Slip
Embroidery Business Production Process Flow
- Take the Order from the customer-make sure that you have all of the information on the order form about the product, design, customer information and contact info.
- Log the Order in and give it a PO Number. The Login form should include the following information:
-
- Date (the order came in)
- Job Number
- Customers Name
- Job Name
- Item Description
- Quantity of Pieces in Order
- Process (embroidery, screen printing, twill, heat press)
- Date Due
- Date Goods Arrived from Distributor
- Date Shipped
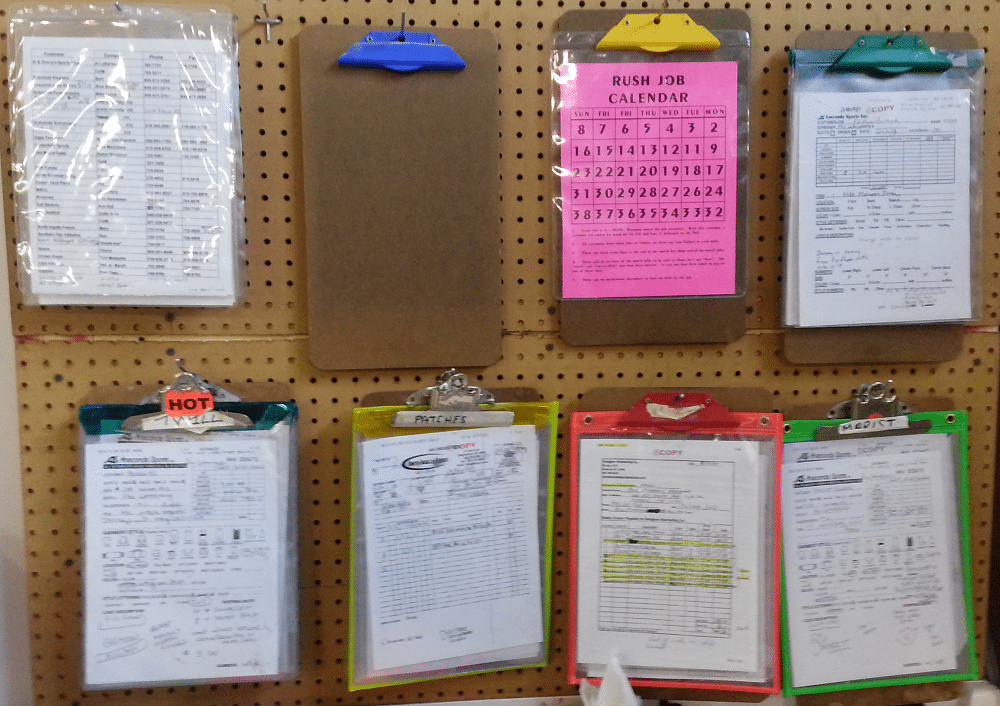
- Your Receiving area should consist of a table and a box to file your order in or a wall to hang your orders on that are not complete in one form or another. The tools that you need for this area are a Copier or Computer and Printer, Clip Boards, Plastic Job Folders for your orders.
- Plan out the Order‚ Design setup, Pull Design if reorder
- Create Design or send it out to Digitizer
- Order Products-Place the Order sheet on a clip board and hang it on the wall behind the Receiving table or place it in a file box left on the clip board of orders waiting for goods to come in.
- Check to see if you have the correct thread color on hand
- Check to make sure you have enough backing and topping
- When Design comes back from the digitizer or is complete, it should immediately be sewn out on the Embroidery machine-Embroidery Machine Worksheet is created and a manila Design Folder is created by the digitizer or set up person
- Products Arrive from Distributor and taken to the Receiving area.
- Clip Board with the order is removed from the file box and Order pulled off the clip board and matched to the PO number on the packing slip from the distributor. Products inspected for flaws or dirt, Counted & matched to the Original Order with Packing Slip to make sure that they are all correct.
- PO Number
- Quantity
- Item Number of the garments
- Color
- Sizes
- Product items are placed into size stacks on a cart or in a box or basket for easy hooping and sent to the Staging area waiting to be hooped. Once you have all of the information together and you have all of the correct items, place all of the information along with the order inside of a clear plastic Job Folder and tape it to the front of the box that has the goods inside of it. If there is more than one box label each box with the Order No., Job Name and Box 1 of however many boxes in the order. It is now time to place the order in the Staging area of Received Orders Ready for Processing.
- Design Folder is placed into a basket or box in the staging area ready for hooping
- Garments are hooped
- Garments are run on the embroidery machine
- Items are removed from the embroidery machine, remove the hoops and place flat on a cart or in a basket and sent to the Finishing area.
- Garments are Trimmed, backing cut off, excess topping removed.
- Garments are steamed and remaining topping is removed. This needs to be done with a commercial steamer. When I say commercial steamer, I mean just that and not one of the handheld ones. They do not do the job that the upright steamers do and my favorite brand of a steamer is the Jiffy Steamer. The reason for that is the amount of time that it lasts and the ease of being able to get parts for them if something does need to be replaced.
- Garments are folded and placed in size stacks.
- Garments are counted in the size stacks and matched to the original order.
- A Packing Slip is filled out with the quantities, color, sizes of each item.
- Items are all boxed and made ready for shipping. A copy of the packing slip is made and the copy goes into the box. Make sure the packing slip has the Order no. and the PO number on it.
- Add the shipping cost to the Original Order and staple the original order and the packing slip together along with any other notes ready for accounting to create the invoice.
- The production forms such as the Embroidery Room Worksheet, the packing slip a copy of the design information, the design run off all goes into the Design Folder to be filed in a file drawer in Alphabetical order for each retrieval for repeat orders.
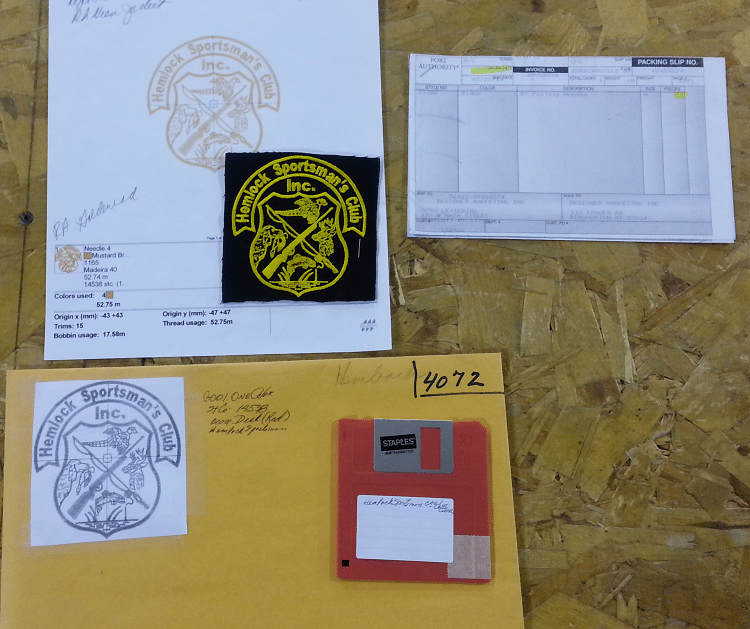
 Here is a picture of the Design Folder and what Information I put inside of it. When I took this picture, I also added a floppy disk with the design on it and place inside of the folder with my Embroidery Room Worksheet that had all of the information about the job sequence, what color the garments were and all of the information about the design. Today, we have upgraded and now use the USB devices on newer machines. You can also store your designs in the cloud, in a backup system and send the designs directly to the machine or add them to the USB when you are ready to embroider.
It is very easy to pull a folder out of the file drawer with all of the information inside and we do not have to worry about whether or not our information is all there for a repeat order. This is extremely important. If you have to contact a customer to bring in an item so that you can match it, that is extremely unprofessional and very inefficient. The only thing missing in that folder is the actual design. We now add it to the USB when we are ready to embroider.
I hope that this article has helped you. If you will put a good system in place for organization, you will be able to increase your production and increase your profit as well! Getting your embroidery business organized is not hard, just stop and think about each step in your process of taking an order to creating the invoice and write it down and create a good flow. To learn more about organization go to 9 Steps To A Profitable Embroidery Business.com.