Understanding the Embroidery Push and Pull concept for your embroidery designs can be a difficult one to grasp, especially if you are new to embroidery. Understanding the different types of fabrics and how they are created, will be very helpful. I have found that for most embroiderers, this has never been part of their training and they do not even know the difference between a knit fabric and a woven fabric. On the other hand, most home sewers, do know the difference between knit fabrics and woven fabrics.
In this article, we will talk about the 3 main types of fabrics: Woven, Knit, and Terry Cloth and how they are affected by the push and pull concept.
Woven fabrics are usually very stable in nature and do not stretch very much. Some popular examples include denim, canvas (tote bags or Carhart jackets), thin nylon windbreakers, waffle weave fabric such as a bathrobe and Linen fabrics, such as table cloths and napkins. These types of fabrics do not require as much pull compensation as others.
A knit or a loose knit will require more compensation than the woven. Good examples of knits are t-shirts, polo shirts, sweaters, sweatshirts and Lycra garments. These fabrics all have various amounts of stretch and must be compensated according to the weight and stretchiness. The more open or loose that a knit is, the more pull compensation will need to be applied than fabrics that are more stable. Terry cloth is another type of fabric that must be handled on its own. We will talk about this a little later in the article.
What is Embroidery Push
and Pull Compensation?
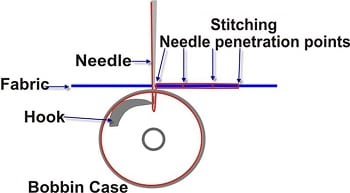
When the needle goes down and penetrates into the fabric this is called the penetration point of your stitch. As the top thread in the needle penetrates the fabric it connects with the bobbin thread. As the two threads connect it creates a pulling effect. This pulling effect is magnified if you have a long stitch or a stretchy fabric. The longer the stitch is, the more it will pull in. This is also true if your fabric is soft and stretchy.
When this happens, you need to compensate by making your stitch even longer. This is called EmbroideryPull Compensation. When you create a design to sew out on a denim shirt and on a knit golf shirt, you want the finished design to look the same. It will not unless you add stitch length to compensate for the amount of give or stretchiness in the fabric. You will find this very evident when you are working with shapes; such as a circle or a square.
Most fabrics require that Pull compensation be added in order to compensate for the push and pull effect brought about when you stitch a design into the fabric. All types of stitches create the push-pull effect, but it is most prominent when you are using Satin path or Complex fill stitches and also when sewing a large area. The larger the area, the more push and pull you will have. Knit fabrics are known for pulling in. The softer the fabric the more you will have this push-pull effect.
The Push orExpansion area is the open end of the segment or column (ie. Top or bottom of the letter I.) This is on the opposite side of the penetration points. You must bring those areas in, cutting them shorter. This is called Push Compensation. It does not matter if you are working with a letter or a shape. It also holds true with the angles of your shape. The amount of stitch length or pull comp that you add depends on how stretchy the fabric is, what type of underlay or how much underlay you are using or how wide the column of your segment is.
If you find that you have a design that you are currently using that does not stay in registration, you might want to try adding to the stitch length on the pull in areas. The push or expansion portion of the area or segment would need to be brought in using approximately the same measurement as you have added for the Pull compensation.
Always save your outlined designs in your native software file, to ensure that you can adjust the push and pull for various fabrics. You want the finished embroidery to look the same on a denim shirt, as it does on a polo. They will not unless you have added the right amount of pull comp and underlay to accomplish this job.
Embroidery Push and Pull with Terry Cloth
Terry cloth is basically an animal all its own. Terry can be a knit or a woven fabric and comes in varying weights, from light to heavyweight. Because of these varying factors, the underlay and pull comp that you add depends on both the weight of the fabric and the size of the embroidery design or monogram. You will have to experiment on a sample before you can come up with your final settings. Once you have that you will want to save these settings and use them all of the time for your terry fabrics. Keep in mind that all software packages are different and all embroidery machines are different so there will always be adjustments. Sometimes this means that you have to digitize the actual 0000000pull comp into your design if you are not getting the results that you need or that will work with your machine. If you are creating your own underlay, you must know how much pull comp you are applying before you even create your underlay.
I hope that I have helped you to understand pull comps a little bit better. I know that this subject is huge and tough to grasp but if you do a lot of experimenting and keep track of your settings, you will soon gain a whole lot more knowledge of this huge subject and will be able to create better-looking embroidery designs.0000000000000000000000000000000000000
How can I set up my Embroidery Business Structure? What consists of a good Embroidery Business Structure?
Before you can actually start offering your embroidery as a business there are a few items that need to be in place in order to have a successful embroidery business.
• A good solid foundation of How To Embroider – Know how to embroider all of the products that you will be offering your marketplace!
• A Business Plan in place, even if it is a simple 1- or 2-page plan will work just to keep you on track!
• Your pricing structure in place– one that you have created based on your expenses and profit need for your business that will make you money!
• Your sales tools created to make it easy and quick to work with customers!
• Your accounting system set up to save time as you are invoicing your customers!
• A scheduling system in place to stay on track of your production so that you can get your orders out on time.
• You are running smoothly with all of your systems in place
Having the right embroidery business structure with the necessary tools in place will help you create the systems to give your a good workflow. Knowing which business tools to purchase and how to set them up is extremely important in the success of your business.
If you are a business owner of any type of decorating apparel business that has been in business for a while and you are unsure of what business tools you need or how to set up your embroidery business structure, I have a training that you need to watch. Fill in the form below and get registered for that training. You will learn about all of the embroidery business tools that you need to start with.
Do you ever see with holes in garments after embroidery? Do you know how to prevent holes in garments from embroidery? Once the holes are there, it is very hard to repair them, sometimes impossible. Yes, many times this can be done, but the time that it takes is very costly. The best course of action is to prevent them from occurring in the first place.
If you see holes in garments after embroidery, check to see if any of these have been the culprit.
The wrong type of needle
The wrong sized needle
A burr on the needle
Too many stitches in your design
Too many stitches in one area in your design
The wrong type of backing
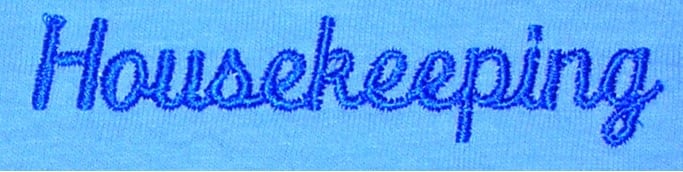
In our featured image, there are holes inside some of the small letters. These holes were created because the wrong needle was used. This image of embroidery was taken from a lightweight cotton t-shirt using polyester thread. The needle that was used was a 75/11 sharp needle. On a knit garment, you should be using a 70/10 ball point needle. As far as backing or stabilizer is concerned, on a knit garment, use 2 layers of no-show and1 layer of crisp tearaway backing along with topping on the top. The no-show cutaway backing holds it firm and gives it great stability and the tearaway keeps the small lettering crisp and flat so that it does not pucker up. This is especially important when you are working on a performance fabric.
Many times you will see holes in the centers of small letters when there are too many stitches in one area such as going around a curve. If you decrease your density this will usually help. If it does not cover enough, increase your underlay stitching, not your top thread stitching.
Holes in garments after embroidery can be totally avoided. I have a checklist that you can get to use as you are sewing out each of your designs before applying them to the finished garments. This checklist is going to help you with many of your production issues!
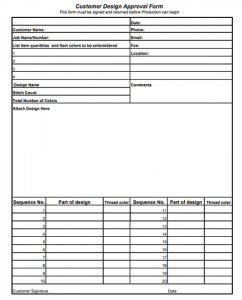
Do you have a signed Embroidery Design Customer Approval Form as one of the required steps in your embroidery job process?
Do you ever finish an embroidery job for a customer only to find out that the colors were not exactly what the customer wanted and then we will not accept it? This is an issue that can be totally avoided. I have also been given repeat orders that were just like the last one, but this time the shirt is a different color and the same colors will not work on this new shirt; now what do you do? Many times your customer will tell you that you can select the right color but that does not mean that they are going to like the colors that you selected. Do not get caught in this trap!
An Embroidery Design Customer Approval Form should be one of the necessary forms that you have in your embroidery business and make sure that you always get your customers approval before sewing out their embroidery design! This is a very important step, whether it is a new order or a repeat order. This is a step that so many embroiderers overlook and do not want to be bothered with, but many get caught with a job that is finished and the customer is not happy with it. This is a huge mistake that can be totally avoided!
An embroidered sample of the finished design, it can be a virtual sample, in the correct colors is a must. If you cannot physically give your customer a sample, email a copy in the correct colors and require that he or she reply back to you with an OK. Print out this OK and file it with your job order.
If you have several color combinations on different colored garments, show him the predominate sample in the correct colors and attach a list all of the color sequences for the remaining combinations on another copy of the approval form. Make sure that your form does include all of these color combinations. This is very important. This can help save you many headaches, time and money. This process will show your customer how organized you are and will help to create confidence in both you and your customer.
Download your copy of the Embroidery Design Customer Approval Formand make copies of it for your future use. If this form does not work for your particular business, create one that will.
Are you charging enough for embroidery to pay all of the bills, make a profit and have some extra set aside for growth? This is an struggle that most embroiderers deal with every day and cannot seem to get on top of it. They do not know how to charge or where to begin.
You may have heard my story of how I almost lost my business because of underpricing. I did what most embroiderers do; I gathered everyone else’ s price lists and averaged them out to create my own price list! Sometimes I would give the customer the lowest price around just to get the business and this was a huge mistake! So many embroiderers start out doing exactly the same thing that I did and that is a practice that must stop! There are many embroiderers that are in the same position that I was in and it is very sad. It does not have to be this way.
It Is Time To Stop Undercharging For Your Embroidery!
I would love to start a movement for embroiderers to stop working for nothing and start pricing their work for a price that is worthy of them. We are highly skilled professionals, not unskilled laborers, but so many embroiderers charge like they are unskilled laborers! This is not fair to the embroiderers that are trying to make a living and it is really causing many of them to second guess what they are doing! This is very disheartening!
There are many embroiderers that are working from home and they are just getting started. They think that their time is worth nothing and to get the work they must practically give it away. When you are first learning your craft, I can understand this way of thinking but it really must stop. Most embroiderers do not offer their products until they feel confident that they are ready and that their quality is good. You did not get into this business to kill time, you go into this business because you wanted to earn an income doing something that you love to do!
It is time to stand up and start charging what you should charge like the professional that you are so that you can actually make a living from your business or at least give you a good supplemental income.
There Is More To Pricing Embroidery Than Stitch Count!
When you are trying to come up with a good price list you must consider several factors and it is not all by stitch count. There is so much more that goes into figuring your pricing other than stitch count and that is what the majority of embroiderers are charging for. When your embroidery machine is not running, you are not making any money, how can stitch count be your only factor? It isn’t. You have color changes, stops and starts, the time it takes to put the garment into the machine and take it out along with other factors.
Who is paying to hoop it, who is paying to trim it, who pays for the packaging of the finished product? Most of the time it is the embroiderer and not the customer that pays all of those charges. This is not the way that it is supposed to be! You are performing a service and each piece of that service needs to be figured into your pricing structure.
You need to know exactly how much each one of these pieces are costing you and the only way that you can accurately know that is to start timing each one of your steps. Each function that you perform in your business has a time and cost attached to it; start timing each one of these functions and figure out how much it is costing you. I have always been an advocate for timing everything that I do. Time is money and you cannot get it back when you give it away. Your time is precious. Use it wisely and start charging for your time.
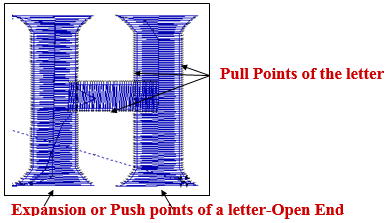 opposite side of the penetration points. You must bring those areas in, cutting them shorter. This is called Push Compensation. It does not matter if you are working with a letter or a shape. It also holds true with the angles of your shape. The amount of stitch length or pull comp that you add depends on how stretchy the fabric is, what type of underlay or how much underlay you are using or how wide the column of your segment is.