by The Embroidery Coach | | Embroidery Tip
This embroidery tip is all about quoting embroidery designs for your customer while they wait? Do you ever have a customer that brings in designs that they want you to reproduce? Of course, you do. Do they want a price while they wait? Sure they do. Have you ever wondered how you can be quoting embroidery designs for your customer without having to go to your digitizer to find out how many stitches there would be in that design?
I came up with a system that is fairly simple for quoting embroidery designs and it works great for me and has worked for the past 20 years. I started creating my system by typing in letters at different sizes into my digitizing system to find out what the stitch count would be. Of course, each style is a little bit different but for the most part, it worked. I averaged out the different letters and here is my result.
- 1/4″ letter = 150 stitches
- 1/2″ letter = 200 stitches
- 3/4″ letter = 350 stitches
- 1″ letter = 500 stitches
- 1 1/4″ letter = 600 stitches
These are the sizes that I have always used the most. If you add up all of the letters in the design by the size and multiply them by the number of stitches, you will have the stitch count for the lettering.
To figure the other areas in a design, there are approximately 1600 fill stitches in a square inch. These of course vary with the pattern and length of your stitch, but this is an average.
Satin borders are approximately 175 stitches per inch. This again is an average, it depends on the density of your stitch. You must also remember to add a little extra for underlay stitching but this will at least give you a starting point and it will make it much easier to look at a design and give a quick quote while the customer waits!
Do you have a method for quoting embroidery designs that you have used that has worked great for you? I would love to hear about it! You can learn more about quoting embroidery designs at the Embroidery Business Academy.
Joyce Jagger
The Embroidery Coach
by The Embroidery Coach | | Embroidery Production
In our last article about where to start training a new embroidery employee, I talked about starting them with the finishing process and then moving them into the helper’s position as soon as they were ready. Make sure that they totally understand each and every process along the way before they are moved into the next position. You must test them to make sure that you know they understand. This may sound very elementary but just asking them is not good enough. YOU MUST KNOW!
In step one of the previous article, we went over putting new cones of thread onto the machine and learning how to tie a Weaver’s knot. I gave you a video showing you a simple way to do this. Having a helper change thread colors saves the operator a lot of production time. Have them do the thread-changing process over and over until they have it mastered. As I said before, this sounds so simple that anyone should be able to immediately do it. Do not assume that. Once again, do not let them go to step two until step one is mastered.
Thorough Training Of The Embroidery Machine Helper is Very Important!
A helper is someone that will tie new thread cones onto the machine, help load and unload the machine, carry work from the hooping area to the machine, and carry the finished work from the machine to the trimmers. Their main purpose is to keep the operator focused on keeping the machine running as much as possible. The training of this new embroidery employee helper is important for maximizing your production. Make sure that they understand exactly how and why each step of the process is done a certain way. Now we are ready for Step two in the process of training the new helper.
Step two- Teach them how to unload the machine without getting anything caught or snagged by the needles. Teach them how to remove the hoop without touching the needles. This will dull the needles. Show them how to remove the hoop from the garment as they unload the machine and place both the unhooped garments and the hoops in their correct locations. Do not let them go to step three until step two is mastered.
Step three- Teach them how to load the machine without getting any of the garments caught under the presser foot or trapped between the bottom of the hoop and the throat or needle plate. This is especially important when loading tubular-style machines. Show them how to run their hands under the garment to make sure that nothing is caught. Teach them not to touch the needles with the hoop as they are loading the machine. This will dull the needles.
These are basic skills that need to be mastered by everyone on the production floor. This includes the trimmers, hoopers, packers, steamers, as well as the machine operators. This helps everyone to know what the whole process is and also gives you skilled people to use if you need to pull them from another position to help out temporarily.
Give New Embroidery Employee Copy of Training Manual
Give the new Embroidery employee a copy of the training manual that is applicable to their position which explains all of the processes that they will be expected to perform. They should be tested at the end of each training period to see if they have indeed mastered all of the skills that are required. It is too often taken for granted that the new person knows exactly what to do after they have been shown a couple of times. This is not the case as a general rule. Some people learn faster than others. Just because a person has not learned as quickly as you, or as quickly as you have expected them to, does not mean that they are not qualified to be a good worker.
Helper Makes It Possible For The Embroidery Machine Operator To Produce More!
If a person has mastered the skills of a helper but cannot go on from there, that is OK. They can remain a helper and be extremely valuable in that position. This helper makes it possible for the machine operator to get much more production done at day’s end.
Make sure that your machine operators treat these new employees with the same respect that they want to be treated with. This is not always the case. They very often expect too much too soon. Keep the lines of communication wide open between the new employee, the older employee, the supervisor, and you. Everyone needs to be made to feel important in their position. You do not want any resentment, jealousy, or dissension building up between anyone in the organization. This needs to be emphasized from Day 1 with any new embroidery employee!
by The Embroidery Coach | | Embroidery Production
As a small embroidery shop owner, have you ever had a situation where you needed to train a new embroidery production employee but really had no idea where to start? This can be very frustrating for the small embroidery shop owner that has always worked alone and has never had to teach anyone how to efficiently help them.
In this article, I will start with the very first employee that a small embroidery shop owner should start training for the embroidery production floor.
Start The Training Of A New Embroidery Production Employee With The Final Process – Finishing!
If you have hired a new employee for the production floor, the best place to start them is with the finishing process. Regardless of what you have hired them for, start them trimming, folding, and packing. This helps them to see how the process is completed and gets them excited to learn more. If a new employee cannot trim, they need to be dismissed. This is a very basic function but takes dexterity and attention to detail. Many people feel that this part of the process is for low paying individuals that cannot do anything else. This could not be farther from the truth. A trimming mistake can ruin the entire process if close attention is not paid to detail. They need to have a positive attitude, and their attitude will really show up during this process.
How To Start Training A Production Helper
Once the new person has learned the finishing process, they can then be moved into a helper’s position. A helper is someone that can tie new threads onto the machine, load and unload the machine, carry work from the hooping area to the machine and carry the finished work from the machine to the trimmers. The training of this helper is very important. They must be shown everything that they are supposed to do and be thoroughly tested on these skills. This may seem like it is so simple that anyone should be able to do it, but they still need to be taught exactly how each step is done.
Step One – Show them where the threads are stored and how you put them onto the machine. Teach them how to do the Weavers knot so that the threads will pull right through the needle eyes. Have them do it over and over until they have it mastered. Make sure that they understand exactly how and why each step of the process is done the way it is. Do not let them go to step two until step one is mastered.
Here is a video showing you how to tie the Embroidery Threads so that they will go right through the needles! It works 99% of the time. Huge time-saver!
Proper training is extremely important when you hire a new employee for your embroidery operation. Without the proper training this new employee can end up creating a lot of mistakes which will lead to lost production. This is just as important for the small embroidery shop owner that is hiring their first employee as it is to the multi-head shop that has many employees. Learning the right process to train a new embroidery production employee is very important. It is going to mean the difference between a well-run shop and one that is only mediocre. You want to make sure when you train a new embroidery production employee that everyone is on the same page, so to speak!
by The Embroidery Coach | | Embroidery Business Marketing
Preventing possible issues with production runs is essential when planning your daily embroidery production. Trying to get the best production possible out of every single day is a must if you want a profitable embroidery business!
In today’s economy, where so many embroidery business owners are doing all they can to keep expenses down with less employees, this is extremely important.
You always sew out all of your embroidery designs before you start any new jobs. Right!! Paying close attention to every detail of a logo is important when you are trying to prevent errors before starting a long production run! You want to thoroughly examine your design as it is stitching to see if there are any issues you need to correct or improve on.
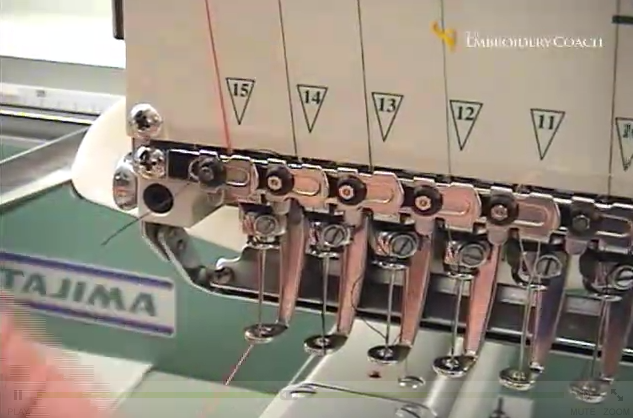
You must watch the machine as it is sewing out your design in order to be able to pinpoint any of the possible problems! You cannot start the machine and walk away then expect to be able to find the issues, it just does not work. YOU MUST watch it as it sews out! As it is sewing out, ask yourself these questions:
- Is there something that you can do to shorten your run time?
- Are there any thread breaks? If so, find out why. Maybe your density is too heavy. Check for a dull needle, bad thread, or tension that is too tight.
- Is it locking as it starts and stops? If it does not lock at the beginning, the thread can come out of the needle. This can cause a real production nightmare! No lock at the end, the thread can unravel.
- Is it trimming where it is supposed to?
- Do I see any threads between my letters? If you do, they are not close enough.
- If I change my running order of my text will it run faster? First line left to right, second line right to left, third line left to right.
- Are all of the colors correct and are my colors running in the correct order?
- Do your letters or columns look to thick or too thin? Your letters may be pushing because your density is too heavy or your pull comp is too heavy. If too thin, your pull comp needs to be increased.
Check your sew out and have it verified before the job is started. Make sure that you watch each stitch as you sew out the design to see if there are any mistakes or problems that can be prevented. Slowing the machine speed down can help you pinpoint any issues.
- Do you have any jump stitches that are too long? This can cause the thread to get caught and your needle to break.
- Are all of your starts and stops in the correct location? If not, your machine has to move too far to start the next sequence causing wasted production time.
- Is your sew sequence in the right order? You do not want any travel stitches showing. A wrong sew sequence can create too many trims that could have been prevented if the sew sequence was changed.
- Can any of your color changes be combined? This will depend on how your design was created and what it is going to be sewn on. Sometimes like colors can be combined if your design is going to be sewn onto a flat garment. I do not recommend doing this for embroidery on caps. Please note: This can cause registration problems. Before you take this step, make sure that you can combine the colors and not have any registration issues.
It does not matter if you digitized your embroidery design or had the best digitizer out there doing your work, make sure that you sew out every design before you start the job and watch it sew out stitch by stitch. Not only will you prevent issues; you can also learn from watching your designs sew out. This is also true if you have set up a design or lettering in your software. Every design is a new design, digitized or not, and needs to have the same close attention to detail.
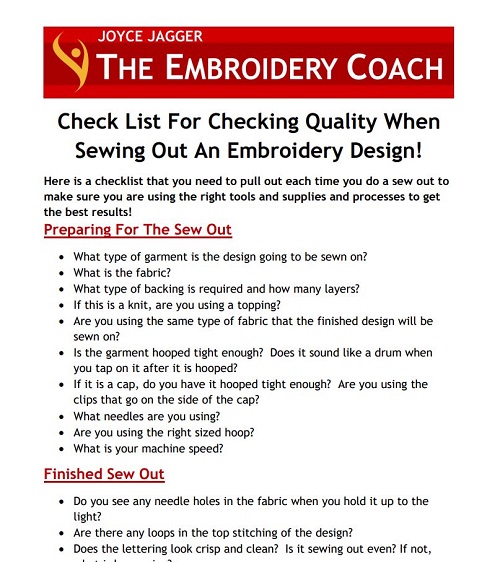
Create a checklist of all of the items to look out for as you are doing your sew outs and go right down that checklist to make sure that you have covered every item. This is going to help you save a lot of time and frustration as you are going through your long production runs.
There is nothing any more frustrating than having constant thread breaks or knowing that something could have been changed in your design to make the entire job get done in a lot less time! Time is precious and time is money! You cannot get it back once you have lost it!
It may seem like a waste of your time to watch designs sew out but it never is. I have been digitizing for many years and planning out production for many more years. I never send out a design to production unless I have sewn it out at least once to make sure that it has no issues, and yes, I watch it! Preventing unnecessary production issues is part of planning for all your embroidery production runs. This is going to help you create more profit in your bottom line!
Would you like a copy of the same checklist I use while sewing out each design? We will be happy to send it to you. You can pick one up for free by filling out this form.

by The Embroidery Coach | | Embroidery Business Management
As a new embroidery business owner, do your family and friends have the opinion that you should be available for their every need 24/7 because you are working from home? Set boundaries and create your own space when you are working from home. This is very important for new embroidery business owners.
This was a huge problem for me when I first started my business from home. I still had one teenage daughter at home and I had always kept up with running the kids everyplace they needed to go and kept up with all of the regular home duties that a housewife is expected to do. No one in the family expected any part of their life was going to change when Mom started her own business.
For a while, I was driving myself crazy trying to be all things to everyone in the household and run my business at the same time. It just was not working and I could not accomplish anything in my business.
New Embroidery Business Owners Must Set Boundaries
This is a problem that so many new embroidery business owners are faced with when they are first getting their business started from home and they do not know how to say NO or to set boundaries and create your own space for those around them!
I learned very quickly that I had to set regular business hours and regular family hours. I have to admit, this was not easy at first, but it was a must if I was going to succeed with my business and keep my sanity.
Setting boundaries is absolutely a must for the health of your family life and your business life. Without certain “rules” and even physical divides in your home, your children assume that you are available for their every need, and even partners and friends can impose on your working day, causing frustration and tension for everyone involved. This is very hard on relationships.
Set Aside One Room To Create Your Own Space
Set aside one room to create your own space if at all possible; one that you can close the door to the rest of the world. This is very important. If you cannot separate yourself from the family you cannot do your business justice, you will not be able to concentrate with all of the interruptions and you will not be able to grow your business.
When my door is closed in my office, my family knows that they are not to disturb me for any reason unless it is an emergency. I established this rule several years ago and it has worked very well. Now my husband is retired, another big adjustment, and he knows DO NOT ENTER!
I now have 2 rooms, one is my office and the other one is my workroom that has my embroidery machines and all of my other equipment in it. The door to my workroom is always open but the embroidery machines are not going to stop unless there is an emergency. They can come in and talk to me but they are not to disturb the workflow.
Running your business from home is entirely possible for the new embroidery business owner if you do set boundaries and create your own space, but you must stick to your rules. Your family will soon learn what the rules are and both you and your family will be happier at the end of the day!
If this has been a problem for you, let me know what you have done to eliminate the issues and how you enforced your rules.