
by The Embroidery Coach | | Embroidery Business Marketing
WOW! Here we are at the beginning of another new year and now we are faced with having to close our books for the year. Are you ready? Are your records all organized and ready for the simple process of closing the year out or do you have a mess of papers stuck in a box or file that need to be organized into some kind of order so that your accountant can make it happen?
Bookkeeping is one of our least favorite things to do as embroiderers! We did not start our embroidery business so that we could do bookkeeping! We are born creators, not bookkeepers, but unfortunately, it is part of owning a business and is a very necessary part of the business that we must be on top of! You may feel like you are drowning in paper work.
It is critical to organize every part of your business and your records must be organized for easy and accurate bookkeeping. Without good organization of your records it can become very overwhelming when you need to produce some important information and it can cause unnecessary stress in your personal life and your business.
Have you found yourself spending many days just before time to file your taxes trying to get everything organized? Trying to pull it all together at tax time when it is disorganized is really hard and time consuming, not to mention how frustrating it can be. You could be spending this time getting more jobs out, but instead you have to stop producing your embroidery and concentrate on the taxes in order to stay compliant with the government.
Your business generates a lot of paperwork and it can easily get out of control if you do not have a good system for taking care of it. This was a huge struggle for me until I realized that I could not continue to do it as I was and get my jobs out at the same time. I had to take some time out, stop the crazy disorganization of papers and get my books in order.
I had been told about systems where you can scan all of your paperwork and then dispose of it but I have not found this to be successful for me. I bought the scanner and spent a lot of time trying to get a good system figured out so that I could eliminate all of the paper but that did not work for me. It would be great if we could just throw all of that paper away, but unfortunately, we must keep a good share of it and file it in an organized manner so that it is easy to retrieve.
Keeping accurate financial records is necessary for the growth of your business. You need to be able to look back and compare one year to the next so that you can plan in a more efficient manner. You also need to know which area of your business is performing the best and in which area you are not making enough money. Without accurate records, this is impossible.
If you are new to bookkeeping and you have not started to use any type of accounting software you must first go through and organize all of your records. You must have them in order before you can even think about using any type of accounting software.
Start The Process of Organizing Your Bookkeeping Records
Step 1- Separate the receipts for your expenses and for your income. Make sure that you have every little piece of paper because it can make a difference at tax time.
Step 2– Take the pile of receipts of your expenses and separate them by the month. Do the same for your income.
Step 3– Separate the piles of expenses and income for the first month into piles of like kinds.
Step 4– Create a spreadsheet with columns of the like kinds for your expenses and add the receipts into each column that is applicable. By like kinds I mean, Office supplies, loan payments, travel expenses, etc.
Step 5– When finished with the month, place the receipts into a file folder marked by the Month and place the file folder in a file drawer. Keep one file drawer for this purpose only.
Step 6– Repeat this process for your income statements.
Step 7– Total each column of expenses for the month. Do the same step for your income.
Step 8- Repeat this process on a separate spreadsheet for each month.
Organizing them in this manner will make it easier for you to start the process of working with accounting software. I know that the term accounting software is scary if this is all new to you, but it really is very simple to use once you have your expenses and income organized.
Spread Sheet Ready To Go!
I have created a spread sheet that you are welcome to use to get this process started. It will be much easier than having to create it yourself. Fill in the form below and I will send you the Spreadsheet and you can start using it.
This spreadsheet will get you ready for starting to set up your bookkeeping system or get you ready for the end of your year and be able to give your accountant your spreadsheets. I worked with my spreadsheets for several years before I started using accounting software and it worked for me as my business was very young.
In today’s world, the accounting systems are very simple and it is smart to start using them right from the beginning of starting your business. I have created a program called Embroidery Business Bookkeeping System that teaches you how to set up your books for the apparel decorating business. This goes beyond embroidery and can be used in other areas like vinyl, DTG, screen printing and more. You want to have your books set up in such a way that you can tell in each area of your business where you are making money and where you have problems.
Once your accounting system is set up correctly, this is very simple. You will also be able to create your invoices quickly which helps you get paid quicker! You won’t lay awake at night worrying about paper work! It will be taken care of!

by The Embroidery Coach | | Embroidery Business Marketing
When you are creating your basic pricing structure, there are many factors that need to be added in over and above the actual cost that you are currently incurring as you start your new embroidery business. This also applies to businesses that are expanding by adding new machine or services, such as screen printing, vinyl, rhinestones…pertinent to any apparel decoration within your business.
You should always include the cost of doing business as a store based business from the very beginning. Most new embroidery business owners that are home-based do not include many basic expenses that will prevent them from making a living with their business or plan at all for future growth.
- Rent
- Insurance
- Utilities
- And More
Figure Floor Space Required To Determine Cost
These are just a few of the basic expenses that must be covered. Do you know exactly how much floor space you need for your business? You are going to need at least 1 small room or a corner in your basement to hold your embroidery machine and other equipment, a work table, some shelving. My home workshop that I started with was 12 feet by 14 feet. It was very compact but workable. I had 2 single head embroidery machines in that room, but I did not have my desk in this space. However, I would have had room for it, if I did not have 2 machines.
Call a real estate agent in your area to find out what an average charge per square foot would be for a rental of commercial space. You can then ask someone that has rental space, about what the utilities would cost. Call your insurance agent and find out approximately what the insurance would be. As long as you have an idea as to how many square feet you would start out at, these would not be hard figures to come up with.
If you have a machine that is paid for and you have no machine or loan payment, you still need to include the cost of new equipment. If you paid cash for your machine or took the money from your savings then you need to set up a repayment plan to pay yourself back.
Without including these types of cost when you are creating your basic pricing structure, you will have no way of creating a price list that will give you the means for planning for your future growth.
When I started my business I was in my home, did not take a salary, I had no idea that I needed to add for my utilities, rent or other items. I charged very low prices so that I could get the work and made many mistakes as a new business owner.
I just kept thinking that if I increased the numbers that went through my business, then I would eventually start making money, but I found out that it does not work that way. I did what most embroiderers do; by trying to undercut the competition and found out in the end that I was only undercutting myself! That practice set me up for failure right from the start.
You may have heard my story of how I almost lost my business because of the way that I was pricing. When I had to move out of my home into a retail location, I was not at all prepared for it. I was not aware of the many additional costs that were associated with operating my business away from my home. As a result, I had to work extra hours to bring in more money to pay for all of the extra expenses.
When I went to the bank to borrow money because I needed another machine, I was told no because I did not have a plan for future growth or even a plan B.
This is NOT the way to start your business! It is very important to include all of the basic expenses when you are creating your pricing structure right from the beginning of your embroidery business! Without it, it is impossible to grow. DO NOT MAKE THIS MISTAKE!
Click Here to start creating your pricing structure that will help you plan for future growth!

by The Embroidery Coach | | Embroidery Business Marketing
Building great relationships with your customers is one of the most important duties that we have as business owners and this is something that does not have to cost a lot of money. There are three ways of building great relationships with your customers and prospects, relationships that will help you build up a base of loyal repeat customers.
- Personally connecting with your current customers
- Email Marketing
- Make sure you are offering Excellent Customer Service!
Many times it is the little unexpected things that we do that mean the most and keep that customer coming back to our business over and over!
A handwritten thank you note when you have done a large job for a customer, thanking him for his business and telling him how much you appreciate the fact that he trusted you with his order! Another time to send a thank you note is when you meet someone new at a networking meeting.
These are both great strategies in showing your appreciation and building a new relationship or improving a relationship that you want to see grow even more.
Connect With Your Customers To Build Great Relationships!
The best way to start building great relationships with your customers is to connect with each one of your current and lost customers. Start out by making 3 lists.
- Current High Volume Customers
- Current Lower Volume But Repeat Customers
- Former or Lost Customers
Create some scripts that will make it easier for you to talk to people. I have found that having the scripts in front of me, it just made it easier as I was talking to them and I did not forget anything. You can also print out a script for each customer and fill in the blanks as you are talking to them. This was always my favorite way of working with my customers on the phone. I still do this today. Keeping notes makes it a lot easier to recall what they said for future reference.
Call each one of your customers- Start with your current high-volume customers – Ask them questions such as:
“What is it that you like about our products or services? In your opinion, what it is that I can do to improve my company or service to you? Do you have a particular time of year that works best for you that we could sit down and plan out some promotions for you?”
If it is a customer that you are no longer working with, you will ask them different questions such as:
“I know that you are no longer using us as your supplier for your gift items and promotional products. Is there a way that we can change that? If you don’t mind my asking, what was it that I did or did not do that made you decide to go elsewhere?”
As you are talking to them, tell them about your referral program and how it works.
After you finish talking to each customer, fill out a thank you note, thanking them for taking the time to talk to you, and insert some business cards. Make sure that you tell them to sign the back of the business cards before they hand them out to their family, friends, and acquaintances. This handwritten Thank You note will go a long way in helping to build your new customer relationship with that customer and it will be something that they will not forget!
Getting your customer’s opinions and feedback is extremely valuable to your business and makes it a lot easier to plan your strategies as to how to work with them and provide them with the type of services and products that they will be anxious to purchase from you. They really do appreciate you asking them what they need. This can be the beginning of a long working relationship with each one of your customers.
‘If you don’t have any kind of relationship with a customer, they’re simply not going to be a customer, says Brent Leary, a columnist for Inc. Technology and the co-founder and partner of CRM Solutions, LLC., based in Stockbridge, Georgia. ‘If we can build a relationship where they know who we are, they like what we can do, and give an example of how we can help them, then we can give them the trust and that helps solidify relationships.’
This is part of the Embroidery Business Marketing System program that I am teaching. Click Here to get signed up for it. I have a lot of great information for you!

by The Embroidery Coach | | Embroidery Business Marketing
When I first started my embroidery business, I thought that all I had to do was put out my sign to let everyone know that I was now in business! I soon found out that getting customers was not as easy as I had envisioned. I really loved what I did, but I had no plan in place to attract new customers. This is not the right way to get your business started! I learned very quickly that a Marketing Plan was essential for my embroidery business and I needed to have a plan in place for every aspect of my business!
What is Marketing?
Marketing in my own simple terms is All of the things that you do to get your product in the hands of the right people! It is also all of the ways that you do to get the word out about your product or service.
The most important process in getting ready to market your embroidery business is to create a working plan. A working Marketing Plan is essential and you want one that will help keep you on the right track. If one strategy is not working, you can go back and review your plan and make some changes, but without a working plan you spend your time running in circles and do not have any idea as to what to do or where to get started.
The Starting Point For Your Marketing Plan!
You need to create a simple picture of your next 12 months. By that I mean what is going on around you in the next 12 months. What are the holidays, special happenings, the different times in a persons life that they need gift items, school sport seasons, and corporate events that take place in your area. These are just a few of the areas that you can cover. Make a list for each type of event.
- Do you have a Niche Market?
- List the events that are held throughout the year.
- What type of items are needed for each one?
- What months do each of these happen?
Write down each month that these events are happening in. You can plan special promotions around each one? This is the beginning of your plan.
In this economy today we have to be very proactive and not sit and wait for the next customer to walk in the door. It is not going to happen! There are too many choices for them and we have to make sure that we are in their mind first and foremost so that they will think of us instead of the competition when they need our services. Without an actual working plan it is very hard to be proactive.
People need you and what you have to offer. All you have to do is make them aware of what you have, work with them to find out exactly what they are look for and you can create the perfect relationship.
Once I put a Marketing Plan together and started working my plan, I found out that letting everyone know that I was in business was not as hard as I thought it was going to be.
If you do not have a Marketing Plan written out, take the time to get it started today. This is extremely important! Without a Marketing Plan it is very hard to grow your business and keep yourself on track!
Click Here to help you get started creating your own Embroidery Marketing Plan today!

by The Embroidery Coach | | Embroidery Business Marketing
Are you afraid of doing embroidery on caps? Do you put it off because you are unsure of exactly how to do it? Do you refuse to work on caps because they feel intimidating? If you feel like that, I can surely understand this. I was so afraid of caps when I first started my embroidery business. I absolutely turned down every job for caps, from anyone that wanted embroidery on caps or even brought them to me. This was like a foreign country and it absolutely scared me to death!
One day I had a customer come in and was desperate for one single cap and I decided to give it a try. Now back in those days, I did not have a cap machine and I would embroider on unfinished cap fronts and then send them to the cap manufacturer to have the cap fronts made into finished caps. That was simple and I did not have to deal with the blank caps. This was before they even made cap machines. When my customer only needed this one cap, I knew that I would have to embroider it flat but I was totally unsure of how to do this. I decided that I would treat it like any other item that I could not hoop and glued it down to backing that I had hooped. It worked and my customer was happy!
They have cap frames now that you can use to embroider fronts flat that holds the bill down. They are mainly made for the home machines that do not have the cap frames for them.
Once I got over the fear of that one cap, I started taking cap orders for finished caps and it was not nearly as hard as I had envisioned! I am so glad that I took that chance to overcome my fear of even trying to do embroidery on caps.
I then decided to purchase a 15 head tubular machine that I could easily use to do embroidery on caps and started taking cap orders on a regular basis. The next trick was to learn how to hoop them correctly and tight enough so that they would be straight and the embroidery would look great!
Here are some tips that will make it easier for you to cope with the embroidery on caps and help with taking the guesswork out of it.
- On structured caps, (6 panel caps with a heavy buckram lining in the front) steam press them first. This softens up the front of the cap, presses it flat and helps it to sit tighter on the throat plate of the machine. You can do this with a regular household iron.
- Use a 3 oz. tearaway backing that has been designed for caps. This is important. If it is a lighter weight backing it will not give you as good a registration. Sometimes you need 2 layers of backing to hold it closer to the throat plate.
- I always use a 70/10 sharp needle, but if you have needle breaks, switch to a 75/100 needle. Some people recommend 80/12 but I have never used this large of a needle on my caps. You cannot get the fine detail in the designs using an 80/12 needle. I use the 70/10 needles even on FlexFit caps.
- For best results, keep your design at 2.10 inches or less in height. This will allow for a design that can be embroidered on most caps. If it is an low profile cap or an unstructured cap (not buckram or lining behind the front fabric of the cap) then you may need to keep your design to a maximum of 2 inches in height.
- Make sure that you have the caps hooped tight and that you are using the clips on the side of the caps to hold it down. Place the clips at the bottom of the posts closer to the bottom of the cap. This will hold it in place but it will not distort the design at the top of the cap.
- Make sure your designs are starting from the bottom up and from the center out. If you are having your designs digitized, make sure that you tell the digitizer that it is for a cap and you need to have it start at the bottom and from the center out.
- Make sure that you have ample underlay to anchor your cap backing to the cap front to keep good registration.
- If you are embroidering a 2 color letter, embroider the inside first and then the outside of the letter before going on to the next letter.
- If you have a large fill area in the center, run a zigzag stitch up the center of the cap before actually starting the design. Tell your digitizer to do this if you cannot. This will help to anchor the design and keep it from pushing and pleating the fabric in the center.
- Start your design on half to three-quarters of an inch up from the metal strap that goes across the front and is sitting on the bill of the cap. If you have a short design, move it up to be in the center of the cap. If it is a tall design, then start it at the one half inch point up from the strap.
When you can learn to embroider on caps and do them efficiently, they will be one of your biggest money makers! Embroidery on caps is a constantly growing business and you do not want to miss out on this huge money making opportunity!
For more information on “How To Embroider On Caps” and other programs to help you grow your embroidery business, click here!
by The Embroidery Coach | | Embroidery Business Marketing
We all want fast! We all want the jobs to fly in the door and fly out the door with as little effort as possible! While that sounds like a dream scenario there are some very small steps that you can take that will increase your production in your Embroidery Business is a huge way! Here are 9 tips that will help you increase your production drastically!
- Keep your machine clean and maintained daily and you will have fewer issues, less down times and fewer tech costs. You need to clean out the bobbin area every single morning and oil it. You need to oil it again at noon or after every 4 hours of running time. This will help you keep your machine in tip top shape with far less downtime. Your production time alone will increase through this daily habit.
- Set up sharp needles on half of your machine and set up the other half of the machine with ball point needles. This will save you a lot of time when you have to switch from knits to woven fabrics. It is much faster to change a cone of thread than to change a needle!
- Keep the colors of thread closest to each other for your thread changes in your design. Example: If the design has 3 colors, place the 3 colors next to each other so that the machine will have less travel time from one needle to the next as it changes colors.
- Time all of the steps in each of your processes. Keep track of these times and try to better your best at all times. Encourage your employees to do the same. Maybe an incentive will help to make them move a little quicker with each step.
- Add the job to the schedule or tracking sheet as soon as it arrives or the order is taken. You may not have all of the information to complete the job at that time, but it needs to be logged in and kept track of immediately!
- When each step of the job is completed, add that to the tracking sheet to see the progress.
- When you have all of your information and the job is ready for production, assign the jobs to certain machines and put the schedule on the machine where the work will be completed. This schedule should be created the night before the job is to be run and the schedule should be placed on the machine that it is assigned to.
- Pay attention to the time that it is taking your operators to do the job. If your schedule is formatted correctly, the time allotted for the job will be right on the schedule. Make sure that it is being completed during that time frame. Employees seem to move faster when they know that they are on a schedule and are being timed.
- Plan your production so that you are running like kind jobs. If you have your machines set up for caps, run all of your cap jobs at one time instead of breaking down the machine for each individual order. Plan 1 day a week for caps and stick with it unless you do not have any caps for that week. Do not plan by date order. Plan it by type of products, hoop size and colors that you have on the machine at the time.
Following these tips will give you the fastest way to increase production in your embroidery business and you will be able to get more products out in a weeks‚ time using this method. More products out each week, more money in! This can greatly increase your monthly bottom line!
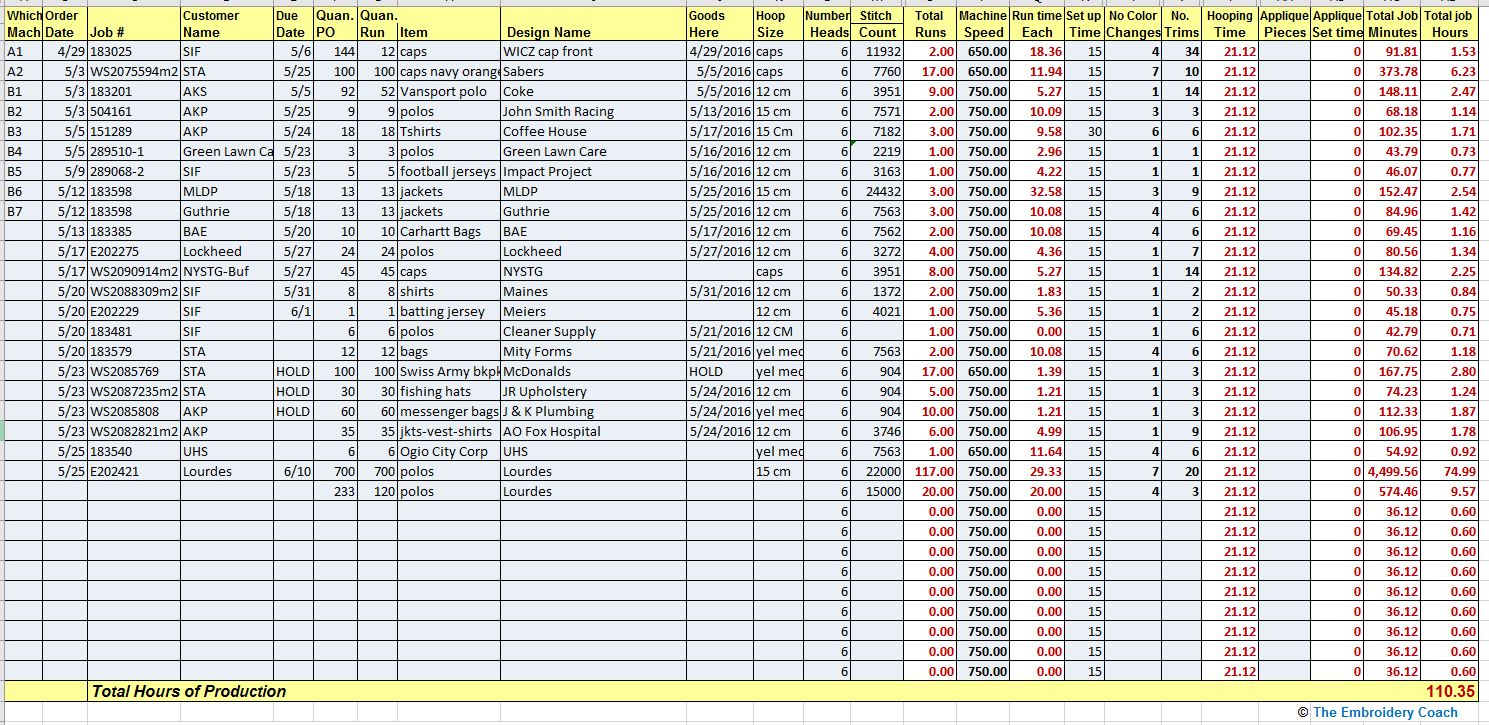
I have developed a simple and complete Embroidery Production Tracking & Scheduling Form‚ that will help you to keep track of each step of your production and give you the time that it should be completed in. This form is part of the How To Price Embroidery Program and will soon be available as a stand-alone product. It is a simple form for you to use and will help you to keep total track of your embroidery that is all formatted and will automatically figure the time that it should take for each job!