by The Embroidery Coach | | Embroidery Business Marketing
Do you ever see with holes in garments after embroidery? Do you know how to prevent holes in garments from embroidery? Once the holes are there, it is very hard to repair them, sometimes impossible. Yes, many times this can be done, but the time that it takes is very costly. The best course of action is to prevent them from occurring in the first place.
If you see holes in garments after embroidery, check to see if any of these have been the culprit.
- The wrong type of needle
- The wrong sized needle
- A burr on the needle
- Too many stitches in your design
- Too many stitches in one area in your design
- The wrong type of backing
In our featured image, there are holes inside some of the small letters. These holes were created because the wrong needle was used. This image of embroidery was taken from a lightweight cotton t-shirt using polyester thread. The needle that was used was a 75/11 sharp needle. On a knit garment, you should be using a 70/10 ball point needle. As far as backing or stabilizer is concerned, on a knit garment, use 2 layers of no-show and1 layer of crisp tearaway backing along with topping on the top. The no-show cutaway backing holds it firm and gives it great stability and the tearaway keeps the small lettering crisp and flat so that it does not pucker up. This is especially important when you are working on a performance fabric.
Many times you will see holes in the centers of small letters when there are too many stitches in one area such as going around a curve. If you decrease your density this will usually help. If it does not cover enough, increase your underlay stitching, not your top thread stitching.
Holes in garments after embroidery can be totally avoided. I have a checklist that you can get to use as you are sewing out each of your designs before applying them to the finished garments. This checklist is going to help you with many of your production issues!
by The Embroidery Coach | | Embroidery Business Marketing
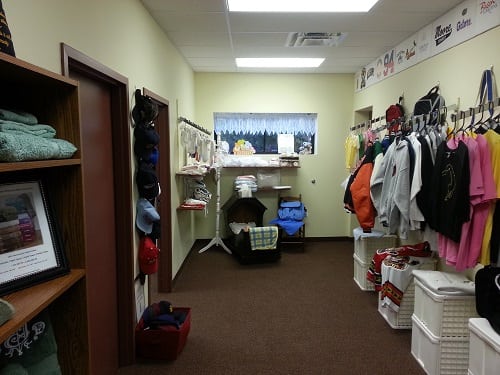
I have had many requests on how to set up a retail area for embroidery when you do not have much space and I wanted to share an experience with you when I set up my retail area for embroidery when I only had a small hallway to work with.
As many of you know I set up a retail space within the embroidery shop that I had open. I have since closed that shop, but I wanted to share the experience with you of how setting up a retail area for embroidery in a very small space is totally doable. We did not have an attractive storefront to work with like many other businesses; our building was set up for office space and production. What I had to work with was little more than a hallway and one office room, but I was determined to make the most of that space and make it work.
This was a very small space, but we have a lot packed into it. You can set up a very efficient and attractive retail area for embroidery even if you only have a small space to work with. We planned out every inch of it and set up our product displays in separate areas in order to make it easy for anyone to find what they are looking for.
It took a lot of time to plan everything out and create our samples but the end result was well worth it.
To start the planning process I laid my entire plan out on a mind map. If you are not familiar with a mind map you can use a Word doc and draw it out. I do all of my planning using mind maps and it makes it so easy and organized.
- I started out by doing some keyword research to choose the name and then I purchased it.
- I decided on what products to carry based on what people had been asking for and the information that I received asking other people what they would like to see me carry.
- I planned out each area and function and what each one would need from each display area to the processes inside of the office.
- I decided on which embroidery layouts, fonts, and designs that I was going to be offering on a stock basis.
- I purchased samples and embroidered them
- I created Product Sheets on each of these items with all of the information about the item including the price
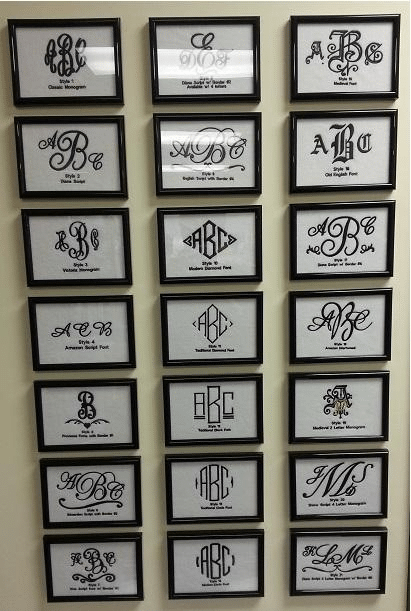
- I created a lot of embroidery samples to hang on the wall in pictures frames such as my lettering fonts and
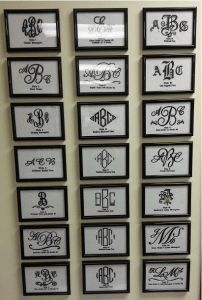 my monogram fonts.
- I embroidered jacket back-sized designs of jobs that we had done in the past and hung them around the ceiling for people to see the minute that they came through the door.
- I created price lists for the different types of items and hung them on the wall or displayed them by the area where the items where. Most of these are done in picture frames to make them attractive.
- I purchased display pieces that I would need. I used a lot of items that I had around my home that I thought would work. I was trying to keep the cost down as much as possible.
- I planned out the promotion for the Grand Opening and the follow-up.
- I purchased a 4‚’ x 12‚’ banner for the front of the building.
- I ordered a Sandwich Board and made a banner on each side and set it out on the sidewalk in front of the building.
- I also planned out the Follow-up Marketing System
Planning is the key to getting it all done and on time. I set a specific date and planned out each week as to what had to be done that week in order to have the Grand Opening on a certain date.
I went to the town board and spoke with the Economic Development director to see if there was a way that we could get some type of publicity and that was a really good move. He said that I could have a ribbon-cutting ceremony and that he would arrange that part. He gave me the names and addresses of all of the town, county and state dignitaries so I sent each one of them an invitation to attend our ribbon-cutting ceremony.
The Monday before the Grand Opening date, I sent out a press release to all of the local media. I ended up having 3 radio stations and 2 TV stations represented for the ceremony. It was great! I really never expected that part, but it really turned out excellent for us. One of the TV stations did a segment on us that appeared on the evening news and one of the radio stations also did an interview and it was on the radio during the afternoon.
That has brought in a fair amount of people and I did not have to pay for any of that advertising so I was very happy with the results. I did some trade advertising on one of the local radio stations and that worked out fairly well. We had several people come in and say that they heard about us on the radio.
The amazing thing was that our neighbors had all discovered that we existed and were starting to visit us. The contract part of this business had been in this building for 7 years and no one in the neighborhood even knew there was an embroidery shop there at all! There was only a tiny sign on the door and no one you could even read from the street.
I had a banner made to put on the front of the building. At least people were seeing the banner and were curious! The sandwich board with the banner on was also working.
For the Grand Opening, we embroidered coasters to give away along with a $10.00 gift certificate that they could use towards their next purchase. We also had refreshments and a drawing for a gift basket. Our grand opening lasted 3 days, we had a lot of fun doing it and as I said earlier, it was so worth it!
I wanted to share this experience with you to help you in planning out setting up your retail area for embroidery in a small area for your products. You did not have to spend a lot of money to do this, it took more planning than money!
This would work for you even if you want to set up a spot in your home to display your products, or rent a small space in a hotel or a club that you belong to. You can plan out a customer appreciation night or a couple of nights to bring people in and show them what you have to offer. What you get out of it will more than pay for the cost of putting it together. This will make people aware of what you are doing and what you have to offer.
Promotion and marketing is very important and without it, your business will not grow in the way that you want it to. To learn more about marketing and promoting your business, go to The Embroidery Business Academy. Check out what is offered in the Platinum Level.

by The Embroidery Coach | | Embroidery Business Marketing
When you are setting up your display samples you want to create them to encourage quick and easy sales. The way in which you select and prepare your samples for display whether you are going to add them to a retail space or create them for selling samples to take out to your customer is very important. You want to make it easy for the customer to be able to select the right garment quickly and you also want to make it easy and time saving for you as you are selling to your customer.
- Select what items you want for display or selling samples.
- Create a product sheet with all of the information about that product for each one of your sample display items. This includes the Style no., Available sizes, Colors and Order information for the distributor, the Price from your distributor and your actual Selling Price. (This makes it easy for you to be able to place orders for your products). Add all of your product sheets to a binder in tabbed sections.
- Create information Hang Tags for the items using card stock purchased from the office supply store. (You will use your information from your product sheet to create your sample tags.) Add your logo at the top, add Item name and Style number, Colors and Sizes available and Pricing. Use the C category pricing and add quantity pricing. (I create my pricing in categories to make it easy rather than by each stitch count) Cut the tags into 3 x 5 sizes and laminate them. Attach them to the garment with a labeling gun.
- Decorate each item for display-Make sure that all of the decorating is of high quality, no threads showing, no puckers, no hoop marks, no dirty marks and no wrinkles.
- Create design samples for display for the customer to choose from, such as lettering styles, Monograms display samples, thread colors, stock designs. You will also want to have the same information in your binder for easy retrieval.
- Create simple fill in the blank order forms with a space for item number, description, size, color quantity, decoration type, all design information, pricing and delivery information. Also have a space for amount of deposit, (min. 50%) along with total due upon delivery or pickup.
- Set up one set of basic polo shirts for the customer to try on for size. Purchase one of each size and make sure that each size is a different color. These sample shirts should be embroidered with your logo on them. You will want a shirt that can be washed repeatedly because you will need to wash them after each person tries one on. This should be a good basic sample that is medium priced, and embroiders well. This will give the customer a chance to see how the shirt performs after many washings and what the true size and color is after it has been laundered.
- Select display racks for your items if you plan to set it up for retail. There is no need to spend a lot of money on this. I use the 2 inch grid racks that you can purchase in 2 foot sections. They can be set up to stand alone or they can be attached to each other with clips to create an entire wall for your display. You can also purchase the slat wall and hang your items on fixtures attached to the slat wall. For some of my items, I purchased peg board, painted it the same color as the wall and hung simple items on that. You can be very creative with your displays. You may have some items laying around the house that you can use for display. I found a cradle in the attic that I used for my babies and grand babies. I pulled that down and created a display of several baby items. A display like this will get lots of attention.
- If you are going to be taking your items out to your customer, purchase a high quality garment bag and embroider it with your logo. Make sure that it is a garment bag that you can use as a sample also to sell to your customers. If you are going out to your customers, make sure that everything that you take is something that you can purchase. You may have a tote bag with your selling supplies in it or a brief bag with your computer and supplies. You can purchase a bag to carry your cap samples in. Each one should be labeled also with the selling information and be embroidered with your logo on it.
- If you are selling promotional products, use a pen with your information on it and leave it behind for the customer. Have a display of pens in your retail space and one for the customer to take with him.
- If you have retail space organize your samples together in areas that will be applicable to each one of those samples, such as all of your baby products together, and all of your wedding products together. If you are selling to corporate clients, have all of your items in one location, such as shirts, caps, jackets, pens, mugs, and anything else that you would be selling to that market. You want to make it easy for your customer to buy, buy, buy!
Your samples should be impeccable and very eye catching. Taking care to prepare your samples whether for display or for taking out to the customer will pay off in dividends. Your customer will be able to see your professionalism and will have more confidence in you as their supplier for their promotional products. This is also a very easy way to increase your sales! For more information in creating Simple Sales Tools, go to The Embroidery Training Resource Center in the Gold Plus Level.
by The Embroidery Coach | | Embroidery Business Marketing
Embroidery on the tongue of sneakers is a new craze that is happening because someone showed a pair on the “Today Show” a couple of months ago. I received a phone call asking me if I could embroider the tongue of the sneakers. Well, my response was, if someone else did it, I could certainly do it also. Just bring them in and I will do it.
The customer brought her sneakers in, asked if we could do embroidery on the tongue of sneakers and of course, we said yes! She picked out her monogram and we embroidered them and she was extremely happy with the finished results. They were going to be a Christmas present for her teenage daughter.
We do not use clamping systems or any other type of devices in our shop. We only use hoops, the same hoops that we use for every other project. When I first started embroidery, none of those items even existed but I had to embroider any type of item that everyone is embroidering today. It was no different than it is today, just the fact that we had to learn to accomplish it with the tools that we had. All of the other types of hooping devices came along many years after I started.
I am not saying do not purchase any of the new types of hooping devices, I am just saying, you can embroider these types of projects with your current tools. I am going to show you how we accomplished this using our normal hoops, backing and applique glue and masking tape. Those have always been the tools that I used for every project that I have done whether they were hoopable or not.
I am going to go through the step by step process of embroidery on the tongue of sneakers.
I do not have a picture of each process but you will be able to see exactly how we did this using our normal hoops, backing, glue and masking tape.
Step 1 – Measure the distance from the top of the tongue to the spot where the lace is going to go through the tongue. Leave about one-fourth of an inch at the top and at the bottom of where the monogram will be.
Step 2 – Create the monogram in your software to match the area of where you are going to be embroidering your monogram.
Step 3 – Print out the monogram, cut it out and lay it on the area to make sure that it will fit and is exactly as you want it.
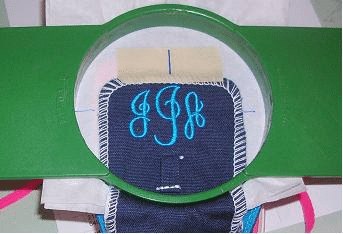
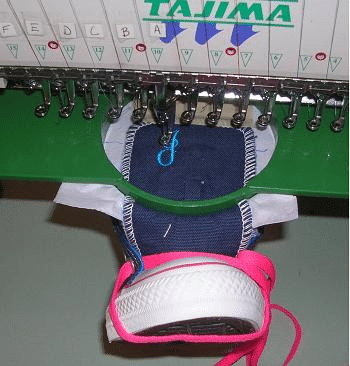
Step 4 – Take 2 layers of 1.5 oz crisp tearaway backing. Mark a center line on the backing both horizontally and vertically. Spray the backing with applique glue. Position the tongue onto the top layer of backing and tape the top of the tongue in place using masking tape. Do not try to use scotch tape, it will not hold it.
Step 5 – Place the 2 layers of backing with the taped tongue onto the bottom part of the hoop and add the top part
of the hoop. You will need to make sure that you have the lines marked on the backing with the lines marked on your hoop. It will need to be perfectly straight.
This particular picture is showing you how it is hooped even though the embroidery is finished. You can see how straight it is, how the top is tapes and the marks on the backing.
Step 6 – Place your hooped sneaker tongue into the embroidery machine and line it up so that your design starts in the center. Press Start. In this picture, you can see how it was hanging from the hoop in the embroidery machine.
 Step 7 – When they are finished, you remove the sneaker tongue from the backing and tape. If you have placed marks on the tongue, remove the marks and you are finished.
Embroidery on the tongue of sneakers is something that any embroiderer can do. Give it a try, you will find that it is not hard at all and is a fun project!
To learn more information about how to embroider on all types of fabrics and garments, so to The Embroidery Training Resource Center.

by The Embroidery Coach | | Embroidery Business Marketing
Are You Stuck Trying To Figure Out What To Charge Your Customers For Their Embroidery?
Pricing your embroidery is probably the hardest task that you have to do in your whole business and getting your embroidery price list done in a way that you can make a profit can seem like a huge job that has no beginning or end! You wait on your customers, show them your samples and then they place their order. As they are placing their order, they want to know what the price is going to be. Now you are panicking! “You have to come up with an answer and they are standing right here in front of me waiting for that answer. Now what do you do?”
So many embroiderers at this point will just pull an answer right out of the air with no idea as to whether it is right or not. They are afraid if they throw out too high of a number, the person will just walk out and then they will not have the order at all. It is better to price low and get the job than to price high and take a chance on not getting the job, so they think!! Does that sound familiar?
Get Your Embroidery Pricing Done Now 5-hour Workshop
This 5-hour Pricing Workshop will take place July 21st from 10am-3pm Eastern Time. This virtual workshop is going to be hands on and interactive right from your own computer! You are going to be able to ask me specific questions about your business and I will answer them! This is going to be your chance to finally get your pricing structure done correctly and be able to walk away with a good embroidery price list.
Are you wondering if this Embroidery Pricing Program Workshop is for you?
Are you just starting out and want to create a price list that is going to make a profit?
Are you tired of trying to figure out what to charge your customers!
Are you struggling? Trying to get it all together and just DO NOT KNOW where to start?
Are unsure of your price list and want to check to see if you are charging correctly?
Do you have many pricing levels and DO NOT KNOW how to charge for the different levels?
If you said yes to any of those questions, then YES this is for YOU!
This is for the embroiderer that is just starting out and wants to create a price list that is going to make a profit!
This is for ALL EMBROIDERERS that want to make money, and please do whatever you can to be a part of our “Get Your Pricing Done Now” workshop on July 21st.
This is going to be your chance to FINALLY get your pricing structure done correctly and be able to walk away with a good price list. And make a profit in your business! If you have not purchased the pricing program, it is included in the price of the package, however, if you have purchased it, you can still purchase the workshop alone. You will see on at the bottom of the video page there are 2 links.
After purchase, you will be receiving instructions as to what to do to prepare for it. I want you to get the most from this training possible. Click on the link below to the information page and access to purchasing the Workshop!
by The Embroidery Coach | | Embroidery Business Marketing, Embroidery Pricing
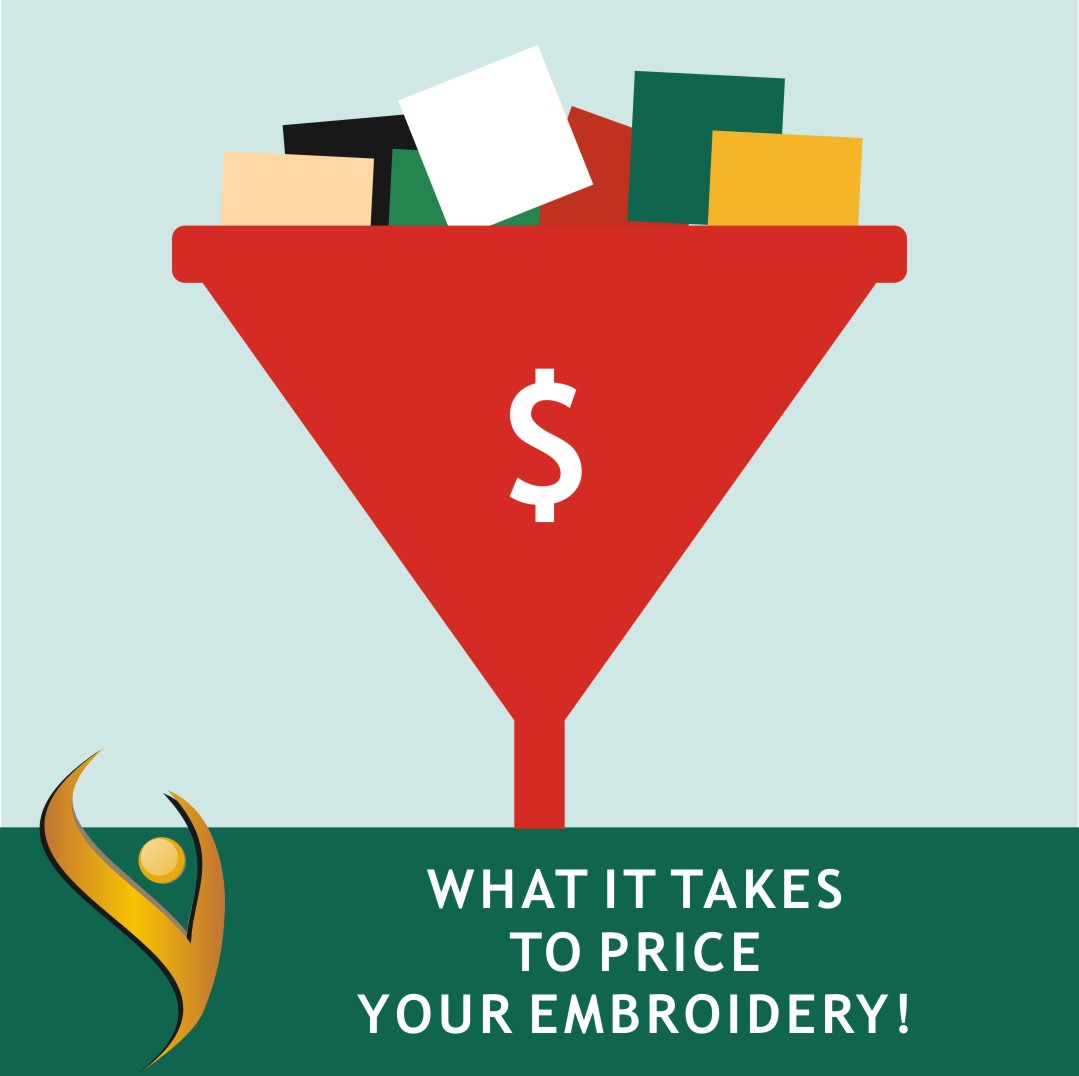
Do you know what it takes to price embroidery correctly so YOU can make a good profit?
Pricing is one of the main concerns that most embroiderers have when they are first starting out in business and even after they have been in business for a while; they are still trying to figure out how to price their embroidery. I have found that most embroiderers start out by obtaining the price list from anther shop and this is what they use to start charging their customers. They really do not understand what it takes to price embroidery.
They soon wonder why they are not making any money or have any money left over at the end of the month when the other shop is still operating at what appears to be very smoothly and maybe even profitably!
You may have heard my story of how I almost lost my embroidery business because I was pricing totally wrong. When you are first starting your embroidery business, you really do not know where to begin when it comes to the pricing area of your business. You start by getting the price list of your competition and many times try to stay one step ahead of them by lowering your prices just a bit or else charging exactly what they are charging; thinking that this is the way to go.
That is exactly what I did when I first started and kept this up for several years! I felt so pressured because many times the competition was charging less than I was and I thought that I had to keep my prices low so that I could get the work!
After 15 years of struggling I finally sat down with my accountant told him that I was sick and tired of struggling and he told me that I needed to raise my prices or else get out of business! I did not want to get out of business because I loved embroidery but I was scared to death to raise my prices. I just knew that I would lose all of my customers!
But really, what was the difference? Either I had to try this to see if it would work or I would just quit because I did not want to continue to work night and day any more for no profits! Actually, I was in the hole! There was no take home pay for me, it was just work, work, work day after day! I had the mindset that it was all in volume and that eventually when the numbers were large enough it would all even out and I would finally be making some money.
That was the wrong mindset and I finally discovered that the volume theory with the amount of machine that I had was not working. I know that many other embroiderers find themselves in the same trap and they really have no idea how to get out of that hole!
Most embroiderers start their embroidery businesses, because they love what they do and they decide that they can earn some money with it and they soon learn that there is a lot more to it than just getting jobs and getting those orders out the door!
There is so much more that goes into figuring your pricing than just stitch count and that is what the majority of embroiderers are charging for. When your machine is not running, you are not making any money, how can stitch count be your only factor? It isn’t. You have color changes, stops and starts, the time it takes to put the garment into the machine and take it out along with other factors.
Who is paying to hoop it, who is paying to trim it, who pays for the packaging of the finished product? Most of the time it is the embroiderer and not the customer that chokes on all of those charges. This is not the way that it is supposed to be!
However, what do they do? Where do you start? In this training I am going to give you the steps that it takes to price out your embroidery correctly and what you need to do to run a profitable embroidery business.
No. 1 Know Your Break Even Point!
You must know what your break even point is. Do you know what a break even point is? That is the sum total of all of your expenses that you have that costs to run your business each & every month. What is that figure and how do you find out? What is included in this figure?
No. 2 Know All Of Your Processes!
You must know what all of the processes are that are performed with each and every order. Each step in your business has a process and that process has a price attached to it. The bottom line is, it costs money to run your business! It costs money to wait on a customer! It costs money to plan out their order! It costs money to create their product! It costs money to stand there and chat with your customer when they pick up their order. You need to know what each one of those steps and processes is costing you.
No. 3 Time All Of You Processes!
Time out all of your processes. Start timing each process as you are performing it when starting and completing a job.How much time are you spending:
- Taking an order
- Ordering your products
- Getting your job ready for production
- Creating the Invoice
- Talking to the customer when they pick up their order.
Each and every one of these tasks plus many more need to be timed out and has a cost price attached to them. When you have that done, you will be able to see exactly what the job is costing you. Too many people make the mistake of pricing by stitch count alone not really realizing that they need to be adding all of these other steps onto the price as well.
This is what it takes to price embroidery correctly! Being aware of all of your costs and watching your numbers are extremely important and the bottom line of what it takes!
I would love to start a movement for embroiderers to stop working for nothing and start pricing their work for a price that is worthy of them. We are highly skilled professionals, not unskilled labor, but that is how most embroiderers charge. This is very disheartening!
It is time to stand up and start charging what you should charge like the professional that you are!
For more information about What It Takes To Price Embroidery Correctly For A Profit click on the link below!