by The Embroidery Coach | | Organizing
In part 2 of this series on Organizing Your Business I am going to start talking specifically about the individual work areas or work stations within your embroidery shop. In this article I am going to start with the first area in your business after the order has taken. That area is Receiving.
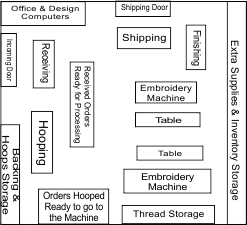
In part 1 of this Organizing Your Business series, I showed you a floor plan that is below on this page. This is a small shop with 2 embroidery machines and the square footage for this shop is about 1,000 square feet. I drew up this basic plan, but it is not drawn perfectly to scale. This plan was to show how you can lay out your shop for a good workflow and not specifically for an exact floor plan.
This is a basic floor plan that I had when I had a 6-head machine and 2 single-head machines. The single-head machines were sitting next to each other and in the floor plan, it is listed as one machine. At the time I had 5 employees, 2 machine operators, 1 hooper, 1 person finishing, and 1 person doing shipping & receiving.
It does not matter how large or how small your shop is, what matters is how you have it laid out and how many steps you are saving going from one area to another. Each one of your areas or workstations needs to be laid out in such a manner that it is physically easy for the person working in that area and efficient for the workflow.
One of the main concerns for employees is the table height that they are working at. It must be the right height for the person so that they do not have back aches and are not wasting time with the movements that are required for them to take as they are performing their tasks.
Received Orders Ready for Processing
Whether you have a large shop or a 1 person at home embroidery business, you must follow the same type of system in order to be efficient in your workflow. The first process that occurs after the order is taken is the Receiving of the order.
Your Receiving area needs to consist of a large table preferably with a back (like a short wall) built on it so that you have a place to hang your orders that are not complete in one form or another. The tools that you need for this area are a Copier or Computer and Printer and Plastic Job Folders for your orders. If you do not have a wall that you can hang the orders on, you can file them in a file box under your table.
As soon as the Order Processing is completed you are ready to Log in the Order. This is the first step in Receiving. You can Log the order in on the computer and then print out a copy daily and place it in a 3-ring binder. This binder will be stored on the Receiving desk. If you do not choose to Log in on the computer, you can create your Log in Form, print out the blank forms, and fill them in as the orders come in. If you are an embroidery shop where you have someone that receives the orders specifically, you can have them fill in the form as they receive the orders and at the end of the day, it can be input into the computer. This is the process for many small to medium-sized shops. The Login form should include the following information:
- Date (the order came in)
- Job Number
- Customers Name
- Job Name
- Item Description
- Quantity of Pieces in Order
- Process (embroidery, screen printing, twill, heat press)
- Date Due
- Date Goods Arrived from Distributor
- Date Shipped
The work order may come in from the customer by phone or email without the garments. If you are working with a Retail customer, you will be the one that is ordering the goods. The garments are shipped in separately from a distributor or manufacturer. Log the order in, assign it a job number and attach a copy of the order to a clipboard marked “Waiting for Goods”. When the Goods come in from the distributor or manufacturer, you pull out the Work Order and match it to the packing slip from the distributor. The order must match exactly.
- PO Number
- Quantity
- Item Number of the garments
- Color
- Sizes
You need to physically count all of the items and check to make sure that the color and sizes are correct and that there are no damaged goods. Notify the customer that the garments have been received and that there is a complete match or that there is a problem with the order and it is up to the customer to make whatever corrections there are to be made with the distributor or manufacturer. If it is for a Retail customer, you are the one that has to solve the problem with the distributor or manufacturer.
Design Work Can Begin As Soon As Job Is Logged In
After the goods have been successfully Logged In and even before the Goods are received the process for the design can begin. The design and sew-out can be done and approved by the customer while you are waiting for the Goods to arrive. Many times the entire job can be ready for production as soon as the goods arrive from the distributor. I will talk more about the design process in another article.
Once you have all of the information together and you have all of the correct items, place all of the information along with the order inside of a clear plastic Job Folder and tape it to the front of the box that has the goods inside of it. If there is more than one box label each box with the Order No., Job Name, and Box 1 of however many boxes in the order. It is now time to place the order in the Staging area of Received Orders Ready for Processing. At that point, the order can be picked up by the next person that is going to process that order. In the case of the Embroidery area, the next stop is Hooping. In our next article, I will talk a lot about the Hooping area. This is a big subject with lots of variables!
by The Embroidery Coach | | Embroidery Business Planning, Embroidery Production, Organizing
In Part 1 of our Saving Time series I talked about how to save time Creating Embroidery Design Layout Style Sheets, in Part 2 I talked about Limiting Your Embroidery Lettering Styles and in Part 3 it was about creating Sample tags for all of your showroom embroidered product samples. Today I am going to go over how to create an Organized Ordering System.
An Organized Ordering System
An organized ordering system is simple to put into place. This is true when you have all of your information computerized and even if you are using paper forms to be filled out while you are waiting on the customer. You can create Sales Order Packets with all of your forms included so that you do not have to look for your information forms while you are working with your customer. Inside of this Sales Order Packet you should have:
- Customers Quote form
- Your Order Form
- Form of Payment
- Production Timing Form
- Artwork Production form
- Packing slip.
When you are first working with a customer, they usually want a quote before they place an order. Prepare your customers quote and make a copy of the quote form for him to take with him. Place your copy along with all of the other forms into a file marked Customer Quotes. When the customer comes back to place his order, pull the packet of forms from the quote file and you are ready to complete your order taking process.
By having all of these forms together in one packet, you will keep all of the customer information together and you will prevent mistakes from occurring.
During this series we have gone over 4 ways to help your customers make quick ordering decisions. You want the order process to be a pleasant experience for both you and the customer. When you offer your customers so many options they only get confused and it takes longer for them to make a final decision and sometimes that final decision is no decision. Reducing the amount of choices you have to offer will save you and the customer a lot of time.
I hope that this series has helped you to become a little more organized in your ordering process and that you see the value of taking the time to go through your ordering process and make some immediate changes that will benefit both you and the customer!
All of these forms plus many more business and production forms are available through my Embroidery Business Training membership website, the Embroidery Business Academy.
Joyce Jagger
The Embroidery Coach
by The Embroidery Coach | | Embroidery Business Planning, Embroidery Production, Organizing
In Part 1 of our Saving Time series, I talked about how to save time Creating Embroidery Design Layout Style Sheets. In Part 2 I talked about Limiting Your Embroidery Lettering Styles. Today I am going to talk about saving time by Creating Sample Tags with order information to apply to all of your showroom samples.
Sample Tags With Order Information
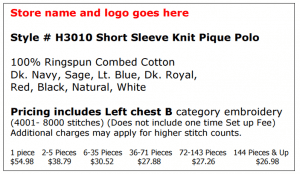
Your showroom should be complete with high-quality embroidery samples that are tagged with all of the order information that is applicable to that product sample. This tag should include the style number, colors and sizes available, manufacturer, price, and quantity pricing. All of this information should be on a Tag that is attached to the sample garment.
These embroidery Sample tags are very simple to produce and portray a good image to the customer about your organization. I created my Sample tags on card stock that I purchased from the office supply store, cut them apart, and laminated them. They stay very clean and always look professional when they are laminated. I then attached them with a Hang Tag attachment.
Having all of your samples tagged ahead of time with the appropriate information will save you a lot of time and prevent you from having to look up the information in the catalogs. As your pricing changes, so do your Sample tags. Always keep them up to date with all of the correct product and ordering information!
In part 4 of our Time-Saving series, I will talk about having an organized ordering system!
Joyce Jagger
The Embroidery Coach
by The Embroidery Coach | | Embroidery Business Planning, Embroidery Production, Organizing
In Part 1 of Saving Time-Helping Customers Make Quick Ordering Decisions, I talked about how to Create several Design Layouts Options for your customer to choose from. During Part 2 I am going to talk about limiting your customers lettering style options.
Limited Embroidery Lettering Style Options
In each of the embroidery software packages today you have many lettering styles to choose from and it is very tempting to want to show our customers all of the lettering styles that we have available. Many new embroiderers make the mistake of offering all of these styles to their customers and letting them chose which one they want to use.
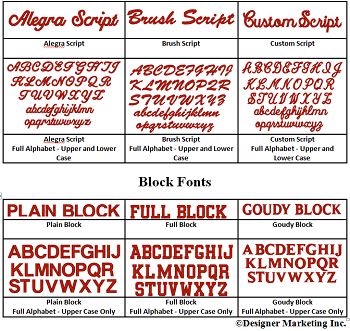
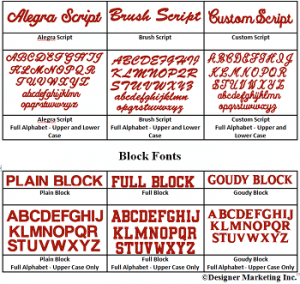 In order to do this, you must sew out every embroidery font that you have available and know what the capability and size restrictions are for each one. This takes a lot of time and is totally unnecessary. Our customers get so confused when they are faced with so many choices. I have found that the best way to handle this is to offer 2 or 3 Block lettering styles and 2 or 3 Script lettering styles. This is enough for them to choose from and will prevent the customer from being overwhelmed with your vast selection.
By limiting the embroidery lettering style options, you not only save time working with your customer in their selection, but you also save time in the set up of your lettering designs. If you are only working with a few lettering style options, you can have templates made ahead of time with all of the style settings included in the template. This is a huge time saving process when you are creating your customers design set ups!
In our next Saving Time series, I am going to talk about tagging your samples with the correct ordering information!
Joyce Jagger
The Embroidery Coach
by The Embroidery Coach | | Organizing
In Part 1 of Organizing Your Embroidery Business, I talked about organizing the information that you use in running your embroidery business. In Part 2 I l talked about your customer’s design information. In Part 3 I talked about your Production process. In Part 4, I will go over the information for Shipping and Invoicing
The completed order, customer order form, and production form go to shipping. The shipping information is added to the production form. This shipping information includes the weights of boxes, shipping costs, and the time allowed for this process. The packing slip is filled out with all of the items listed that are being shipped to the customer. A copy is then made of the packing slip and attached to the production form and customer’s order. These forms are all sent to billing.
The person doing the invoicing pulls the original customer order and uses the production form to do the invoicing. The production form is then detached and goes back to the production supervisor to be analyzed and to see what could or should have been done or what other methods could be used to save time and money.
These forms are very important. The original customer order is attached to the invoice created and filed in the accounts receivable drawer. After payment has been received, the paperwork is then filed in a paid file drawer or cabinet inside of the customer’s file by order number or date.
Organization is not hard, but it does take some time and thought. You need to go through each process of your particular business and put an organization plan together. If you take the time to get fully organized, staying organized is very simple and you will save time in your total business operation.
I hope that this series on Organizing Your Embroidery Business has been helpful. I would like to hear from you about any areas of your business that are troublesome for you to organize.
Joyce Jagger
The Embroidery Coach
by The Embroidery Coach | | Organizing
In Part 1 of Organizing Your Embroidery Business, I talked about organizing your information that you use in running your embroidery business. In Part 2 I l talked about your customers design information. In Part 3 I am going to talk about your Production process.
The first step of my production process is to log in the job on the log-in form, make a list of new artwork that has to be created, and either give that to the person that creates the artwork or sends it out to the digitizer. If I have to order anything for the project, I do so and put a copy of the original customer order in a plastic sleeve and hang it in the receiving area waiting for the goods to come in. A production form is filled out with the customer and job information on it that follows through the entire production process. The original order is placed into the customer’s file folder in the office. I connect that order and the production form with the goods when they arrive.
After the design is ready, I place that with the order and it is then placed onto a shelf ready for hooping. If you have employees, it is best to have at least one job hooped ahead of time. This creates a smoother and faster production flow. When I had my large embroidery business, I have all of the jobs hooped the day before they were placed onto the embroidery machines. I had 24 dozen hoops of the most popular sizes (12 centimeters and 15 centimeters) so this was possible unless the order sizes were larger than 24 dozen. Sometimes this was the case, but at least the first 24 dozen pieces for the job were hooped ahead of time.
At the time for embroidery, the baskets of hooped garments are moved to the embroidery machine area and the machine operator can start the embroidery process. The design is loaded into the machine by whatever process you use to get your designs into the machine. The garment are then loaded onto the machine and embroidered. After they are embroidered, they are removed from the machine, unhooped and placed into another basket or bin and moved to the trimming area.
The trimmer will trim, steam, fold and pack the garments ready to be shipped. In a large business this will be more than one person. You will have a person that trims and steams and another one that will fold and pack the garments ready for shipping.
The production form is filled out by the operator with all of the information about each process as it passes through production.
Part 4 of Organizing Your Embroidery Business will be about shipping and invoicing procedures.
