
by The Embroidery Coach | | Embroidery Business Marketing
Hi, I am Joyce Jagger, The Embroidery Coach and I started my business back in 1978 when a friend of mine asked me to Embroider names on some school jackets for him. When I finally got the job done, he was thrilled with it. There was no one in our area at the time that was doing embroidery, so I decided that this just might be a way that I could earn a few dollars and still stay at home.
Like so many other people that decide to start a business, I had big dreams of this being a business that was going to give me the freedom that I wanted, I could name my own hours, and make some extra money doing something that was enjoyable. It didn’t quite turn out that way, at least not at first.
This was the start of my home embroidery business that grew into a medium-size multi-head embroidery shop. Unfortunately, I learned everything the hard way and it was tough going. I spent many years struggling because I had no mentor and made many mistakes through it all.
I did not know how to price my embroidery, so I gathered the price lists from embroidery businesses all across the nation. These price lists were from large embroidery shops with many embroidery heads as well as small embroidery shops. I would average out what everyone was charging and create what I thought would be a good price. I had no idea that a large embroidery shop with many embroidery heads could charge less for the same design than a small shop with only a single head.
I was on a constant treadmill of running and running and never getting anywhere. Each month it seemed like I had less money to work with and more work was coming in. We were known for our outstanding quality and my business grew rapidly with repeat orders and by word of mouth. I was constantly borrowing money to purchase more equipment and be able to keep up with my payroll.
Our customer base was increasing and yet I was still struggling to make ends meet. This was a mystery to me. Why wasn’t I making some money. I was going further and further into debt and yet I was working night and day, 7 days a week trying to keep up with all of the work.
Then something happened that changed everything…
After 15 years of this nightmare, I finally went to my accountant and told him I just could not go on like this. I was tired of struggling and needed to stop this chaos. He told me that I needed to raise my prices and I was scared to death to do that because I would lose all of my customers. He flatly told me that either I raise my prices or go out of business. I had no idea how to do that. I thought that I had to be charging what the average embroiderer was charging, but I was so wrong.
He agreed to come into my shop and work with me for one solid week. He timed everything that everyone was doing and taught me how to keep track of each process and how to figure out what the cost was for each one. I was shocked when I learned that I was losing money on every single job that went out the door. He taught me how to create a price list that was profitable, and it is the same process that I teach today. He also taught me how to better organize my entire business and get it running more smoothly.
My whole life changed.
After 15 years of running night and day with no light at the end of the tunnel I had learned how to stop the chaos and start running my business like it should be run. After a few months, I totally turned my business around and started making money. I was able to go home at night with a clear head and enjoy my family. This is the way that it is supposed to be! With the right pricing structure, this can happen for you also.

by The Embroidery Coach | | Embroidery Business Marketing
This time of year is generally a bit slower, but for some, it is just another month that they have more work than they can handle. But some people need to bring in more customers.
Yesterday I sent out an email asking what your biggest issue is at this time of year and I had several responses like
- I am too busy; I wish it would slow down a little bit.
- I and buried and I need more help.
This is how it is for most of my high-level students.
Now for those that are not that busy, this would be a great time to join a networking group. They are all over the country and many of them are inexpensive to get started. Most all of them have a fee, but it is worth it
- What type of organization or clubs do you belong to?
- Are there organizations within your church that would be applicable to letting the people know what you do and that you are looking for more work? You can even start with a 15 or 20% discount for the month of February. This would not bring in a huge amount of income, but it could help you find more customers at a very low cost.
The local Chamber of Commerce would be good for most people to bring in more customers. When I had my large business, I joined the Chamber and was able to receive a lot of work from them and from other members of the Chamber.
You want to make sure you are always wearing an item that you can sell along with your logo on it. This is really important. People do not realize how important this is and what an impact it can make on those who view your work. Having our work on display can be a real boost to your business. I make sure that I wear my logo every place I go, including the gym. You would be surprised at how many people notice and start asking questions.
When you join, it is important to get involved and let people know what you do and how you can help them with their promotional needs. You need to promote your business in such a way that you are helping them promote theirs, not just tooting your horn about what you do. If you have high-quality clothing on with high-quality embroidery on it, that will speak for itself.
Hand out brochures selling your services, but do not add pricing to your brochure. You are only selling your business, not a particular product. I show you an example inside of the EmbroideryBusinessAcademy and even give you the template to use to make it easy to create your own brochure.
I hope that this gives you an idea as to how to get yourself in front of more prospects and bring in more customers.
Let me know how you currently are getting your name out there or getting your business in front of other prospects.
by The Embroidery Coach | | Embroidery Business Marketing
Do You Keep Track Of Your Embroidery Design Setups? When you are setting up your embroidery designs, do you keep track of what you did? Do you write down the settings that you added or do you think that you will remember them? It is very important to keep track of each one of your embroidery design setups.
I have found that thinking you will remember does not usually work. You have too many things rolling around in your head at the same time and when you go back and try to replicate what you did, it is very difficult to remember.
Way back in 1982 when I first started using design software, I started writing down everything about my embroidery design so that I could go back to it when I created another one similar to it or a repeat of what I had done. I had a simple little book that had the words on the front, Favorite Recipes. I had gotten it as a gift from someone for Christmas and instead of writing regular recipes down, I used it for my embroidery recipes. It worked out great.
I wrote words, added the customer’s name, and drew diagrams and little drawings to show exactly what I had done. I put in my settings, thread colors, sizes, and lettering styles. After I did a sewout and made some changes, I went back to my book and made the changes there.
You may want to start a system where you keep track of each embroidery design setup on your software design sewout sheet and then place that in a binder or in your catalog envelope with all of your information about that job or design that goes with a certain job.
The most important thing is that you need to start a system of keeping track of every one of your embroidery design setups or digitized designs that you do. This is very important and will save you a ton of time when you go back to that design or create another design using the same parameters.
Some people use recipe cards to keep track of their information and then file it inside of a recipe card file in alphabetical order. This works also. Whatever you decide to use, get a system started and start keeping track of each one of your embroidery design setups!
Joyce Jagger
The Embroidery Coach

by The Embroidery Coach | | Embroidery Business Marketing
Knowing which embroidery backing to use on a particular garment when you are getting ready to embroider your design will make the difference between turning out a mediocre product or a high quality finished product.
Backing is required to give the garment or piece of cloth more stability so that it can hold the stitches
Some people are under the impression and have even been told by other embroiderers or instructors that you do not need a backing if your garment is heavy such as a bag, cap or a jacket back. You will have a higher quality result with a finished design if you do use a backing.
Often if I have a garment such as a bag that is hard to hoop with backing, I will hoop it without the embroidery backing and slide a piece under the hoop when I put it into the machine. This applies only to very rigid fabrics. This will give it the stability and crispness needed for the finished product. It also gives you a piece of backing to rip against instead of your garment if you happen to make a mistake. And trust me from time to time, we all make mistakes!
I am going to share some pictures of the different types of garments with you and this may make it easier for you to understand which embroidery backings to use on each type.
Two Categories Of Embroidery Backings
There are basically two categories of embroidery backings but within these two categories there are different types that you need to carry in your inventory to be used on a daily basis depending on what type of garment you are going to be applying your embroidery.
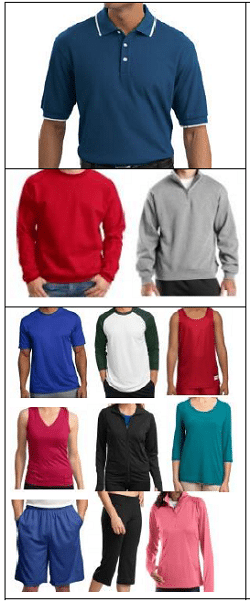 Knit Fabrics-Cutaway Embroidery Backing
In the picture to the left you will see several types of knit garments. All of these garments should be backed with Cutaway backing.
There are several types of Cutaway embroidery backing but I am only going to be talking about 2 of them here.
Basic Cutaway backing is popular and is the most commonly used. It is awet laid non-woven embroidery backing designed specifically for machine embroidery. Available in several different weights; I recommend and use the 2 oz. backing for most of my applications. It can be used on all types of knits but I specifically use it on my heavier knits such as the left chest areas of Sweatshirts and Fleece .
No Show backing is a very light weight waffle weave cutaway embroidery backing used for all light weight and pastel colored knit fabrics. Sometimes it is called a Mesh backing. This is my favorite cutaway backing and it is so soft that it is advisable to use 1 layer of tear-away backing under it for extra stability especially if you have small letters in the logo.
The tear-away will then be torn off and the No show backing will be cut away. You will not see a shadow of the backing from the front of the garment as you so often see when using the normal basic cut-away backing. This is extremely important when you are applying your embroidery to the very thin fabrics such as the pima cottons or the performance wear fabrics.
The No show backing also works great if you are embroidering the full front of sweatshirts because it will let it fall in a natural manner instead of being stiff once the backing is removed. This type of fabric does not need the extra bulk of the two layers of normal cut away backing. Many people think because it is a sweatshirt, that you need to use heavy backing; untrue. It is stability you are looking for; not weight.
The combination of 2 layers of No show embroidery backing and 1 layer of 1.5 oz crisp tearaway backing works great for the moisture wicking or performance wear fabrics that are so popular today.
The No-show backing is a little more costly than the basic cutaway backing but to me the end result makes it well worth the cost. When I am trying to create a high-quality product, I need to use high-quality materials in order to produce that high-quality product!
Woven Fabrics Tearaway Embroidery Backing
In the picture to the left you will see several types of woven garments. All of these garments should be backed with Tearaway backing.
Tear-away backing is used on all woven fabrics such as denim, chambray, twill, dress shirts, nylon oxford, canvas, bags, aprons, flags, sheets, pillowcases, tablecloths, napkins and etc.
It is also used on towels and washcloths. I have found that a 1.5 oz weight has worked best for almost all of my applications using the tear-away backing. I normally use two layers for most applications; sometimes I use only one and occasionally I will use three. I only hoop two layers into the hoop when I am hooping the garment, but I
will place another layer under the garment after I put it into the machine. This will give extra crispness to small lettering. It actually makes the columns in the lettering wider. It can also prevent puckering if the garment is hooped tight enough and has the proper amount of backing.
If you have a full back design that has several thousand stitches you will need a 3 oz. crisp tearaway backing. This 3 oz crisp tearaway embroidery backing is the same one that is used in caps, but it is on a larger roll rather than being cut in 4 inch strips.
Cap backing is a 3 oz. heavy tear away backing that is used on caps, front, sides and back. It usually is available in strips cut at 4 inches wide to fit inside of the front of caps. I have found that one layer of cap backing will work great for most caps, but sometimes if you have an unstructured cap 2 layers will produce a sharper more crisp look than using one layer. I will hoop one layer into the cap when I am putting the cap onto the cap frame, and then lay the extra layer into the cap as I am attaching the cap frame to the cap driver on the machine. It really does not take that much extra time and I notice a huge difference. The lettering will be much flatter and does not pull in nearly as much.
When hooping a cap back, I use a flat or tubular hoop and I do not hoop the backing in. I hoop the cap back, attach the tubular frame to the machine and then slide in a piece of the cap backing under the hoop. It really is too hard to keep the cap back straight when you are hooping it with the backing. I have also used cap backing at times as an extra layer on extra heavy terry towels. It really helps to flatten out the columns in the monograms. It will soften up after it is washed.
I hope that this helps to take the mystery out of which embroidery backing to use on the different types of garments. If you would like to have a copy of these Embroidery Backing Guides, fill in your Name & Primary Email address and I will send you a copy of each one.

by The Embroidery Coach | | Embroidery Education
Many embroiderers find that embroidering Small Lettering is very challenging, but once you learn how to cope with many of the issues, it is easier. In order to control these challenges, there are some key elements that must be considered.
- Fabric
- Needles
- Thread
- Style of Lettering
- Underlay
The small lettering in the design, ONTARIO COUNTY, NEW YORK is only 3.6mm in height. This would not work well if it was upper and lowercase. It is best to keep lettering that small in all upper case letters. It also helps to use a plain block letter rather than one with serifs when you are embroidering lettering that small.
Making small lettering work to your satisfaction often means making adjustments to allow for your fabric type and the size and style of the lettering that the customer is requesting. Many times what they are requesting is not acceptable for embroidery. They are used to seeing their logos in type set usually in ink or screen printing ink and this does not always work with needles and thread. It is not uncommon for a customer to request an unreasonable amount of letters all to be placed on one line.
With Small Lettering, you have to create a balance between the fabric, needles, thread and the size and style of your lettering. You cannot have letters so small that you are creating stitches that will be stitching on top of each other. This causes holes in the fabric and thread breaks. Your stitch length must be a minimum of 1 millimeter in order for it to sew and not create holes.
Embroidering Small Lettering is not hard and you can learn to embroider small lettering on any type of fabric once you learn to control the factors that seem to make it difficult. Join us for the Small Lettering Intensive. Click on the link below for more information. Small Lettering Intensive.