
by The Embroidery Coach | | Embroidery Business Marketing
How Has The Pandemic Affected Your Embroidery Business? How has the pandemic affected you personally? Have you spent much time thinking about this and how you are going to make changes to be able to cope ? Do you know how to hang on to your embroidery business during these uncertain times?
Do you still have the same amount of business and customers that you had before the pandemic started? Have you noticed any attitude change in your customers and prospects? Are they giving you unreasonable requests?
I have heard a lot of embroiderers say that their customers are getting obnoxious and more demanding than ever. Some embroiderers are being treated like servants and are expected to continue to do more and work more and in today’s’ world they are being bullied into lowering their prices.
Are you wondering how you to deal with all of these situations right now? How should you hang on to your embroidery business? What you should do right now to hang on to your embroidery business and keep your customers coming back for more during these uncertain times?
No. 1 – PLEASE, do not get caught in this pricing trap. DO NOT LOWER YOUR PRICES to get the work! You will go out of business quicker than any thing. With the way that prices are increasing to all of us, you are going to have to raise your prices as well. We all have to pay our bills. All of our supplies and products that we have to purchase to do business with and resell to our customers are increasing in price and you cannot absorb those price increases. You must adjust your pricing and get your pricing structure created to work during this time.
No. 2 – Keep in touch with your customers. You want your customers to realize how important they are to you and how you value their business. Your customers are the lifeblood of your business and deserve your best. If you have not focused on your customer list and keeping in touch with them, stay tuned to my next post. I will explain how to get started with it so you can get that hang on to your embroidery business!
by The Embroidery Coach | | Embroidery Production
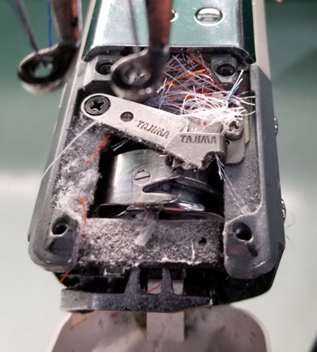
Does the bobbin area in your embroidery machine look like this? Embroidery Machine Maintenance is a must and something that none of us want to deal with but in order to get the maximum efficiency from our equipment this is a must. It makes no difference if you are a sole person with a single head or a large multi-head production shop. Dealing with constant thread breaks or machine downtime is both very costly and annoying. Our customers don‚’t want to hear that you can‚’t do their job today because your machine is down. Most of the time this can be prevented with routine maintenance. It only takes a few minutes each week for each head and is easy to keep up with once you get it worked into your daily and weekly schedule.
I have found that stopping production early on a Friday afternoon to do all of my weekly maintenance pays large dividends the following week. It really helps to start the new week out on Monday morning knowing that all of my equipment is in tip-top shape and I can begin production immediately without the fear that the machine is going to break down right in the middle of a job.
The first thing that you should do every morning before you start production is to remove the needle plate and the bobbin case. Brush or blow out the Rotary Hook and Knife area. Oil the hook. This is done by placing one drop of oil, and I do mean one drop, (I use the small needle point applicator for this) on the rail of the hook just outside the bobbin case. Replace the needle plate and bobbin case and you are ready to begin.
Plan out all of your Embroidery machine maintenance and schedule your daily, weekly and monthly maintenance just like any other appointment. This is a very important habit that needs to be developed and a habit that will save you a lot of down time and frustration.
Joyce Jagger
The Embroidery Coach

by The Embroidery Coach | | Embroidery Business Management
Are your controlling your Embroidery Business or do you feel like your Embroidery Business is controlling you? Do you feel like your embroidery business is choking the life out of your personal and family life and you just cannot seem to get control of it? Many embroiderers feel very overwhelmed and are very disorganized in how they have their business set up. This can cause so much pain and frustration that it makes it really hard to think straight and then in turn it can create a lot of tension at home and drastically affects every area within your family life.
Do You Have Systems Set Up?
Do you have systems set up for your business that helps you run your business on a daily basis? Are you doing so many tasks at one time that you cannot even think about how to get someone to help you? Do you have an easy way to train someone else to help you out when you are buried with work?
If you cannot answer yes to these questions, you need to do some serious thinking about your business.
The next question is how do you stop it? You are so busy during each day of your business trying to get all of the orders out, how do you change this? Is there a quick fix to this problem? No the answer is there is no quick fix, but in order to change this, you must take a step back and take a good look at your entire business.
Where do I Begin to Reorganize my Embroidery Business?
You must take some time out of your business, go through each area within your business, get systems set in place for each function of your business and totally reorganized it. This is the only way that you can grow your business, move forward in an organized manner and get back control of your life.
If you continue on as you are, you will just continue on as you are! That may not make sense to you, but stop and think about it. I know exactly where you are coming from. I had no idea as to how to really set up systems for each area of my business until I brought in some help. Thankfully, it was my accountant that could see what my issues were and where my bottlenecks were also. He had been inside of my business and helped me create a good pricing system for which I was very thankful. After doing a lot of observing in each area, he could see what was really happening. Did he do it for free? No he did not but it was some of the best money that I had ever spent. Sometimes you need an outsider, but someone that is familiar with your type of business in order to be able to see what is really happening.
You CAN do this yourself but you will have to be very objective and look at it from an outsider’s perspective. You must take off your business owner’s cap, step back as if you were a consultant, and take a look at each function of your business that you go through on a daily basis.
- What could you do to make each step easier and more organized?
- What steps could you eliminate?
- What steps do you need to add?
- Do you have all of the steps to each function written down to make it easy to train someone else?
- Can some of your equipment be moved to cut out some time going from one area to the next?
- Can some of your supplies be moved to save steps?
- Is your order-taking process easy?
- Do you have a system in place to keep track of the goods that you have ordered?
- Do you have a way to keep track of the jobs that come in on a daily basis?
- Do you have a system in place to help you schedule your jobs?
- Do you know exactly how many hours of work you have in your shop at all times?
- Do you have a systemized approach to your hooping?
- Do you have a system set up for trimming, packing & shipping or pickup?
- Do you have the process written down for taking an order from a customer?
- Do you have the process written down for creating an invoice?
These are only a few of the items that you need to take care of to make your business run smoother and make it easy to bring in someone else to help you in your business. If you do not have systems in place, it is very difficult to train someone else because you are so scattered in your thinking about how to do the different steps each and every day.
You get into the robot habit every day of doing the same thing over and over without even thinking about it but you cannot train someone help to help you when you are like this. You must take time out, even if you have to close your shop for a few days, and re-evaluate your entire system and how you are running your business.
Your first step is to look at every aspect of your Embroidery business and write down what needs to be changed. Then you need to create a plan as to how you are going to do it. Maybe it means bringing in someone else that is not working with you to see if they can see where you need to make some changes. When I brought in my accountant, he walked with me through every step of my business and told me what I had to do to make the changes. This took some time, but I took each area, started writing down all of the steps to each process that took place in that area and created process manuals. This was a huge help and made it so much easier for me to train someone else to help with that part of the business.
This is not an overnight process, it takes weeks to get this done, but it is such a huge time-saver in your embroidery business and helps you to gain back some of the control in your business. You cannot do everything in your business by yourself. It just does not work. You need to have someone that you can call on to help you from time to time if you are working alone. If you have the processes written down, it makes it so much easier and saves you a huge amount of time. You need the assurance that whomever you have to help you is going to do the same job the same way that you do. Without written processes this is impossible.
Take the time out and take a good long look at your business and see what you can do to make your business run a little smoother. This is going to give you more control, help save you a lot of time and help you grow your business much easier.
If you would like to set up a strategy session to talk about your embroidery business I would be more than happy to answer some of your questions!
Joyce Jagger
The Embroidery Coach
by The Embroidery Coach | | Embroidery Business Planning, Embroidery Production, Organizing
Saving time – Helping customers make quick ordering decisions can sometimes be very frustrating. Is your customer ordering process taking you too much time away from your production time? I want to talk about how you can cut back on the amount of time that it takes you to help your customers make a final decision.
As embroiderers we want to be able to offer our customers a full range of lettering and design options but in the process of doing so, we sometimes have the tendency to over complicate the process causing us and the customers unneeded frustration. There are 4 simple ways that will help to save time and speed up your customers ordering process.
- Embroidery Design Layout Options
- Limited Lettering Style Options
- Samples Tagged With Ordering Information
- Organized Ordering System
Today we will talk about the first in this series, the Design Layout Options.
Embroidery Design Layout Options
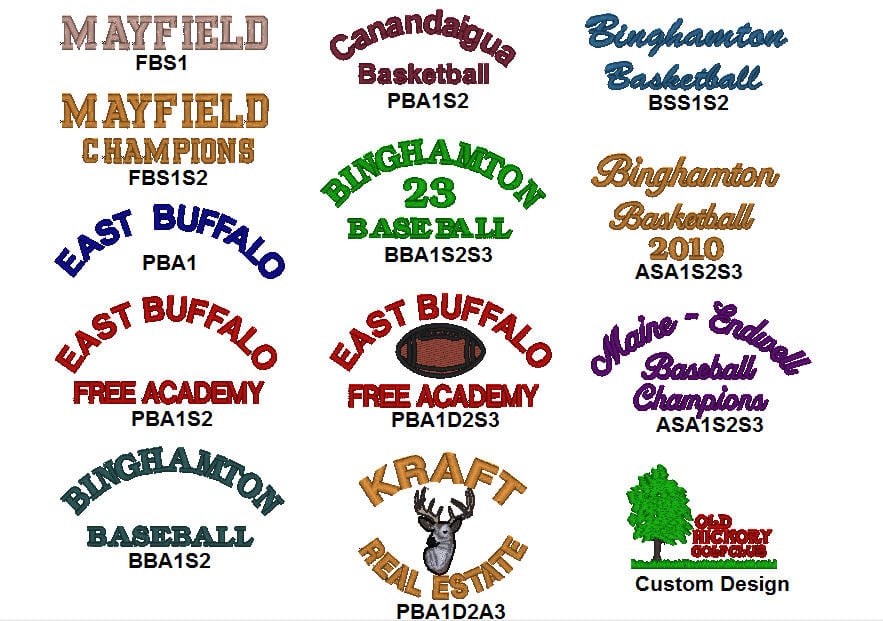
 Create several Design Layouts Options for your customer to choose from. By giving your customer choices of different layouts for him to look at before he places his order, you prevent him from asking you to create his logo with several different options for his approval.
These Design Layout Options save time and instills confidence in the customer that you know what you are doing and know what will be the best option for him or his logo.
Create Design Layout Sheets with several design templates that you have you already set up in your embroidery design software. Give each one of these design templates a Style No. When the customer orders a specific style no. you can quickly recall the design template from your system that he has ordered, change the lettering to what he or she is asking for and your design is ready to be sewn out.
You can create two sets of identical design templates, one set to be sewn on woven fabrics and one set to be sewn on knit fabrics. These two sets of Design Layout templates will work for 95% of your customers garment or fabric choices.
Click on the picture and you will see a larger view of the Design Layout Options
Helping customers make quick ordering decisions helps your business in several ways!
- You look more professional
- It save a lot of your time and the customers time
- You have more time for production
- You will bring in a lot more revenue!
In Part 2 of this series, I will talk about Limiting Lettering Style Options.
Joyce Jagger
The Embroidery Coach

by The Embroidery Coach | | Embroidery Business Marketing
Recently, I was working with one of my Lifetime Students that was not sure how to price her embroidery. She had the misconception that the proven embroidery pricing program that I have created was not for her. She was a home embroiderer and thought that this program and the way that I teach you was only for big businesses! I was shocked! Do you feel like learning how to price your embroidery correctly seems to be too difficult or more advanced than what you feel you are ready for?
If that is the case, let me simplify this! Pricing your embroidery correctly, so that you can make a profit and not work quite so hard is comprised of 7 basic things.
- How much money you need to be bringing in every single day and then each hour of the day to pay all of the bills and give yourself a salary=Cost per hour
- Break this cost down into minutes
- How long each process in your business takes in minutes
- Knowing how much each process costs based on your minutes cost=Cost per process
- How long it takes to complete a job, from start to finish.
- What was that total cost?
- How much do you want to mark up your cost? (Min. 25%, I highly recommend 50 to 100% depending on the type of customer)
Basically, that is the total formula. Now that being said, it does not matter how long you have been in business, at what level of business you are, how many embroidery heads you have, whether you work from home or have a storefront, whether you have employees or not, whether you paid cash for your machine or borrowed the money. None of that matters. It all works the same.
Learning to price your embroidery is not difficult, but pricing must be done correctly so that you can in fact make a profit. but you may need some guidance in your circumstances to make it easier.
To make it easy, go to https://howtopriceembroidery.com. This simple program that will help you get your pricing together very easily. All you have to do is add your expenses and it will create your price list for you! Go to: https://HowToPriceEmbroidery.com You will be glad you checked it out!