by The Embroidery Coach | | Embroidery Business Marketing, Training Embroidery Employees
Do you have high-quality standards set in your embroidery business or are you focused on just getting the job done? Quality is extremely important if you want to build a business that is going to last no matter what state the economy is in.
Many customers are unaware of what good quality is when it pertains to embroidery. When you educate them and show them the difference, they get it. They also realize you want to provide them with the best!
I have certain standards that we have always gone by and if they are not met, the person responsible has to either be retrained so that they can produce the quality that I want or they will no longer have a job. If there has been a mistake on a job or if the job does not meet my standards of quality, I will not charge the customer for the job.
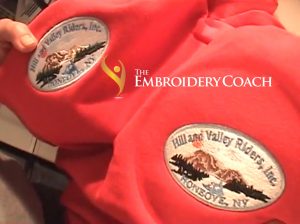
Case in point! We finished a set of 49 football jerseys that I was not happy with. While I was out training a new student, an operator embroidered the school name on the back of half of the jerseys instead of the front below the V of the neck where it belongs. I truly do not know how he ever made such a mistake, but it happened! These were $70.00 jerseys, which the customer supplied, before the numbers and embroidery were ever applied to them. This was an awfully expensive job, but I could not charge the customer for this. The mistake was rectified with the customer’s help, but I could not in good conscience charge him for this job.
When I called him and told him about the problem, he was extremely grateful and happy that I was so honest about it. When I told him that I would not be charging him for the job, he was thrilled and said that they would live with the issue and that he would be sending me a lot more work!
If a mistake is made, do not try to pass it off on the customer without them being totally aware of it. Mistakes do happen to all of us, but you must own up to it, keep the customer informed, correct it, and in most cases let him make the decision on how to handle the job. It does not matter how large or how small the job is.
If you do not have high-quality standards set in your embroidery business, you will not stay in business for the long haul. This is especially important.
by The Embroidery Coach | | Embroidery Tip
When you change the needles in your embroidery machine there are some points that you want to remember:
- After you remove your needle from the machine you want to put in a plastic container with a lid, don’t ever just throw it into the garbage.
- Be very careful that you do not touch the needle on any part of the surface of your presser foot. As you are putting it into the machine, hold it with needle nose pliers and rest the index finger of your opposite hand against the pliers to smoothly place it down through the hole in the presser foot and then up into the hole where the needle goes without touching any of the surface. If you do happen to touch any surface of the presser foot, throw your needle away. You have already damaged the tip. The tip damages very easily and you want to avoid this.
- After you change your needle make a notation about your needle on your needle replacement sheet. You always want to know where your different needles are in the machine and when you changed them. Record the size & type of needle, which needle bar it went into and why you changed it.
Keeping good records of your needle changes will help when it comes time to call a tech with a problem.
I hope that you will find this tip helpful. If so, please respond below this video and let me know. I have a free ebook for you. Just go to MasterEmbroiderySkills.com
Embroidery Business Mastery, “The 3 Skills For Every Successful Embroidery Business”. Go pick it up today!
by The Embroidery Coach | | Embroidery Business Marketing
Do you ever make mistakes when you are embroidering your garments? Have you been faced with an item that a customer brought in and it was not replaceable? Unfortunately, everyone makes a mistake now and then, but you need to know how to save those expensive garments when mistakes do occur! Sometimes you have garments that cannot be replaced! It is very important to have the skills to be able to fix these mistakes just in case you have items that customers have brought in to you and you do not have any way of replacing these items!
If it is an item that can be replaced, you need to weigh in the cost of replacing the item, your time spent on repairing it and of course the time that it takes to wait for the item to be shipped to you. Would it be more cost-effective to purchase a new item instead of going through the process to fix it?
Sometimes it makes no sense to spend the time to do it. This is something that you need to determine. You need to keep track of how long it takes you to do a repair or fix a mistake. You must know what your actual cost is for each type of mistake.
I have a 10-Step process to show you how to match up a design that has been taken out of the hoop before it was finished. This is a very common mistake especially if you are running a multi-head machine and you ran out of bobbin thread but the machine did not stop. In your haste to unhoop your items, you discover after it is done that it had not finished.
The mistake that I am going to show you is one that I hit the hoop with my arm and I just pulled the garment right out of the hoop. Now it needs to be rehooped and matched up perfectly so that the customer will not ever know that this happened. This is a very simple method that I learned many years ago and it works beautifully!
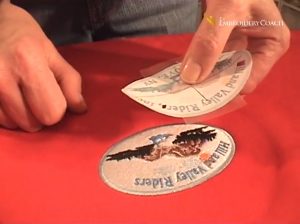
Step 1- Print out a copy of your worksheet from your design software. Make sure that you print out crosshairs or lines on your worksheet to make it easy to match it up in your hoop.
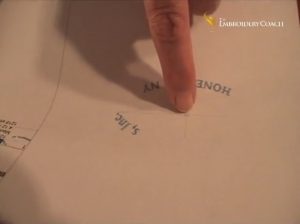
Step 2 – Cut out the design from the worksheet all around the edge of the design so that it matches the same size as 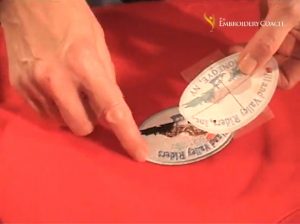 your finished design. You now have a paper pattern of your design. Look at it closely to get some good defining lines so that you can line it up perfectly.
Step 3 –Cut out the first letter of this word and the last letter that was finished so that I can lay the paper but out 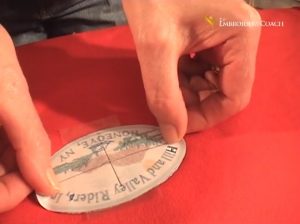
 pattern down over top of the design on the shirt and line it up perfectly.
Place a piece of tape down to hold it in place.
Lift the edges of the paper pattern up it to make sure that the letters are in the exact same location.
Step 4- Place the bottom part of your hoop underneath your garment and position it to be in the center of your 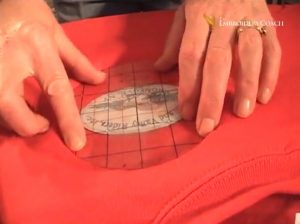 design. Do not forget to place new backing on your hoop. Taping the backing around the hoop will help to hold it in place if you are not using a hooping device.
I have a template with grids on it that I cut out from an extra one of my design placement templates. I lay it down on the horizontal and vertical lines of my design and line it up. With my grid, I can line up my design perfectly. If you do not have a grid that you can use inside of your hoop, you can mark vertical and horizontal lines from the edge of your paper pattern to the outer edges of where the design will line up with your vertical and horizontal lines in your hoop. I use a sharp edge of a piece of soap for marking my garments. Hotel soaps are great for this.
Step 5- Place the top part of your hooping frame on, line it up and press it down with the center lines of the grid 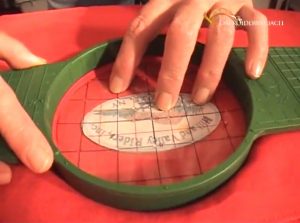 matching the center lines on the hoop both vertically and horizontally. If you are using marks that you made on your garment, they must line up perfectly in order for this to work, but it is not hard to do.
Step 6- Remove the template. The start/stop position of your paper design will be at the correct location in the center 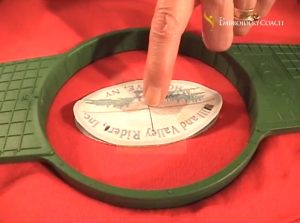 of the hoop.
Step 7- In your software, you will need to mark the start/stop position so that it stays in the center of your design
 Delete all the parts of the original design that has been embroidered and is correct. Make sure to leave all of the part of the design that needs to be completed. This is now your new design.
Save it with a new name so that you do not override your original design. Make sure that the new design is going to start in the same location as the original design.
Step 8- Place the garment into the machine and lined it up both vertically and horizontally. Remove the thread from 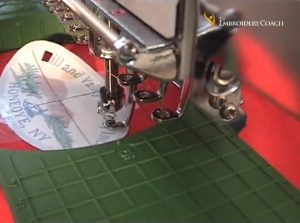 the needle to start with because you want to make sure everything is perfect and that it lines up with the last letter that finished.
You have to hold the thread tight if you do not have a button to turn off the head because you don’t want it to register a thread break. Start the machine at a very slow speed or walk it holding the start button. This will help you make sure it’s lined up correctly.
Step 9- Stop, rethread the needle and remove the paper template and start the machine.
Step 10 – After the design is finished, you can pull it out of the hoop to see the finished product. If you follow this
 method, everything matches and no one will ever know that you had made the mistake in the first place.
I use this same method to repair many types of mistakes, such as when you must remove stitches and replace them. It works great for many different types of situations. It has saved me many times and keeps my customers happy! They never know a mistake was made in the first place!
For information on how to build a successful embroidery business, visit Embroidery Business Academy

by The Embroidery Coach | | Embroidery Education
Creating a simple system for storing embroidery information is very important. There is a lot of information available today and if you are like I was when I first started my business, you have collected everything that you could and put it in drawers or boxes to save until you could really study it. When I wanted to retrieve the information, I had no idea as to where it actually was. I spent hours going through all of my boxes to find a particular piece of information that I wanted.
I found through trial and error that the best way to save all of my information was to set up binders containing different subjects.
- Hooping
- Finishing
- Production
- Embroidery Design and Editing Information
- Maintenance
- Favorite Suppliers-with Addresses, Phone Number, Website with Login Info and your Customer Number for each.
- Resale Certificates for Dealers and Exempt Certificates for Organizations
- Quotes
- Pricing Information
- Price lists
- Customer List
- Best Selling Products List
As you collect your embroidery information such as an article from a magazine, cut it out from the magazine or copy it, punch three holes in it and place in the specific binder. You may need to create tabbed sections for different areas within that subject. When you print out files from TheEmbroideryTrainingResourceCenter or the EmbroideryBusinessAcademy, place them into the binders.
When you new Wearables or Impressions magazine arrives, sit down and quickly go thru the entire magazine. Cut out or copy each item that you want to save and immediately place it in the correct binder. Do not take the time to thoroughly read it. you can do that when you have the time or when you are looking for that type of information. Then throw out the rest of the magazine. You will soon have a complete reference system built up with all of your information at your fingertips when you need it.
As you grow you will need to create procedure manuals for each area in your business, but this is the beginning of creating a simple system for storing embroidery information. Make sure to sign up for our Free Embroidery Tips and add them to your binders!

by The Embroidery Coach | | Embroidery Education
Finding a good local digitizer is not so easy in today’s market. The embroidery digitizing world has changed in the past few years and trying to find a good digitizer that is located here in the US is not really easy. With all of the competition from outside of the US, a digitizer from here cannot make a good living. What to expect from a digitizer for your embroidery designs is a very important question?
First of all, we all expect that the design that we have had digitized will come back to us perfect and the sew out will look just exactly what we had envisioned, but what happens when it does not? First we blame the digitizer for not coming through for us in exactly what we wanted, but did you give the digitizer all of the correct information to make this happen? What is the information that is necessary for the digitizer to give us that great design?
- What fabric is this design going to be sewn on?
- Will you be using this design for any other type of application?
- What format do you want the design to be finished in?
- Will you want to increase or decrease the size of the design from the original size?
- Does he have the liberty to make some modifications to the design to make it sew better such as increase the letter size or choose a different font style?
There can be many other questions, depending on the design and the information that you have given them. When you are looking for that perfect digitizer, look for one that uses the same software that you do and request that you have a copy of the outline or native file. This will allow you to make changes such as resizing or removing lettering from the digitized file. You may have to pay a little more for this privilege, but it is well worth it.
Digitizer must know embroidery production
Make sure that your digitizer knows production so that you have as few trims and color changes as possible. Make sure that he or she sews out the designs before sending them to you. This is a problem with a lot of digitizers, especially with Graphic Artists.. They get their software and think that since they can create any type of graphic art, they can digitize. This is far from the truth. They don‚’t usually know anything about the sewing process and have no idea about push and pull comps, underlay or density.
If you can find a digitizer that digitizes their designs using the same type of embroidery software that you are using, this is the best of both worlds. This makes it easier for you if there is need for a size change or some fabric setting changes. Instead of expecting that your designs are going to be perfect, it would be to your benefit to learn how to edit your designs so that you can get the perfect design that you are looking for.
Every embroiderer should take the time and make the investment in learning how to edit your designs that you receive back from the digitizer. If you have that skill lever, it is going to save you a lot of time and you will be able to make all of your embroidery designs production friendly! Your idea as to what you expect from a digitizer will change. You will not expect all of your designs to be perfect from the digitizer, and you will be more educated and be able to communicate better with your digitizer. This is going to give you a leg up from your competition!