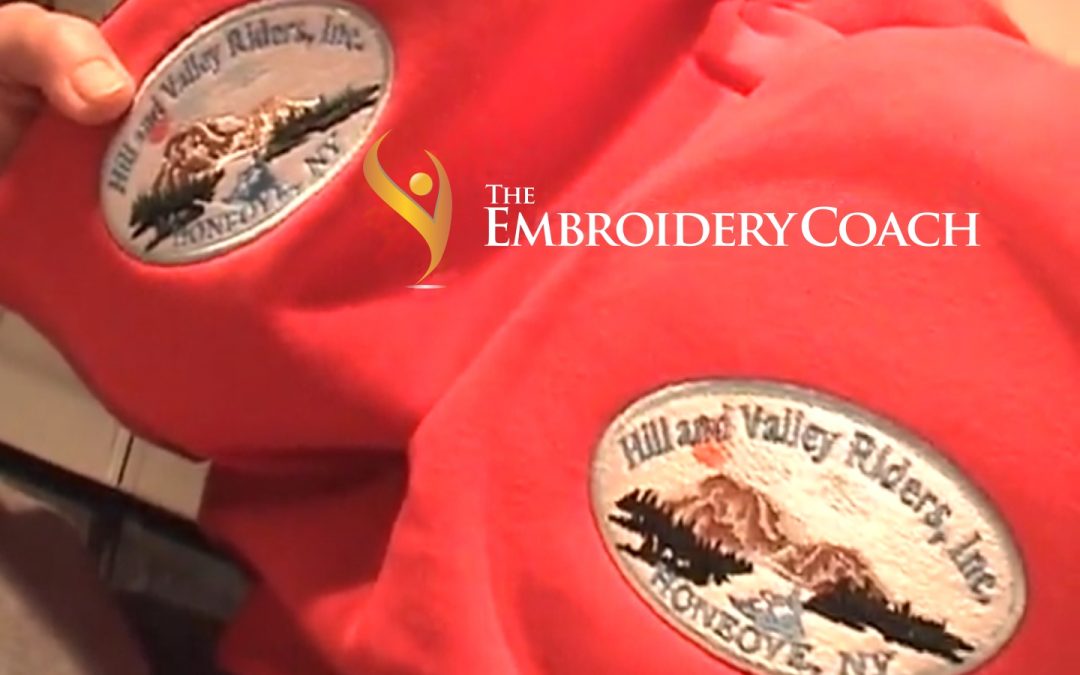
by The Embroidery Coach | | Embroidery Business Marketing
Do you ever make mistakes when you are embroidering your garments? Have you been faced with an item that a customer brought in and it was not replaceable? Unfortunately, everyone makes a mistake now and then, but you need to know how to save those expensive garments when mistakes do occur! Sometimes you have garments that cannot be replaced! It is very important to have the skills to be able to fix these mistakes just in case you have items that customers have brought in to you and you do not have any way of replacing these items!
If it is an item that can be replaced, you need to weigh in the cost of replacing the item, your time spent on repairing it and of course the time that it takes to wait for the item to be shipped to you. Would it be more cost-effective to purchase a new item instead of going through the process to fix it?
Sometimes it makes no sense to spend the time to do it. This is something that you need to determine. You need to keep track of how long it takes you to do a repair or fix a mistake. You must know what your actual cost is for each type of mistake.
I have a 10-Step process to show you how to match up a design that has been taken out of the hoop before it was finished. This is a very common mistake especially if you are running a multi-head machine and you ran out of bobbin thread but the machine did not stop. In your haste to unhoop your items, you discover after it is done that it had not finished.
The mistake that I am going to show you is one that I hit the hoop with my arm and I just pulled the garment right out of the hoop. Now it needs to be rehooped and matched up perfectly so that the customer will not ever know that this happened. This is a very simple method that I learned many years ago and it works beautifully!
Step 1- Print out a copy of your worksheet from your design software. Make sure that you print out crosshairs or lines on your worksheet to make it easy to match it up in your hoop.
Step 2 – Cut out the design from the worksheet all around the edge of the design so that it matches the same size as 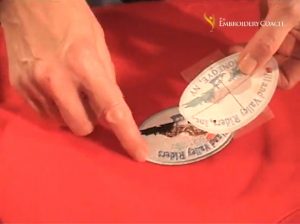 your finished design. You now have a paper pattern of your design. Look at it closely to get some good defining lines so that you can line it up perfectly.
Step 3 –Cut out the first letter of this word and the last letter that was finished so that I can lay the paper but out 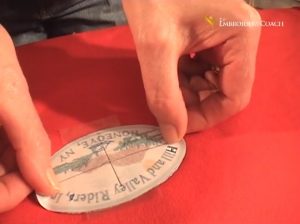
 pattern down over top of the design on the shirt and line it up perfectly.
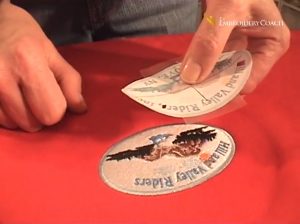
Place a piece of tape down to hold it in place.
Lift the edges of the paper pattern up it to make sure that the letters are in the exact same location.
Step 4- Place the bottom part of your hoop underneath your garment and position it to be in the center of your 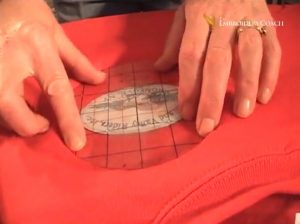 design. Do not forget to place new backing on your hoop. Taping the backing around the hoop will help to hold it in place if you are not using a hooping device.
I have a template with grids on it that I cut out from an extra one of my design placement templates. I lay it down on the horizontal and vertical lines of my design and line it up. With my grid, I can line up my design perfectly. If you do not have a grid that you can use inside of your hoop, you can mark vertical and horizontal lines from the edge of your paper pattern to the outer edges of where the design will line up with your vertical and horizontal lines in your hoop. I use a sharp edge of a piece of soap for marking my garments. Hotel soaps are great for this.
Step 5- Place the top part of your hooping frame on, line it up and press it down with the center lines of the grid 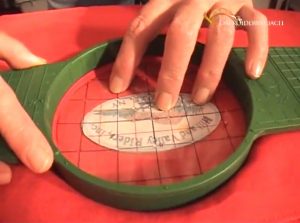 matching the center lines on the hoop both vertically and horizontally. If you are using marks that you made on your garment, they must line up perfectly in order for this to work, but it is not hard to do.
Step 6- Remove the template. The start/stop position of your paper design will be at the correct location in the center 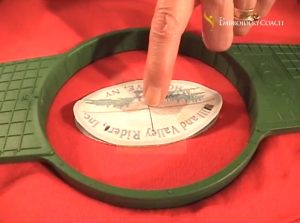 of the hoop.
Step 7- In your software, you will need to mark the start/stop position so that it stays in the center of your design
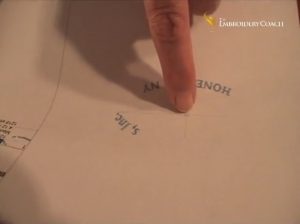 Delete all the parts of the original design that has been embroidered and is correct. Make sure to leave all of the part of the design that needs to be completed. This is now your new design.
Save it with a new name so that you do not override your original design. Make sure that the new design is going to start in the same location as the original design.
Step 8- Place the garment into the machine and lined it up both vertically and horizontally. Remove the thread from 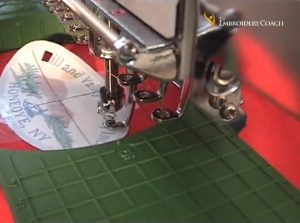 the needle to start with because you want to make sure everything is perfect and that it lines up with the last letter that finished.
You have to hold the thread tight if you do not have a button to turn off the head because you don’t want it to register a thread break. Start the machine at a very slow speed or walk it holding the start button. This will help you make sure it’s lined up correctly.
Step 9- Stop, rethread the needle and remove the paper template and start the machine.
Step 10 – After the design is finished, you can pull it out of the hoop to see the finished product. If you follow this
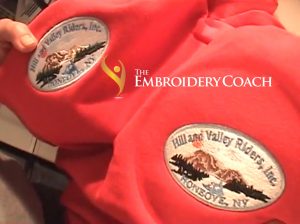 method, everything matches and no one will ever know that you had made the mistake in the first place.
I use this same method to repair many types of mistakes, such as when you must remove stitches and replace them. It works great for many different types of situations. It has saved me many times and keeps my customers happy! They never know a mistake was made in the first place!
For information on how to build a successful embroidery business, visit Embroidery Business Academy

by The Embroidery Coach | | Embroidery Business Marketing
Be Creative during the slow periods in your embroidery business is a great way to add new materials and do some extra planning that will bring in more sales. These slow periods are good times to develop new sales materials and samples. This is a time to be creative designing your new sales materials to use in marketing your embroidery business.
I embroidered new designs on white felt, cut out the design samples with pinking shears, and glued them onto card stock. I put these samples into 3 ring binders to distribute to my dealer customers during these slow times. I also embroidered all of the lettering styles that we offered onto the white felt using the standard thread colors that we had in stock. I labeled each lettering style the font name and the thread color. The dealers were always very impressed and thrilled to get their new sales materials from us. This was a way to showcase our work to our dealers and it gave them a way to show their customers the quality of work that they were offering.
I also embroidered coasters to give away as samples. I created a design with my logo, added my contact information and embroidered these on white felt. This is an excellent way to showcase your embroidery and a great leave behind when you are visiting a customer. This can be done for wholesale and retail customers alike.
You can also create new samples to give your showroom a fresh new look.
If you do not have any slow periods in your embroidery business, you need to block out some spare time to accomplish these little profitable, sales creating tasks.
Joyce Jagger
The Embroidery Coach

by The Embroidery Coach | | Embroidery Business Marketing
People work with businesses and professionals they trust. Building customer trust and loyalty in your embroidery business is an ongoing process. Here are 9 tips for building customer trust and loyalty with both old and new customers.
- Keep your agreements with your customers
If you promise delivery on a particular day, make sure to deliver when it was promised. Even something as small as the time you have scheduled an appointment is an agreement. Each time you break a promise to a customer, you break the trust.
- Create realistic customer expectations
Make sure the customer understands exactly what you will do for him or her and what is included in your service and what is not. What will create extra charges? How and when will you be billing the customer? Living up to the expectations you create helps to build trust with your customers.
- Help customers to understand the process and strategy for their order
If your customer understands how you and your business works and what the process of their order is, the customer can then know what to expect and when to expect it. Trust comes when the customer feels confident and comfortable with the plan and the strategy.
- Never over promise
It is tempting to promise whatever the customer wants to hear without looking at your schedule or asking if it is doable. When you do not deliver on your promise this causes broken agreements and broken trust.
- Carefully explain the customer’s role
When a customer is clear on what his or her role is then he or she gets clear on what progress can be made without their involvement. Getting really clear on what the customer needs to do to move his or her order forward, helps you work as a team and builds trust.
- Discuss potential problems that can happen
Nothing disturbs the trust of a customer more than when something unexpected happens. Guard against something negative happening as a surprise by discussing the potential pitfalls with the customer.
- Review the work order in detail
Any decisions that the customer is going to have to make should be discussed in detail. Relationships and trust are built over a long period of time but it can be broken easily. An unexpected issue that is a surprise to the customer that he or she was not expecting can break that trust quickly.
- Avoid making the customer feel stupid
No one likes to feel stupid. If customers feel that you think they are stupid they will no longer entrust you with their ideas or work. Customers who don’t feel valued by you may stop trusting you. No one sets out to make a customer feel stupid, but it could be an attitude, an inadvertent comment, or a look that gives the customer that impression. Be aware of your inner thoughts. They show up without your noticing. Be very careful with your language.
- Don’t allow interruptions when you are meeting with a customer.
It gives them the feeling that they are not important to you and you really do not want their business. Everyone needs to feel special no matter how large or small their order is. This can ruin the good will and trust that you had with them.
Building relationships and customer trust with both your customers and prospects helps you to build loyalty. Loyalty is something that is very uncommon in the embroidery business anymore but it is not impossible to get. When your customers feel that they are valued and you give them excellent customer service, they will become loyal!

by The Embroidery Coach | | Embroidery Business Marketing
I want to congratulate Howard Potter! He is a very successful student of mine! Howard started with me about 12 years ago when he purchased his first embroidery machine. I worked with him when he was working out of his home with a single head Tajima and the Tajima by Pulse Embroidery software! He has since gone on to purchasing 2 more machines, digital equipment, screen printing equipment and much more. Howard now has his own building with a beautiful showroom and very well organized workrooms for each of the different types of applications that he offers.
He is very young man with a wife and 2 children. He and his wife Amanda have worked very hard in this business, turn out top quality work and have taken their business from zero to almost 2 million dollars in this short period of time.
I trained his main graphic artist, to digitize their designs and have since trained several more digitizers as the business has grown. They have worked very hard at producing high quality embroidery designs and on time delivery.
You can visit his website MasterYourImage .
Congratulations Howard, keep up the great work!!
Joyce Jagger,|
The Embroidery Coach

by The Embroidery Coach | | Embroidery Business Marketing
Did you know you’ll spend five times more money attracting a new customer than you would satisfying an existing one? It’s not rocket science to figure out customer retention is far more cost-effective than customer acquisition. It only makes sense, or should I say cents to focus on creating more sales with current customers, rather than keep trying to continually search for new customers.
Increasing sales with your current customers is all about creating relationships. Creating good customer relationships is the most important duty that we have as business owners and this is something that does not cost a lot of money. Many times, it is the little unexpected things that we do that mean the most and keeps a customer coming back to our business over and over!
Here are some simple ways of creating more sales with current customers.
- Offer Exceptional Customer Service
- Offer More Low Cost-High Profit Services To Your Existing Customers
- Build A Relationship With Existing And Former Customers
- Offer More Than One Price Level Of Products
- Create A Good Web Presence with Social Media
Offer Exceptional Customer Service
Offering exceptional customer service to all of your embroidery customers is extremely important in today’s competitive market place! Offering better service, or a bit more service than your competitor can make all the difference in the world.
Here are 7 Tips that if followed by your entire organization, will change your business and give it a whole new life!
- Start Out Each Day With A Positive Attitude!
- Always Wear A Smile!
- Have A Clean And Well Organized Environment!
- You Must Be Willing To Work With Your Customer-Give Them A Reason Why They Need To Come Back!
- Always Return Phone Calls And Always Respond To Emails!
- Take Accurate Notes
- Never Show Anger With A Customer!
Offering Exceptional Customer Service is not hard! If you give all of your customers more than they expect and you will be greatly rewarded.
Offer More Low Cost-High Profit Services To Your Existing Customers
Acquiring new customers can be very costly. It costs more money to acquire a new customer than to offer more services to your existing customers. Along with your embroidery, you can offer your customers many other complimentary services. Many of these services can create a low cost/high-profit income center for you. Here are 5 low cost/high-profit services that you can offer to your customers almost immediately.
- Bagging or Packaging Garments
- Sewing Services
- Banners
- Heat Press Transfers
- Promotional Products
When you can create a one-stop shop for your customers with many products and services, they are inclined to be more loyal and think of you first with all of their promotional and gift giving needs!
Build A Relationship With Existing And Former Customers
The best way to start building good customer relationships is to connect with each one of your current and lost customers. Start out by making 3 lists.
- Current High-Volume Customers
- Current Lower Volume But, Repeat Customers
- Former or Lost Customers
Create some scripts that will make it easier for you to talk to people. I have found that by having the scripts in front of me, it just made it easier as you are talking to them and you do not forget anything. You can also print out a script for each customer and fill in the blank as you are talking to them. Keeping notes makes it a lot easier to recall what they said for futures reference.
After you finish talking to each customer, fill out a thank you note, thanking them for taking the time to talk to you and insert the business cards. Make sure that you tell them to sign the back of the business cards before they hand them out. This handwritten Thank You note will go a long way in helping to build your new customer relationship with that customer and it will be something that they will not forget!
Getting your customers opinions and feedback is extremely valuable to your business and makes it a lot easier to plan your strategies as to how to work with them and provide them with the type of services and products that they will be anxious to purchase from you. They really do appreciate you asking them what they need. This can be the beginning of a long working relationship with each one of your customers.
Offer More Than One Price Level Of Products
Another way to increase customer sales dramatically with your existing customers is to offer them an alternative. Many times they do not need to have the best quality shirt for their promotion. Maybe they will be just as happy with a lower priced shirt.
I found that by giving my customers three choices in the quality of products I could increase my sales and create a happy customer at the same time.
I would not compromise on the quality of my embroidery, but maybe they would settle for a Stock embroidery font rather than the digitized lettering in a logo. This could make a significant difference in the price of their one time set up. It would not change the running time of the design but between the price of a lower quality shirt or cap and the lower price of the initial set up, you could save the customer many dollars on the total order.
I always gave my customer three quality choices.
- A-Lesser Quality – Low-level price
- B-Average Quality- Mid-level price
- C- High Quality – High-level price
I followed this formula for all of my sales. I always asked the customer what type of budget we were working with before I ever showed him or her any garments. I had them show me the logo and then I would go over what could be done and what I could do for him to meet his budget. At that point, I would show the customer the products in the price level that would fit within the given budget. You gain their confidence immediately when you show them that you are willing to work with them to meet their particular budget. This method will work 99% of the time to increase your sales.
If a customer came in with a certain product in mind, that meant that he had been shopping elsewhere and was looking for a lower price. I was always up front with them and told them that if they were here shopping for a lower price that I probably would not be able to help them, but I would show him what I had and go through the exact same process. Sometimes what I had was better quality than that was already offered. Most of the time, they would go with my suggestions and work with us instead of continuing to shop around.
Create A Web Presence with Social Media
Creating a web presence is a major part of any embroidery business. This is just as important to a local embroiderer as it is to one that is trying to reach the market globally. Before you can begin to reach a worldwide market, you must first reach out to your local market and the best and most cost-effective way to do this is through your own web presence.
Everyone in business needs to create a web presence. The best way to accomplish this is to start with Social Media. There are several Social Media platforms that work great for your particular market, but Facebook is the first one to get started with. This will help to get you out in front of your audience and let people know what you have to offer.
- Facebook
- LinkedIn
- Twitter
- Pinterest
- Instagram
These are the most popular, but as I said, start with Facebook. If your audience is primarily professional people such as doctors, lawyers, business owners, then you will want to be on LinkedIn. In today’s world, every business needs a Facebook Page. This is the first place that people go to start searching for you.
Focusing on creating more sales with current customers is far more productive than constantly marketing to new prospects. Yes, you need to always be marketing for new prospects, but that should not be your focus.
Many times, we have a gold mine right in front of us and don’t even realize it. Our customers are our gold mine and without them, we do not exist!
by The Embroidery Coach | | Embroidery Business Marketing
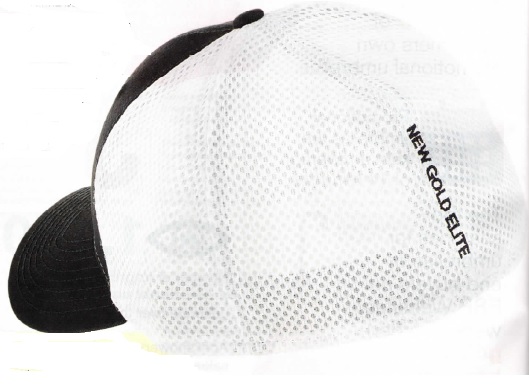
Here is a link to an article about a new idea for embroidery on a cap back. This is a project that I created for “Wearables Magazine”. They requested a new idea and I had been working with one of my private clients, Linda Gadwood from “LogoLinda.com” that had a customer request this very idea. I helped her create the quality embroidery for a cap back and her customer was thrilled. I decided that this might be a great idea to share with other embroiderers. This was featured in the Decorating Solutions section of the April-May 2019 issue of “Wearables Magazine.” Embroidery on a Cap back
I have a step by step PDF copy of the article called “Back-Words Cap” for you to download and keep for a new idea for you to use for your customers or clients. This was very easy to do and a fun project!
The cap that I used for this project was a New Era Cap #1020 Stretch Mesh cap that I purchased from Sanmar.com.It was a structured cap of 100% cotton in front two panels, 100% polyester Spacer Mesh in mid and back panels. It was a mid profile with a stretch fit back.
The biggest challenge was to make sure that the embroidery was totally centered on the back seam. I placed my start point in the center seam on the outer edge of the first word, NEW. I tried using a regular hoop for this, but it was much easier to use the Slimline HoopTech Clamp with a 2.5 x 4-inch window. It made the project very easy to do.
Try this, have some fun with it. You can start the embroidery at the top or even at the bottom with the embroidery reading up the back instead of down the back. This type of embroidery on a cap back is different and fun!