by The Embroidery Coach | | Embroidery Business Marketing
The “Transformation Embroidery Business Blueprint” will help you Build a Wildly Successful Embroidery Business! Would you like to transform your embroidery business into one that is running smoothly, making great money, and lets you go home at night with a clear head? How would you like to stop those sleepless nights wondering if there was going to be enough money to pay the bills?
Here are 9 rules of the Transformation Embroidery Business Blueprint that will help you build a wildly successful embroidery business!
- Learn the skills to offer high-quality Embroidery. Make sure that every piece of embroidery that goes out of your shop is excellent!
- Deliver all of your jobs on time or ahead of schedule.
- Listen to your customers and give them what they want.
- Create a profitable Price List.
- Make sure your entire shop is organized and create Instruction Procedural Manuals (Standard Operating Procedures), for every area of your business so that your employees are highly trained, and you are all on the same page. If you have supervisors, they must be self-sufficient and highly trained as well.
- Have your Accounting Books set up properly and kept up to date.
- Create a Business Plan and a Marketing Plan that will help you stay on track.
- Market your embroidery business according to your Plan to reach your niche.
- Spend at least 30 minutes every day learning how to improve your skill level!
This is not hard to do. The bottom-line secret is to produce top-quality embroidery, learn how to price correctly, get organized, thoroughly train qualified workers, and stay on top of your books! It does take time to get all of these tasks accomplished. But when it is done, you can work less hours and be very happy with your business.
If you would like some guidance and help in transforming your embroidery business, I am here to help you get on the right track. Working less hours with the feeling of balance in your life is totally possible when you have implemented the “Transformation Embroidery Business Blueprint” that I have given you here. Being able to go home at night with a clear head is not only a goal but can become a reality. Wouldn’t it be great to not work weekends and holidays? You could be free to take family vacations without feeling guilty about not being at work.
Send me an email to joyce@theembroiderycoach.com and we can set up an appointment to give you a full business evaluation and help you get started right away. I’ll show you how to transform your embroidery business with a simple and practical process that will help you overcome any roadblock that stands in your way.”
My goal is for every embroidery business owner to be profitable and happy with their business. Use this Transformation Embroidery Business Blueprint to build a wildly successful embroidery business!
Remember, We Help Embroiderers Succeed!
by The Embroidery Coach | | Embroidery Business Marketing
Today I am going to show you the routine planning that I do every weekend using my Embroidery Business Planning Forms. I take Saturday morning to do my weekly planning but if something gets in the way, I will do it on Sunday afternoon. This helps to keep me on track and keeps my mind from wandering around trying to figure out what to do next. I always know what to do next!
Start Planning Small! If you have not been in the habit of monthly, weekly, or daily planning, you need to start today, but start small. I know that in all of the books about planning it says to start out with your entire year first, then your month, then your week, and then your day! To me, this was impossible when I first started my business. I could not relate to that because I really did not know what I was going to be doing in a year and I did not have any type of a plan in place.
I started by planning out my day at the end of the day before. I worked hard to try and complete what I had on my list to do. I also found out what I could realistically do in a day’s time. Once I got used to that and saw how much more smoothly my days started running, I planned out my entire week on a Master plan and then created the daily plan from there.
I have never found a planner that totally worked for me and I have been creating my own planning sheets for several years. Over the years they have changed and the set that I use now works out great for me. I will share those with you.
Now I have a basic plan for the year, but my Master Plan is mainly a plan for one quarter at a time. To me, that is much more realistic. I have specific goals that I set for each 90-day cycle and without my Master Plan, I would never reach them!
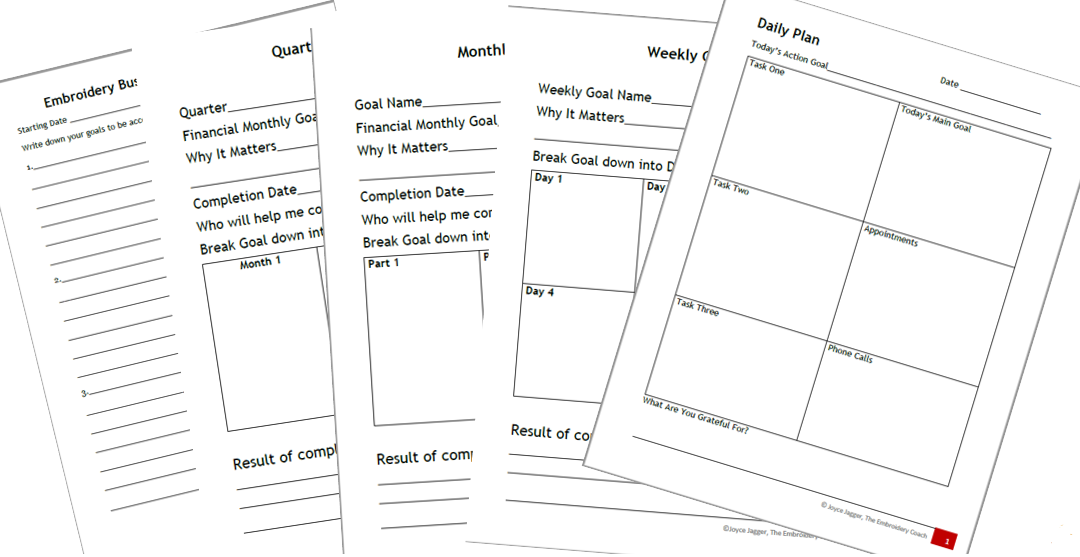
I have 5 sheets that I work with. I created them in a Word Doc and saved them as a .pdf and print out the set for each quarter, month, week, and day. I print out 6 pages for the week. I do not print one out for Sunday. I keep Sundays as free as possible. Saturday’s plan is usually personal stuff going on and not much business except for my planning.
Set of Embroidery Business Planning Forms
- Annual Plan – Print 1 Page
- Quarter Plan – Print 4 Pages for year
- Monthly Plan – Print 3 Pages per Quarter
- Weekly Plan – Print 4 Pages per Month
- Daily Plan – Print 6 Pages per week
You do not need to print out any more than you need for one quarter at a time. I only print out the Daily planning sheets when I need them on Saturday to start my weekly planning.
At the beginning of each quarter, I sit down and go over what I accomplished during the last quarter. Was I happy with what I accomplished and if not, what can I do to turn that around so that I can still accomplish my goals for the year?
Quarter Goal Sheet.
I figure out what I need to do during this next quarter to work toward my annual goal. I divide that goal up into 3 pieces, one part for each month.
Monthly Goal Sheet
I then add that Monthly Goal to the Monthly Goal Sheet and divide that up into 4 weeks. I look at everything that I need to do and add that to my sheet during the week that I will need to get that goal done.
Weekly Goal Sheet
I then add the 4 pieces to each of the 4 Weekly Goal sheets and figure out what pieces to get done during each of the 4 weeks.
Daily Plan
Now it is time to go over everything that needs to be done during that week and add them to each of the 6 Daily plans. This must include your personal and business appointments, tasks, and phone calls that you need to get done. Don’t forget to allow time to go over your finances and see where are you by the end of the week.
Friday afternoon is my time to go over my numbers. This is a very important time and should not be ignored. This also gives you an insight as to what you need to do the next week in order to get closer to your goal. If you will follow this system, you will find it much easier to plan and keep yourself on track.
If you would like my set of Embroidery Business Planning Forms, fill in the form below and I will send them to you.

by The Embroidery Coach | | Embroidery Business Marketing
Here we are, the beginning of the last quarter of this year is here. It just sort of snuck up on me. Are you prepared for this last quarter? I have to admit, I really was not. Get started planning for the 4th Quarter today. When I look back on the 3rd quarter, I really did not get as much accomplished as I wanted. I was working my plan but I had a lot of life sequences get in my way, but that really is nothing new!
Last weekend, I looked back on the 3rd quarter and started planning for the 4th quarter of this year. I have to really step up on it if I want to reach my goal for the year! Have you looked back on the 3rd quarter and figured out what you really did accomplish and what you did not get done that you had in your plan?
Let’s face it, we all want to have a business that we love! We all want to start each day with the feeling of I can’t wait to get started today! Your business is a very serious venture and if you do not plan it out and work you plan, you are just running a hobby and you would be better off doing something else with your time unless of course this is the kind of life that you want! For me, I want to know what I am doing and what I need to do each day of my week and month. I wake up each morning with my plan in place and I know exactly what I have to get done that day and I do whatever I can to get it accomplished.
Does it always happen, No, but I sure do work at it hard enough and try to get it all accomplished? Without a written plan, I would not know what I had to get done by the end of this day, week, or this month in order to reach my goal.
Here Are 3 Tips To Help Get Started Planning For The 4th Quarter Easier!
- Set Your Goals!
Do not set goals too high that you cannot reach them and do not set them so low that they do not mean anything. Set your goals a little out of your reach so that you do have to stretch in order to reach them. Write down your Goals. I have found that if I commit to them on paper, not just on the computer, but actually writing them down they mean a lot more and I am more apt to follow through and reach my goals. You must create a plan for each one of your goals in order to be able to reach them.
- Reach Out for Help!
I used to create my plans in cycles of 60 days, but I have decided that I am going to start working in the 3 months quarters to reach my goals and get everything done that I want to be done at the end of this quarter. I have to reach out for help. I have hired someone else to help me and have given them instructions as to what I need to be done. When you are the main person in your business and the only one running it, trying to get everything done is impossible. There are tasks that you can hire out to take some of the big burdens off of your shoulders. This may be simply having someone come in and clean your home for you periodically. It may be someone that can run errands for you. Before my husband retired, I had someone do small errands for me each week, like going to the post office and making my bank deposits. This freed up a lot of time for me. I also have someone that does all of my bookkeeping for me.
I found that this was one of the areas that was really bogging me down. I have heard embroiderers say, as soon as I get enough money to hire someone I will, and it will be easier. This is the wrong way of thinking. Thinking like that will not be productive for you and you will find that that day will never come. You cannot get ahead and do everything yourself unless of course you are just starting out and you do not have much work. Once the work starts coming in, you cannot afford to try and do everything yourself because some of the other areas of your business will suffer when you are trying to get your embroidery work done.
- Find Out Where You Stand Financially!
Before I hired a bookkeeper, I was always behind with my books and before I knew it, the year was half gone and I had no idea where I was. I did not know if I was making a profit or losing money. I had a vague idea and I knew what was in my bank account, but it was very frustrating for me not to know where I stood.
If you do not know where you are financially, it can really put your whole business in a tailspin and it is usually a downward spiral. You need to know where you are at all times so that you can make the proper adjustments to change whatever needs to be changed. You must also be willing to say NO! This is another area that is a hard one for most of us embroiderers! I know that is a hard one for me, but I have come to the conclusion that I cannot do it all, and what is not creating the most profit for me is gone! You need to know which area of your business is profitable and which area is not. This is the only way that you can realistically make the right course corrections.
Tomorrow I will show my Weekly Routine For Planning! It is very simple!
by The Embroidery Coach | | Embroidery Business Marketing
I want to share with you how to create a system for embroidering team names on jackets or shirts. This time-saving system that I came up with for embroidering team names on jackets or shirts is very simple and as indicated, it is a huge time saver! I take my list of names that I received from my customer and arrange my items in the same order as the names on the sheet.
I take the list of names and put it on my copier and increase them in size by 200%. After that, I will cut all the names apart on my sheet and then tape them to each item according to the size.
After that, I hoop all the items and then stack them in order according to how they’ll be embroidered and how the names are on my sheet because I don’t want any mistakes. That is in the exact same order that the customer gave them to me and that’s how I will be sending them back.
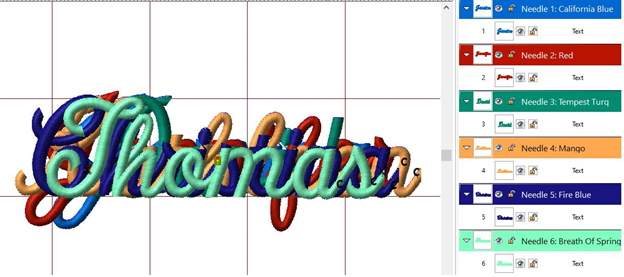
When I set up the names in my Pulse software, I set them up in a Name Stack. By that I mean I set up each name, put a color change between each one and then literally stack one name on top of another name in the software. This way they all start in the center and in the exact same place.
With the color change command between each name, I set the machine so that it automatically stops when it sees a color change command. When I put the first item into the machine and get it all set in place for the first name, it will embroider the first name and then stop.
This allows me the time to take out that first item and put in the next item on the list. I continue this until I am finished with the entire list of names. As the next one is embroidering, I remove the hoop, trim and stack the last one. I can embroider about 40 items in an hour on a single head machine using this method.
If you have a multi-head machine, you load the entire machine, again in the right order that the names will be embroidered, turn all of the heads off except head no. 1. Start the process with head no. 1 and when the first name is completed, turn off head no. 1 and turn on head no. 2 and continue this process until each one is completed.
You can create this system for embroidering names on jackets in any embroidery design software. It will work, trust me on that! No matter what I am charging, wholesale or retail this is a huge moneymaker! Try it, you will like it, I promise.
You can see how to go through the embroidery process inside of the Embroidery Business Academy in Skill Set No. 1. You will find it in Embroidery Production, inside of Embroidery Basics.
If you are interested in receiving this tip and a new one each day, Click Here!

by The Embroidery Coach | | Embroidery Business Marketing
In today’s world of rising prices and uncertainly, we need to be prepared to not only help our customers, but also make sure we can pay our bills! We are running a business, not a charity organization!
I was very excited about our new year and hoping that we could finally get back to normal and then we get hit with all of our supplies and the cost of freight going through the roof. What does that mean to us as far as our business is concerned?
It means that we have to raise our prices. You cannot absorb all of these costs. You must go into your pricing structure and make your adjustments for all of these price increases.
Ask yourself these questions:
- Am I paying more for the freight of my supplies?
- Am I paying more for the thread, bobbins, backings or stabilizers?
- Am I paying more for labor?
- Am I paying more for payroll taxes?
- Am I paying more for the products that I am ordering for my customers?
I have noticed a huge increase in every one of these. I am getting emails from my embroiderers complaining about all of this and what should they do? They keep telling me, “We are having a hard enough time trying to get people to pay our prices as it is, now we have to raise them? How can we do that and get in the job?” How can we stay in business?
Many embroiderers have gone out of business since the pandemic started, but many embroiderers have started businesses. The large companies that I work with have successfully raised their prices and are extremely busy. You have to do this too!
Embroiderers; everyone knows that you have to raise your prices. The price increases have hit every person on the planet, not just the embroiderers. Your customers understand that they are going to have to pay more for your services if they want to be able to promote their businesses!
Raise your prices! If you are having a tough time doing that or need some help with it, contact me. I have an excellent program that will help you get your Pricing structure together, one that will help you make money! Don’t put this off, get it done today before you end up having to close your doors!
by The Embroidery Coach | | Embroidery Business Marketing, Embroidery Education
Setting up the lettering to Embroider on the back of a mesh cap can be done very easily if it is done correctly. There is more than one way to accomplish this, but the way that you select will depend on the actual design that you plan on selecting or creating. Many embroiderers are afraid to try this, but if you follow the simple directions, I will try to make it easy.
If it is a text-only design, the small letters can get lost in the mesh and you will need to add a knockdown stitch under the lettering.
If it is a design that is a heavy complex fill design and no small lettering is outside of the area of the design, you can simply add a piece of topping to cover the entire area before you begin the actual sewing operation.
The Areas That I Will Cover In This Article
- The different ways you can create the lettering
- I am going to show you how to set up the lettering
- The process of creating the lettering
- Explain how to create the knockdown stitch
- Explain the settings I used and why I used them
I am going to show you how I set up the lettering to embroider on the mesh cap back using small text lettering only. The lettering that I will be using will be 6 mm or about 1/4 inch in height. I try to keep it to a simple block font that does not have serifs if at all possible. I also want to keep it in uppercase only, as this makes it much easier to read.
At that small size, a font with serifs does not work well because of the size of the serifs.
Different Ways To Create The Text Lettering
I have found that there are about 4 different ways that you could lay down the text lettering for the cap back.
- Horizontal for a straight bottom fitted cap
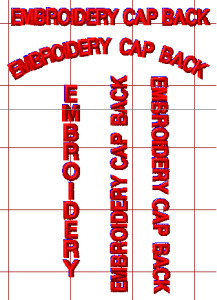
- Arched for a Snap-back keyhole cap back
- Vertical with the lettering starting at the top
- Vertical with the lettering reading up or reading down.
The Basics of Setting Up The Lettering
I used Pulse Embroidery Software to set up the lettering. I started with the basic Horizontal for the straight bottom fitted cap. The font that I used was Block New at 6mm.
Step 1 – I selected my font, set it to 6mm, and then I drew a straight
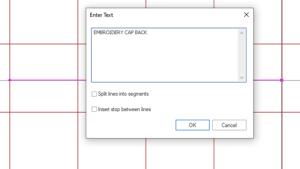 line across the front of my workspace and typed in the lettering, EMBROIDERY CAP BACK. I then clicked OK and my lettering was on the workspace.

Step 2 – I added Center run Underlay Stitching at 1.5 mm in stitch length because the letters are so small and .20mm for the Pull Compensation settings.
Step 3 – I adjusted my spacing between the letters. You want to make sure that you have all of your settings in place and the lettering exactly as you want it before you add the knockdown fill on the design.
Step 4 – Zoom in on your lettering, turn off the 3D or TrueView of your lettering so that you see the stitch points on your letters.

You will notice that there is very little space between each letter. You want your stitch points to almost touch. This will give you a clean easy run on the machine without the machine adding locks and trims between each letter. You do not want your machine to stop and start between each letter, but you also do not want a thread showing between your letters when it is finished sewing,
Step 5 – Create the Knockdown stitch. Pick up your Complex Fill tool in your digitizing tools and start plotting around the outside of the stitch points of your letters. You do not have to be perfect when you are doing this. You want it to be out and around the letters, but do not draw an oblong around the lettering, because it will show much more. You only want to draw around the shape of the letters.

This is what you will see when you have it completed. You would repeat the same process for the remaining 2 words before you go any further.

Step 6 – Now you must change the angle of the fill stitches so that your letters do not sink into the fill stitches and reduce the density to about -35 stitches per inch from your normal fill setting. I also added a .30mm pull comp setting to the fill. The image below will show your finished results.

Step 7 – In your Sequence View, move your fill background (knockdown stitch) up before the lettering so that it will sew out before the lettering sews. You will sew the fill stitching the same color as the mesh on the cap. When it is sewn out, you will hardly see the background stitching at all.
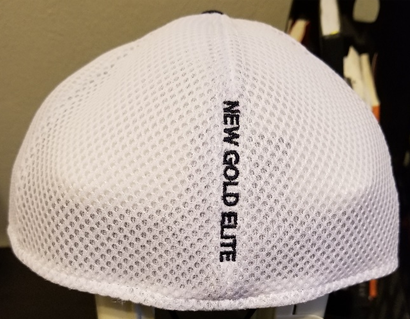
Here is a finished Embroidery on the back of a mesh cap. This is a vertical design up the seam of the back of the mesh cap. The fill stitching or knockdown stitch is sewn in white. You cannot see the fill stitching under the letters and the letters sew out crisp and clean.
This same lettering could have been sewn straight across the back at the
Setting up the lettering to embroider on the back of a mesh cap is not hard, it just takes a few minutes and the finished result is amazing.
Click on the PDF to print out How To Set Up The Lettering To Embroider On The Back of a Mesh Cap You will be able to see the images much better.