by The Embroidery Coach | | Embroidery Education
When you are thinking of purchasing Embroidery Design Software, it is a large investment that you make for your embroidery business. You want to be assured that you are getting the most embroidery software for the least amount of money! There are 3 primary scenarios that will cause you to be searching for new embroidery software.
- New to embroidery and this is your first business!
- You already have a business, such as a screen printing business and you are adding embroidery to your product offerings!
- You been in the embroidery business for a period of time and you upgrading your current software?
When you are new to embroidery, thinking about adding embroidery to your current business or upgrading your services you have to make a big decision as to which embroidery software you are going to purchase. The main questions on your mind are how can I get the most software and tools with the least amount of money and how do I know that I have the right software?
Do Not Choose The Most Inexpensive Embroidery Software
Many new embroiderers make the mistake of looking for the most inexpensive embroidery software on the market, thinking that embroidery software is embroidery software. They all work the same! This is what I thought and with such a tight budget, I did make the wrong decision and as a result, I spent a lot more money than I would have if I had done some more research on my own.
Many embroidery software companies will tell you that their software is the best and that you can create any type of design with it, but when you take a closer look at it, you may be in for a real surprise! Most embroidery software suppliers offer several levels within their software. If you purchase their highest level, it may do everything that you want, but you may not need their highest level to accomplish what you want to do.
You Do Not Need The Highest Level Of Embroidery Digitizing Software
After several years of editing designs I decided that purchasing embroidery design software was the right move to take so that I could digitize my own designs. When I was shopping for digitizing software I was told by salespeople from 2 of the top embroidery software suppliers that I needed to have the highest level of their embroidery software, which was their most expensive software level. If I had any plans for digitizing for other people I would not have enough tools in the lower levels to do everything that my customers would be asking for. I believed them thinking that they definitely knew a lot more about it than I did.
At that time, I was not sure if I was going to be digitizing for anyone else or not, but I thought that I should be prepared to do so. That was a big mistake!
Before you start shopping for your embroidery software, there are several questions that you need to ask yourself and have firmly thought out and written down in your business plan. Each brand of software will offer different tools in their various levels.
- Do you plan to offer digitizing to your customers?
- Will you be sending designs to a digitizer?
- Do you plan to do your own digitizing?
- Are you going to offer stock designs from the stock design companies?
- Will you be editing stock designs?
- What is your budget for the software?
If you are just starting out with embroidery and are planning on learning how to digitize right away, you will need that capability within your software, however, you do not need to purchase the highest level in order to be able to digitize. In many of the embroidery software packages they have most of the basic tools that you need to learn how to digitize. You need to learn the basics and thoroughly understand them before you start working with the more advanced tools.
Too many people want to jump right into the advanced steps of digitizing before they have learned the basics and when it comes to solving a problem with a design, they have no idea as to how to approach that problem.
Upgrade Your Embroidery Software When You Are Ready For The Next Level
You can upgrade as you progress through your learning curve and are ready for the next level in your education. Some of the embroidery machine suppliers offer a discounted price for the embroidery design software when you purchase a machine and software at the same time. At this point it makes sense to purchase a little more or a higher level than you will be using at the beginning.
If you plan to send all of your designs out to a digitizer you will only need an embroidery package software that will allow you to set up lettering and add stock designs to it. You want to make sure though that you have good editing capabilities within that software. This is extremely important. This is something that is not always covered when you are talking to salespeople about which software you need to purchase. I just want you to be fully aware of that fact.
Look For Design Editing Capabilities
Some of the embroidery lettering packages will not allow you to edit the lettering; you can only create your basic lettering. If you want to do any editing, then you have to purchase additional software. I have found that some embroidery design lettering packages do not even offer editing software. You then have to purchase another brand in order to do any editing and they are not always compatible. This is a very inefficient way to create your designs and a huge time waster.
You are better off purchasing embroidery design software at a lower level of one of the higher end software packages that will allow you to upgrade as you grow your business and increase in your editing skills. You want to stay within the same brand of software for each one of your levels. This will give you a better end result for your designs.
It is great to have all of the bells and whistles in your embroidery software but if you are not going to be using them, it is a waste of your money. I found though years of experience, that I did not use the advanced tools until I had been digitizing for many years. I only used them as a source to speed up my digitizing, but they did not increase any of my skill level. Without that basic knowledge and skill level along with the thorough understanding of the embroidery process, all of the extra bells and whistles were totally useless to me.
Before you think of purchasing embroidery design software, thoroughly analyze your situation and do a lot of research. Ask other embroiderers and digitizers their opinions. Do not just take the word of the software salespeople. If you have an embroidery coach or mentor, get their opinion. They can usually help you to make a decision that will save you time and money based on their relationship with you and their knowledge of your situation.
It is easy to get caught up in all of the hype from each of the software companies but when it comes down to making that final decision it can a tough one. You always want to get the most software tools for the least amount of money, but in the end, that wrong decision can be very costly in both time and money!
by The Embroidery Coach | | Embroidery Education
Understanding the Embroidery Push and Pull concept for your embroidery designs can be a difficult one to grasp, especially if you are new to embroidery. Understanding the different types of fabrics and how they are created, will be very helpful. I have found that for most embroiderers, this has never been part of their training and they do not even know the difference between a knit fabric and a woven fabric. On the other hand, most home sewers, do know the difference between knit fabrics and woven fabrics.
In this article, we will talk about the 3 main types of fabrics: Woven, Knit, and Terry Cloth and how they are affected by the push and pull concept.
Woven fabrics are usually very stable in nature and do not stretch very much. Some popular examples include denim, canvas (tote bags or Carhart jackets), thin nylon windbreakers, waffle weave fabric such as a bathrobe and Linen fabrics, such as table cloths and napkins. These types of fabrics do not require as much pull compensation as others.
A knit or a loose knit will require more compensation than the woven. Good examples of knits are t-shirts, polo shirts, sweaters, sweatshirts and Lycra garments. These fabrics all have various amounts of stretch and must be compensated according to the weight and stretchiness. The more open or loose that a knit is, the more pull compensation will need to be applied than fabrics that are more stable. Terry cloth is another type of fabric that must be handled on its own. We will talk about this a little later in the article.
What is Embroidery Push
and Pull Compensation?
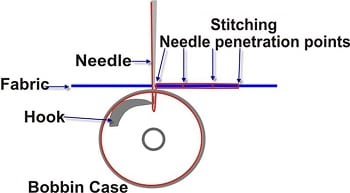
When the needle goes down and penetrates into the fabric this is called the penetration point of your stitch. As the top thread in the needle penetrates the fabric it connects with the bobbin thread. As the two threads connect it creates a pulling effect. This pulling effect is magnified if you have a long stitch or a stretchy fabric. The longer the stitch is, the more it will pull in. This is also true if your fabric is soft and stretchy.
When this happens, you need to compensate by making your stitch even longer. This is called Embroidery Pull Compensation. When you create a design to sew out on a denim shirt and on a knit golf shirt, you want the finished design to look the same. It will not unless you add stitch length to compensate for the amount of give or stretchiness in the fabric. You will find this very evident when you are working with shapes; such as a circle or a square.
Most fabrics require that Pull compensation be added in order to compensate for the push and pull effect brought about when you stitch a design into the fabric. All types of stitches create the push-pull effect, but it is most prominent when you are using Satin path or Complex fill stitches and also when sewing a large area. The larger the area, the more push and pull you will have. Knit fabrics are known for pulling in. The softer the fabric the more you will have this push-pull effect.
The Push or Expansion area is the open end of the segment or column (ie. Top or bottom of the letter I.) This is on the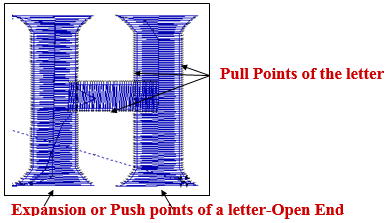 opposite side of the penetration points. You must bring those areas in, cutting them shorter. This is called Push Compensation. It does not matter if you are working with a letter or a shape. It also holds true with the angles of your shape. The amount of stitch length or pull comp that you add depends on how stretchy the fabric is, what type of underlay or how much underlay you are using or how wide the column of your segment is.
If you find that you have a design that you are currently using that does not stay in registration, you might want to try adding to the stitch length on the pull in areas. The push or expansion portion of the area or segment would need to be brought in using approximately the same measurement as you have added for the Pull compensation.
Always save your outlined designs in your native software file, to ensure that you can adjust the push and pull for various fabrics. You want the finished embroidery to look the same on a denim shirt, as it does on a polo. They will not unless you have added the right amount of pull comp and underlay to accomplish this job.
Embroidery Push and Pull with Terry Cloth
Terry cloth is basically an animal all its own. Terry can be a knit or a woven fabric and comes in varying weights, from light to heavyweight. Because of these varying factors, the underlay and pull comp that you add depends on both the weight of the fabric and the size of the embroidery design or monogram. You will have to experiment on a sample before you can come up with your final settings. Once you have that you will want to save these settings and use them all of the time for your terry fabrics. Keep in mind that all software packages are different and all embroidery machines are different so there will always be adjustments. Sometimes this means that you have to digitize the actual 0000000pull comp into your design if you are not getting the results that you need or that will work with your machine. If you are creating your own underlay, you must know how much pull comp you are applying before you even create your underlay.
I hope that I have helped you to understand pull comps a little bit better. I know that this subject is huge and tough to grasp but if you do a lot of experimenting and keep track of your settings, you will soon gain a whole lot more knowledge of this huge subject and will be able to create better-looking embroidery designs.0000000000000000000000000000000000000
by The Embroidery Coach | | Embroidery Education
Helping your customer get the best results for their custom design or logo when they request it for embroidery can sometimes be a challenge with the artwork that is being created today by graphics designers. In today’s world of computers and complex artwork programs many customers will have artwork that was created for them that looks great on paper but does not translate into embroidery very well. When you first look at a design, you need to look at it in terms of how is this going to work with thread rather than ink. Many designs need to be simplified in order to work well for embroidery but that same design may work great for screen printing or sublimation instead of embroidery.I want to show you two designs that were sent in to me for digitizing and both of these designs would look great in ink but not in embroidery.
The first design that was sent to me to be digitized was by a customer that was very insistent on having his design embroidered on caps. This design would not work well for caps and I had to tell him that it would not. His design will work for screen printing or sublimation but not for embroidery.
If he wants embroidery, he will have to compromise and have his design recreated in such a way that he will be happy with it and it will look great in embroidery. This design would not work well for 2 reasons. It was created to look like it was on a round surface and that does not always work out great in embroidery on a flat surface. The second reason is all of the dots inside of each letter. If this could be digitized for embroidery, it would be a production nightmare and he would not be happy with the cost of the digitizing or the end result! This design could work out as a color blend, but not with all of those dots. The customer does not always know this and you have to educate them to make them understand. Show them samples of a color blend and let him digest that possibility.
This second design has too many colors blends in the same area. This design has color blends going in different directions in the same letter. The inside of the letter is one type of color blend and then the border of each letter is another color blend. This would not work in embroidery. 
Also the small black lettering has a white border. The small black lettering needs to be enlarged a small amount and the white border will need to be eliminated.
The customer was also expecting that the white stripes and stars in the flag would just be showing through on his white shirts. This would be impossible. This can work for screen printing but not for embroidery. The white stripes would need to be embroidered in order for the red stripes to look clean and the white stars would need to be placed on top of the navy field.
There is certain information that you need to have from your customer upfront when you are working with them to find out exactly what they want and how they are going to be using their design. Their logo or design is very important to them and you need to know what their final expectations are from you.
Here are some basic questions that you need to ask your customers at the beginning of the process.
What type of garments or articles will be embroidered using his design?
It is very important to know this upfront so that the artwork can be created at that time for the different types of articles. This is very important for you and the digitizer to know. The design is created differently for caps than it is for a left chest shirt design, jacket back or even bags.
Do You Anticipate That This Same Design Be Used For Another Type Of Garment?
It is best to know this up front. The digitizer can create the original design in such a manner that it can be used for more than one type of garment when they first create it.
What type and quality of fabric in the garment will your customer be purchasing?
A design that is created for a woven shirt may not run well on a pique shirt. The designs will require different settings for the different types and quality of the fabric. If you have a design created for a t-shirt it may not run well on a pique shirt because of the rough texture of the pique. There are also different weights of fabrics, so all of these factors need to be taken into consideration when the design is being digitized. The moisture-wicking fabrics need special settings so the digitizer will need to know this at the onset.
How many sizes of this design will be needed?
If your customer has a thought that he may want this design in a larger size for future use, you need to let the digitizer know this. He may be able to create the artwork at that time for both and will save a little on the cost in the future.
Is the artwork camera ready?
An idea of a design on a napkin is not camera ready artwork. If the artwork has not been created in a format that the digitizer can load into his or her computer and start creating the design immediately, then new artwork must be created and there should be an extra charge for this. The best form is a vector file such as a .cdr or a .ai file but this is not always possible for the customer to produce.
A .jpg or a .pdf will also work for digitizing their design. It is very important to get the design in camera-ready artwork from the customer in order to deliver exactly what the customer is expecting. If you do not have camera ready artwork, have the artwork created and then approved by the customer before proceeding with his digitizing order.
How many colors and what exact colors will the design have?
Try to get this established up front, not only how many colors, but where each color will be in the design. This will save you time later on when you are working with the design to create your sew out.
How many different colors of garments will the customer be ordering?
The colors in the original design may need to be adjusted for the different colors of garments. It is best to get this established in the beginning if at all possible. The customer will not even think about this but it is important for you to look at the design in such a manner that you can suggest adjustments to the design so that it will work with all color combinations. He may not order many color combinations the first time, but maybe back for a reorder that will require these adjustments. It is best to anticipate this at the beginning.
Helping your customer get the best results for their custom design is very important and the more that you educate your customer, the more he will appreciate it and have confidence in you. If you will obtain all of this information upfront from the customer, both you and the customer will be happier with the end result. You will save a lot of time by not having to ask questions as you are trying to get his perfect sew out done and he will see you as an expert embroiderer.
by The Embroidery Coach | | Embroidery Education, Embroidery Production
Searching for the right Embroidery Design Placement Chart can be very confusing and frustrating. There are many charts available for many different types of garments and linens, but most of them are not specific and it is up to you to create that perfect placement chart that will work for 99 percent of your items.
Your customer is depending on you to know the proper placement and when he or she receives it and the design looks off, they are extremely disappointed.
The right placement is important in the final quality of your product and the presentation of that product to your customer.
The placement of a monogram or an embroidery design on a garment is subject to many variables. There was a time when tradition was very important, but in today’s world that is not always a big factor. There are basics that really need to be followed, but for the most part, placements are all over the place.
Your customer’s preference needs to be taken into consideration, but for the most part, the customer is trusting in you to make that right decision because you are the professional with the experience.
Many times, we have to figure it out by the type of garments, the lines on the garment, the size of the garment and the basic construction of it, but it is much easier when you have a basic guide that you can follow.
Here are some of the variables that you need to watch out for.
- Working with Stripes – If there is a stripe you must make sure that you hoop according to the stripe even if it appears to be slightly crooked.
- Are there any diagonal, horizontal or vertical seams in the area that the logo would normally be placed?
- Are there any inside zippers?
- Are there any inside pockets?
- Is there an access zipper inside?
- Is there a removable lining?
- Is the lining larger and wants to bunch up?
- Is there an existing embroidery that must be considered?
Attention to all of the details is extremely important when you are placing your logo, lettering or monogram on either the left or right chest of any garment. Having a good basic embroidery design placement chart is very important if you want to be consistent in all of your design placements!
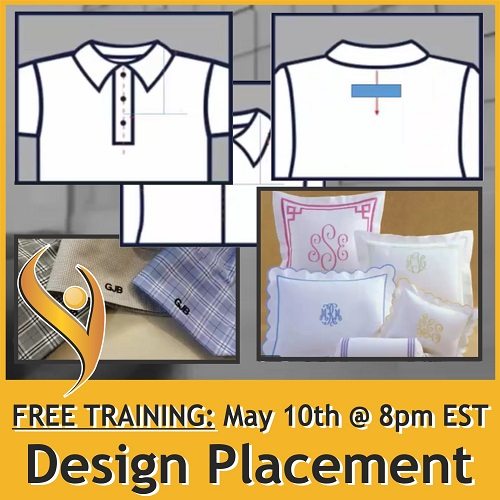
To learn the basics of Embroidery Design Placement sign up for our Free Monthly Embroidery training on May 10th. Click Here to get signed up. Monthly Training

by The Embroidery Coach | | Embroidery Education
Here are 9 tips that will help you to maintain balanced embroidery thread tensions. Thread tension is one of the most frustrating subjects within the world of embroidery. Learning to adjust and maintain good thread tension is a learned skill. Once you develop this skill it will make a huge difference in your finished embroidery. There are tools available that will make it easier for you to develop this skill.
Very often a design would look so much better if only the tension was adjusted correctly on the machine. The wrong tension can cause multiple problems and without the basic knowledge of the relationship between the top and bottom threads it is impossible to know how to correct them.
A stitch is formed when the needle carrying the top thread passes down thru the needle hole in the needle plate and connects with the bobbin thread. A loop is formed directly behind the eye of the needle. As the needle is coming back up the thread will tighten if your tensions are set properly. If one of your threads is too tight it can snap. If there is a burr on the edge of the needle hole in the needle plate, as the thread is coming back up, it can split or fray. It is important to keep a total balance between your Upper thread (top thread) and your Lower thread (bobbin thread).
Here are some tips to help keep your thread tensions balanced
- Avoid switching thread types
- Check your tensions when switching thread colors.
- Check your tensions for different types of fabrics
- Avoid Birdnesting
- Avoid erratic stitching and thread breaks
- Check your tension when you change a bobbin
- Clean out your bobbin case each time you change a bobbin
- Keep your tensioners clean and free from lint and dirt
- Use Tension Gauges to set your tensions
Avoid Switching Thread Types
It is not a good idea to keep switching back and forth with your thread types. It is better to stick to one thread type. Your tension requirement for polyester is much tighter than for rayon and if you are constantly changing thread types; so is your tension and it is hard to keep a good consistent tension when you are switching types. If you find that you need to use a polyester thread for certain jobs, specify certain needles for those threads and use only those for the polyester threads.
It is best for your machine to be consistent with the thread type that you use and it is easier to maintain a more consistent even tension when you do stick to one type. This makes life a little easier and prevents a lot of needless head-aches.
Check your tension when switching colors of cones.
The thread tension needs to be adjusted each time you change a cone of thread. It is best to maintain your colors on the same needles if you can. If this is not possible, stay with the light colored threads on the same needles and the dark colored threads on the same needles. For example, don‚’t change off a white thread with a navy thread. You will definitely have to adjust your tension. This can make a big difference. The dyes are heavier in the dark colors than they are in the lighter colors, so therefore the thread is slightly heavier.
Check your tension for different types of fabrics.
The same tension for a cap does not always work on a knit golf shirt. As a general rule, I run the tension tighter for a cap. This is not always the case, depending on the fabric that is in the cap. You will need to experiment to see which fabrics require a tighter tension than others.
Avoid Birdnesting
Birdnesting is caused by the top thread tension being too loose. This is a lot of top thread that gathers up on the underside of your garment and forms a big wad. You will see loops on top of your embroidery and this will even cause your garment to be pulled down into the hole in the needle plate.
Obviously this will rip the garment. At times, you will need to reach up underneath the needle plate in the hook area and cut this wad of thread loose from the garment in order to remove it. When bird nesting does occur you must remove every strand of thread that has been caught in the knife and bobbin case and in and around the rotary hook. If some of this thread gets caught in the hook when you start to sew again, your hook may freeze up and you are shut down until you either replace your rotary hook or have a tech replace your rotary hook. You can also knock out your hook timing as well as the knife timing mechanism if a wad of thread gets caught in it.
Avoid erratic stitching and thread breaks
If the tension is too tight, you may experience a lot of thread breaks or see bobbin thread that is being pulled up onto the topside of your garment. It looks like you have very erratic or jagged stitching, but when you look more closely you are actually seeing the white bobbin thread showing at the outer edges of your stitching.
Check Your Tension When You Change The Bobbin
Every time you replace your bobbin, you need to check the tension. The tension can vary and be different on each bobbin. Your tension can even change within the bobbin. It is very normal for the tension to change when it gets close to the end of a bobbin. The last 10% should be considered unusable. This is especially true with the cardboard sided bobbins. All of a sudden as you are sewing, you will notice that even though nothing has changed in the embroidery process or your garments, you tension has changed. This is very upsetting. At the first sign of this, remove the bobbin, throw it out and replace it. Again, check your tension to see that it is correct before you start running your machine.
Clean Out Bobbin Case
Each time you change your bobbin, clean out the bobbin case with a brush or blow it out and check the tension spring/clip on the top edge. Lint and dirt build up inside of the bobbin case and under this spring. Your tension will run too loose and it does not matter how much you tighten the screw, you will not get a good tension until you have cleaned this out.
Cotton bobbins produce more lint than polyester bobbins and tend to create the most problems. To clean out the tension spring/clip gently run a piece of heavy paper underneath the spring/clip. The corner of a business card works well. Be very careful when you are doing this that you don‚’t dislodge the spring/clip. The spring/clip has a small lip so that fits into a groove on the left side on the top of the bobbin case. Make sure that it is still in this groove when you are finished. Do not clean it out with a pin. You can scratch the bobbin case and this will create more problems.
Clean out your tension disks or tensioners!
Clean out the tension disks in each of your tensioners. Take a Q-tip doused in alcohol and remove all of the dirt and lint buildup. This is something that should be done routinely about every 6 months if you use your machines on a daily basis. If you only use them part time, you should clean them at least once a year. Sometimes you will have to remove them entirely and soak them in alcohol because there is so much dirt build up behind them that you cannot get it all out especially if you have had your machine for a few years and have never cleaned them out.
I had one client that was ready to throw their 12 head embroidery machine out because they could not get the tensions correct no matter what they did. After I took a look at it, I discovered that the tension disks had never been cleaned. After cleaning them, their machine sewed like new. Three years later, the machine is still there and sewing!
This is a very important maintenance step that many people forget about or aren‚’t even aware of. Put it into your routine maintenance schedule. I know that this is an article on thread tension not machine maintenance but they all go together.
Adjusting Your Top Tension
I have adjusted tensions for the past 34 years and learned the correct feel of the thread passing thru the needle as I pulled on it. Today there is a top thread Tension Gauge that you can purchase to properly set your tensions. The first time that I used this gauge I was amazed at what a great job it did and I also found out that my tensions were not all set properly. After using this gauge, my machine actually sewed better and faster without any problems. It is such a great feeling when you can sew all day long with little or no thread breaks.
Testing With The Top Tension Gauge
To test your tensions with this Tension Gauge, you will thread your machine properly making sure that you have followed the upper thread path correctly. Pull a few inches(about 6 inches or so) of thread thru the needle and wrap it around the hook of the gauge at least twice. You want to make sure that it is caught enough that you can pull on your thread without it coming loose. With the numbers on top of the gauge facing up you will pull the thread straight out horizontally.
- Do not pull out more than 18 to 24 inches during your test.
- The tension should read 100-130 grams for Rayon thread
- 120-150 grams for Polyester thread
On my machines, the upper range of these numbers work better than the lower range. Start with needle #1 and continue the same process until you have completely tested all of your needles. Each time that you make an adjustment, you should perform this test.
(Each machine has its own personality and sometimes these measurements will not be correct for your machine. You will need to experiment and arrive at your own measurement and keep your track of what these measurements are. Many times they will need to be tighter than the measurements listed above in order to have the correct tension.)
(Another side note here: Each time a tech comes in to work on my machine, he loosens all of the top thread tensions and I have to go back and redo them when he leaves. Obviously you are not going to have as many thread breaks if your tension is loose. My point here is that just because the tech has been there and adjusted your tensions, do not think that they will automatically be correct!-Trust me, I am not knocking techs, they are wonderful, I just want you to be aware of your tensions if they are not correct after the tech leaves!)
Testing With The Bobbin Tension Gauge
There is also a Bobbin Tension Gauge that you can purchase to set your tensions correctly. I strongly advise purchasing one of these valuable items. This is a one time investment of approximately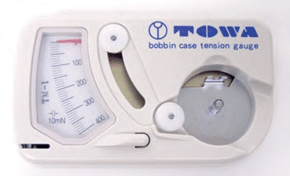 $80.00 but it is worth its weight in gold.
Simply put your bobbin into your bobbin case as you normally would, put it through the tension spring but do not put it through the pigtail. The little clip on the side of your bobbin case will fit into the slot in the tension gauge, so slide the case into the gauge and press down.
Next take the thread and run it through the bottom wheel, around the top wheel and then down through the slot and run it sideways. If your tension is correct it will measure between 18 and 20 grams. If it is not registering correctly, tighten or loosen the screw on the side of the bobbin case and test it again. The numbers to read on some of the Tension Gauges will be between 180 and 200 instead of the 18 to 20.
I hope that these tips have been helpful to you. Print this article out and keep it close to your machine for a reminder. Add it to your regular maintenance schedule. Without a regular machine maintenance schedule, you will never have good tension or the machine performance that you are looking for. For more information about the basics of embroidery, machine maintenance, and much more, go to https://EmbroideryBusinessAcademy.com
How Does The Embroidery Coach Help Maintain Consistency in Embroidery Work?
At The Embroidery Coach, we emphasize that consistency begins with understanding how thread tension interacts with fabric, machine settings, and thread types. We do not rely on guesswork. Instead, we teach structured methods for evaluating and adjusting tension to achieve predictable outcomes.
We help you understand how to maintain consistency in embroidery work. Early warning signs such as looping, puckering, or uneven stitching. By identifying these indicators quickly, you can correct issues before they affect the final design. Our guidance ensures that every stitch is intentional and controlled. We also introduce tools, such as tension gauges, and maintenance routines that simplify complex adjustments. With the right approach, what once felt like trial and error becomes a repeatable process.
Most importantly, we train you to think like a professional embroiderer. This means understanding that consistency is not just about settings but about habits, discipline, and attention to detail.
How to maintain consistency in embroidery work?
We believe that maintaining embroidery consistency requires skill, awareness, and proper maintenance. Our approach focuses on building reliable habits that produce uniform results every time.
Learning to adjust and maintain good thread tension is a learned skill. Once you develop this skill, it will make a huge difference in your finished embroidery. There are tools available that will make it easier for you to develop this skill.
Very often, a design would look so much better if only the machine’s tension were adjusted correctly.
Here are some tips to help keep your thread tensions balanced
- Avoid switching thread types
We recommend sticking to a single thread type whenever possible to maintain consistent tension behavior and avoid unnecessary recalibration.
- Check your tensions when switching thread colors.
Different dyes and coatings can affect thread performance. We always test tension when changing colors to maintain stitch consistency.
- Check your tensions for different types of fabrics
Each fabric reacts differently under tension. We guide you to adjust settings based on material density and stretch characteristics.
We emphasize proper threading and tension setup to prevent thread bunching beneath the fabric, which disrupts design quality.
- Avoid erratic stitching and thread breaks.
We help you identify root causes, such as incorrect tension or poor maintenance, to ensure smooth, uninterrupted stitching.
- Check your tension when you change a bobbin.
Bobbin changes can subtly alter tension. We always recalibrate to maintain balance between the top and bottom threads.
- Clean out your bobbin case each time you change a bobbin
We stress regular cleaning to remove lint buildup, which directly impacts tension accuracy and stitch formation.
- Keep your tensioners clean and free from lint and dirt
Clean tensioners ensure smooth thread flow. We make this a standard part of every embroidery routine.
- Use Tension Gauges to set your tensions.
We encourage the use of precision tools to eliminate guesswork and achieve consistent, measurable tension settings.
Why Consistency Matters in Professional Embroidery
Consistency is what separates hobby-level work from professional output. When your embroidery maintains uniform tension, every design looks polished, every stitch holds firmly, and every project meets client expectations.
At The Embroidery Coach, we focus on long-term reliability. Our methods ensure that your results are not just good once, but consistently excellent across every project you undertake.
Take Control of Every Stitch!
Consistency is not a mystery. It is a skill you can develop with the right guidance and disciplined practices. At The Embroidery Coach, we help you turn uncertainty into precision, ensuring every stitch reflects control, quality, and professionalism.
Frequently Asked Questions (FAQs)
Embroidery thread tension controls how tightly the threads are pulled during stitching. Balanced tension ensures clean stitches, prevents looping, and maintains design accuracy on different fabrics.
Incorrect tension can cause puckering, loose stitches, or thread breaks. Proper tension ensures smooth stitching, balanced thread distribution, and a professional finish.
Check tension whenever changing thread colors, fabrics, or bobbins. Regular checks help maintain consistency and prevent defects in the final embroidered design.
Tension gauges are the most effective tools. They provide precise measurements, helping embroiderers set consistent, repeatable tension levels across projects.
Yes, lint buildup and dirty components disrupt thread flow and tension. Regular cleaning of bobbin cases and tensioners is essential for consistent embroidery performance.