by The Embroidery Coach | | Embroidery Business Marketing
Do You Keep Track Of Your Embroidery Design Setups? When you are setting up your embroidery designs, do you keep track of what you did? Do you write down the settings that you added or do you think that you will remember them? It is very important to keep track of each one of your embroidery design setups.
I have found that thinking you will remember does not usually work. You have too many things rolling around in your head at the same time and when you go back and try to replicate what you did, it is very difficult to remember.
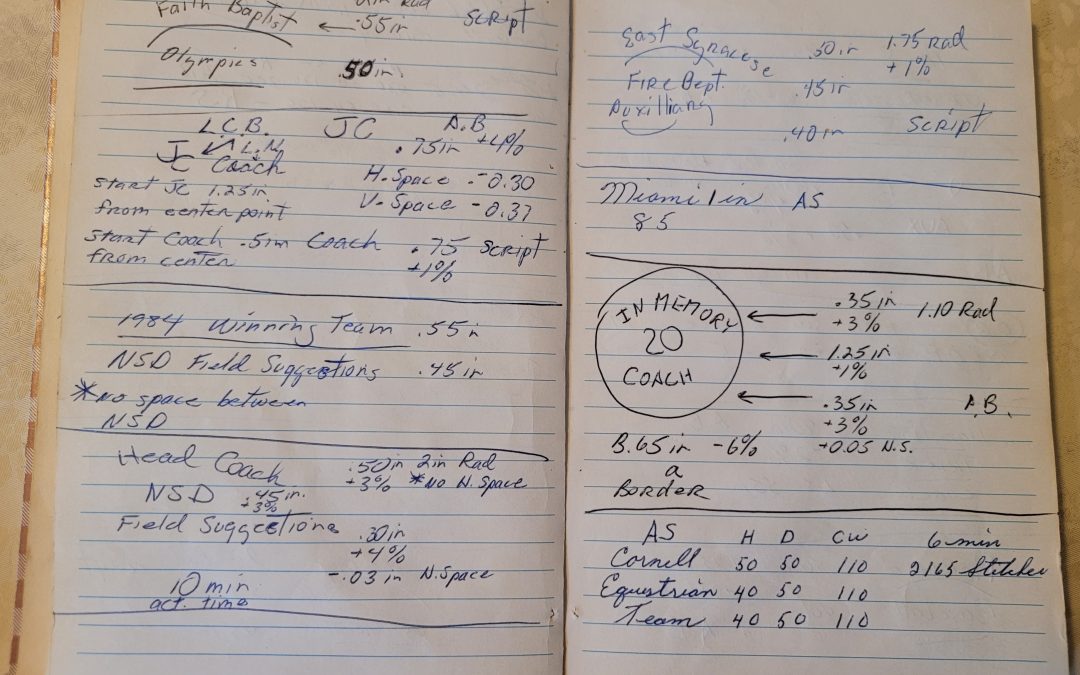
Way back in 1982 when I first started using design software, I started writing down everything about my embroidery design so that I could go back to it when I created another one similar to it or a repeat of what I had done. I had a simple little book that had the words on the front, Favorite Recipes. I had gotten it as a gift from someone for Christmas and instead of writing regular recipes down, I used it for my embroidery recipes. It worked out great.
I wrote words, added the customer's name, and drew diagrams and little drawings to show exactly what I had done. I put in my settings, thread colors, sizes, and lettering styles. After I did a sewout and made some changes, I went back to my book and made the changes there.
You may want to start a system where you keep track of each embroidery design setup on your software design sewout sheet and then place that in a binder or in your catalog envelope with all of your information about that job or design that goes with a certain job.
The most important thing is that you need to start a system of keeping track of every one of your embroidery design setups or digitized designs that you do. This is very important and will save you a ton of time when you go back to that design or create another design using the same parameters.
Some people use recipe cards to keep track of their information and then file it inside of a recipe card file in alphabetical order. This works also. Whatever you decide to use, get a system started and start keeping track of each one of your embroidery design setups!
Joyce Jagger
The Embroidery Coach
by The Embroidery Coach | | Embroidery Business Marketing
Knowing which embroidery backing to use on a particular garment when you are getting ready to embroider your design will make the difference between turning out a mediocre product or a high quality finished product.
Backing is required to give the garment or piece of cloth more stability so that it can hold the stitches
Some people are under the impression and have even been told by other embroiderers or instructors that you do not need a backing if your garment is heavy such as a bag, cap or a jacket back. You will have a higher quality result with a finished design if you do use a backing.
Often if I have a garment such as a bag that is hard to hoop with backing, I will hoop it without the embroidery backing and slide a piece under the hoop when I put it into the machine. This applies only to very rigid fabrics. This will give it the stability and crispness needed for the finished product. It also gives you a piece of backing to rip against instead of your garment if you happen to make a mistake. And trust me from time to time, we all make mistakes!
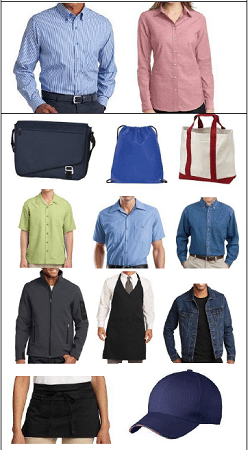
I am going to share some pictures of the different types of garments with you and this may make it easier for you to understand which embroidery backings to use on each type.
Two Categories Of Embroidery Backings
There are basically two categories of embroidery backings but within these two categories there are different types that you need to carry in your inventory to be used on a daily basis depending on what type of garment you are going to be applying your embroidery.
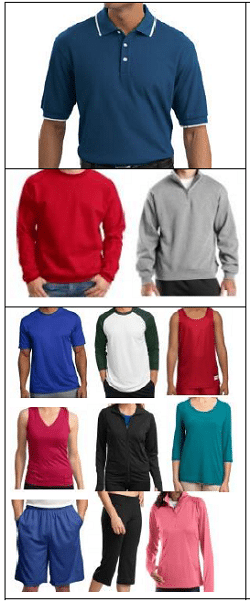 Knit Fabrics-Cutaway Embroidery Backing
In the picture to the left you will see several types of knit garments. All of these garments should be backed with Cutaway backing.
There are several types of Cutaway embroidery backing but I am only going to be talking about 2 of them here.
Basic Cutaway backing is popular and is the most commonly used. It is awet laid non-woven embroidery backing designed specifically for machine embroidery. Available in several different weights; I recommend and use the 2 oz. backing for most of my applications. It can be used on all types of knits but I specifically use it on my heavier knits such as the left chest areas of Sweatshirts and Fleece .
No Show backing is a very light weight waffle weave cutaway embroidery backing used for all light weight and pastel colored knit fabrics. Sometimes it is called a Mesh backing. This is my favorite cutaway backing and it is so soft that it is advisable to use 1 layer of tear-away backing under it for extra stability especially if you have small letters in the logo.
The tear-away will then be torn off and the No show backing will be cut away. You will not see a shadow of the backing from the front of the garment as you so often see when using the normal basic cut-away backing. This is extremely important when you are applying your embroidery to the very thin fabrics such as the pima cottons or the performance wear fabrics.
The No show backing also works great if you are embroidering the full front of sweatshirts because it will let it fall in a natural manner instead of being stiff once the backing is removed. This type of fabric does not need the extra bulk of the two layers of normal cut away backing. Many people think because it is a sweatshirt, that you need to use heavy backing; untrue. It is stability you are looking for; not weight.
The combination of 2 layers of No show embroidery backing and 1 layer of 1.5 oz crisp tearaway backing works great for the moisture wicking or performance wear fabrics that are so popular today.
The No-show backing is a little more costly than the basic cutaway backing but to me the end result makes it well worth the cost. When I am trying to create a high-quality product, I need to use high-quality materials in order to produce that high-quality product!
 Woven Fabrics Tearaway Embroidery Backing
In the picture to the left you will see several types of woven garments. All of these garments should be backed with Tearaway backing.
Tear-away backing is used on all woven fabrics such as denim, chambray, twill, dress shirts, nylon oxford, canvas, bags, aprons, flags, sheets, pillowcases, tablecloths, napkins and etc.
It is also used on towels and washcloths. I have found that a 1.5 oz weight has worked best for almost all of my applications using the tear-away backing. I normally use two layers for most applications; sometimes I use only one and occasionally I will use three. I only hoop two layers into the hoop when I am hooping the garment, but I
will place another layer under the garment after I put it into the machine. This will give extra crispness to small lettering. It actually makes the columns in the lettering wider. It can also prevent puckering if the garment is hooped tight enough and has the proper amount of backing.
If you have a full back design that has several thousand stitches you will need a 3 oz. crisp tearaway backing. This 3 oz crisp tearaway embroidery backing is the same one that is used in caps, but it is on a larger roll rather than being cut in 4 inch strips.
Cap backing is a 3 oz. heavy tear away backing that is used on caps, front, sides and back. It usually is available in strips cut at 4 inches wide to fit inside of the front of caps. I have found that one layer of cap backing will work great for most caps, but sometimes if you have an unstructured cap 2 layers will produce a sharper more crisp look than using one layer. I will hoop one layer into the cap when I am putting the cap onto the cap frame, and then lay the extra layer into the cap as I am attaching the cap frame to the cap driver on the machine. It really does not take that much extra time and I notice a huge difference. The lettering will be much flatter and does not pull in nearly as much.
When hooping a cap back, I use a flat or tubular hoop and I do not hoop the backing in. I hoop the cap back, attach the tubular frame to the machine and then slide in a piece of the cap backing under the hoop. It really is too hard to keep the cap back straight when you are hooping it with the backing. I have also used cap backing at times as an extra layer on extra heavy terry towels. It really helps to flatten out the columns in the monograms. It will soften up after it is washed.
I hope that this helps to take the mystery out of which embroidery backing to use on the different types of garments. If you would like to have a copy of these Embroidery Backing Guides, fill in your Name & Primary Email address and I will send you a copy of each one.

by The Embroidery Coach | | Embroidery Education
Many embroiderers find that embroidering Small Lettering is very challenging, but once you learn how to cope with many of the issues, it is easier. In order to control these challenges, there are some key elements that must be considered.
- Fabric
- Needles
- Thread
- Style of Lettering
- Underlay
The small lettering in the design, ONTARIO COUNTY, NEW YORK is only 3.6mm in height. This would not work well if it was upper and lowercase. It is best to keep lettering that small in all upper case letters. It also helps to use a plain block letter rather than one with serifs when you are embroidering lettering that small.
Making small lettering work to your satisfaction often means making adjustments to allow for your fabric type and the size and style of the lettering that the customer is requesting. Many times what they are requesting is not acceptable for embroidery. They are used to seeing their logos in type set usually in ink or screen printing ink and this does not always work with needles and thread. It is not uncommon for a customer to request an unreasonable amount of letters all to be placed on one line.
With Small Lettering, you have to create a balance between the fabric, needles, thread and the size and style of your lettering. You cannot have letters so small that you are creating stitches that will be stitching on top of each other. This causes holes in the fabric and thread breaks. Your stitch length must be a minimum of 1 millimeter in order for it to sew and not create holes.
Embroidering Small Lettering is not hard and you can learn to embroider small lettering on any type of fabric once you learn to control the factors that seem to make it difficult. Join us for the Small Lettering Intensive. Click on the link below for more information. Small Lettering Intensive.
by The Embroidery Coach | | Embroidery Business Marketing
The “Transformation Embroidery Business Blueprint” will help you Build a Wildly Successful Embroidery Business! Would you like to transform your embroidery business into one that is running smoothly, making great money, and lets you go home at night with a clear head? How would you like to stop those sleepless nights wondering if there was going to be enough money to pay the bills?
Here are 9 rules of the Transformation Embroidery Business Blueprint that will help you build a wildly successful embroidery business!
- Learn the skills to offer high-quality Embroidery. Make sure that every piece of embroidery that goes out of your shop is excellent!
- Deliver all of your jobs on time or ahead of schedule.
- Listen to your customers and give them what they want.
- Create a profitable Price List.
- Make sure your entire shop is organized and create Instruction Procedural Manuals (Standard Operating Procedures), for every area of your business so that your employees are highly trained, and you are all on the same page. If you have supervisors, they must be self-sufficient and highly trained as well.
- Have your Accounting Books set up properly and kept up to date.
- Create a Business Plan and a Marketing Plan that will help you stay on track.
- Market your embroidery business according to your Plan to reach your niche.
- Spend at least 30 minutes every day learning how to improve your skill level!
This is not hard to do. The bottom-line secret is to produce top-quality embroidery, learn how to price correctly, get organized, thoroughly train qualified workers, and stay on top of your books! It does take time to get all of these tasks accomplished. But when it is done, you can work less hours and be very happy with your business.
If you would like some guidance and help in transforming your embroidery business, I am here to help you get on the right track. Working less hours with the feeling of balance in your life is totally possible when you have implemented the “Transformation Embroidery Business Blueprint” that I have given you here. Being able to go home at night with a clear head is not only a goal but can become a reality. Wouldn't it be great to not work weekends and holidays? You could be free to take family vacations without feeling guilty about not being at work.
Send me an email to joyce@theembroiderycoach.com and we can set up an appointment to give you a full business evaluation and help you get started right away. I'll show you how to transform your embroidery business with a simple and practical process that will help you overcome any roadblock that stands in your way.”
My goal is for every embroidery business owner to be profitable and happy with their business. Use this Transformation Embroidery Business Blueprint to build a wildly successful embroidery business!
Remember, We Help Embroiderers Succeed!

by The Embroidery Coach | | Embroidery Business Management, Embroidery Production
Do you have the business organization and forms that help you to run your embroidery business? Do you have your embroidery business organized? When you first start your embroidery business you can become so overwhelmed by all of the forms and processes that are so necessary to keep your entire production running smoothly.
There are software programs that can be purchased to help you keep track of your entire order, but most new embroiderers are not in the position to be able to purchase these programs so you must have a way of keeping track of it manually. I always advise new embroiderers to start keeping track of their jobs manually before going to the computer systems.
Record keeping is so extremely important and there are many forms that I have and keep with each order. You must have a system for keeping track of each step and the forms for each part of your organization or production of every job. Without a good system in place, you will soon become totally overwhelmed with the workload and you will not be able to keep track of your production and it can become very discouraging. I have 3 types of forms
- Office or Sales Forms
- Production Forms
- Shipping Forms
The Office or the Sales Area is the First One That I Will Address.
This scenario is based on the fact that you are an embroiderer that sells retail and may have a retail or showroom in your location. If you are working from home and do most of your orders online or on the phone, the same processes and forms will apply to you as well.
I create sales packets that are ready for each sale so that I can grab them and be ready when I am first starting to work with a customer.
- Customer Quote Form – Can be part of the packet or separate-This form is filled out and a copy given to the customer-your copy is then placed in a binder until the customer comes back in ready to place the order.
- Order Form – I have one for Apparel and one for Caps-You can expand on this if you have different needs.
- Form of Payment -Credit card-Pay Pal-Check form
- Design Tracking & Timing Form
- Production Tracking & Timing Form
- Packing List
- Do you have a checklist to make sure that all of the steps are taken?
These ready-made sales packets make it easy to work with and you do not forget anything as you are going through the entire process with your customer or prospect. Between the Quote form, the Order form and the Form of Payment form, you can collect all of their information and be ready for the sales process. I also have all of their information to easily input it into my database and start marketing to them. This can be in the form of a Newsletter, postcards, emails or a combination of all three.
In the next post on do you have your embroidery business organized, I will go on to the next area of organization. Check out the free training that I will be having on August 3rd. https://theembroiderycoach.com/monthly-training/


 Knit Fabrics-Cutaway Embroidery Backing

