by The Embroidery Coach | | Embroidery Education
The question, Is it important to use Embroidery Underlay Stitching in my Embroidery Designs? is a question that is asked very frequently! Embroidery Underlay Stitching is important to use in all of your embroidery designs!
If you are new to embroidery or new to creating embroidery designs, learning the basic fundamentals of what makes a good quality finished design is extremely important. One of those basic fundamentals is Underlay. Many embroiderers do not use Underlay stitching because they have no idea how to use it or what type of Underlay to use for their particular design, stitch type or fabric style. Instead, they use a heavy density thinking that this will work but this can cause a multitude of problems.
Embroidery Underlay stitching is the most important and most underrated element of creating your designs. Like anything else that is built, you need a good foundation and Underlay Stitching is the foundation of your embroidery design. Many embroiderers are very confused and want to know:
- How can I tell if there is any Underlay Stitching in my design?
- What does it look like?
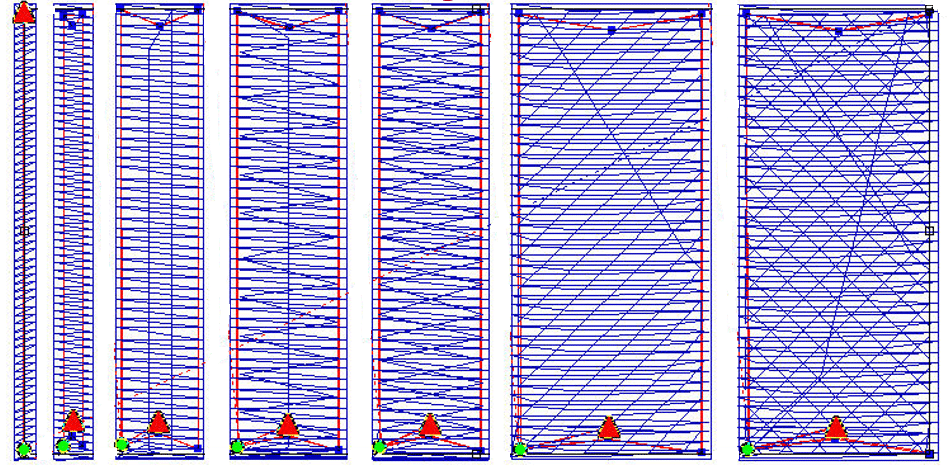
Underlay Stitches are the stitches that are sewn into your fabric first before the actual topstitching is sewn. If you are working with a design file, the .dst file extension, it is very hard for you to distinguish between the underlay and the topstitching.
Sometimes it will follow the same line as your embroidery and sometimes it will look very strange to you if you are new to embroidery and are not familiar with Underlay. It depends on what type of Underlay stitching the digitizer has chosen.
Embroidery Underlay Stitching has 6 basic functions.
- It attaches the garment to the backing creating a stable surface and smooth platform for the topstitching.
- It helps to reduce the amount of give in the fabric.
- It hides the color of the fabric that will be covered with stitching.
- It helps to reduce the density of the topstitching.
- It stops the fabric from puckering.
- It keeps the stitches from sinking into the fabric.
What are the different types of Embroidery Underlay Stitching?
There are 3 different stitch types that are used in creating underlay in your embroidery design.
- Run stitches
- Zig Zag stitches
- Fill or Tatami Stitches
These 3 different stitch types make up the 5 basic types of Underlay Stitches. These can be applied manually if you are digitizing your own design or they can be applied automatically if you have this capability within your software. Sometimes you cannot get the same effect using the auto functions in your software so you need to know how to apply the different types by hand so that you get the exact effect that you are looking for.
The Basic Embroidery Underlay Stitching Types Are As Follows:
- Contour or Edge walk – This creates a running stitch along the edge of the letter or the segment that you are creating. It is also known as an Edge walk stitch. This type of underlay is used to create a rollover edge for your lettering or object.
- Perpendicular or Center Walk– This underlay runs down through the center of the column. It is also called Center Run underlay. This underlay is used when you have a very narrow letter or column that is less than 1.5 m wide. For that, you will only use 1 line or pass of underlay down thru the center. This underlay is good to use in combination with contour or edge walk when you have a wider column and need a little extra for lift in the center of your column.
- Parallel– This underlay is created using Zig Zag stitches or run stitches. It travels only once down through a column. In some software programs, it is called the Zig Zag underlay. This can be used on a lightweight terry cloth or fleece.
- Zig Zag – This type of underlay is the same as the Parallel except it has twice the number of stitches. It runs down the column and then up the column creating twice the amount of stitches as the Parallel. In some programs, this is known as a Double Zig Zag. This is a better choice for terry cloth and pique. You may want to increase the density of your Zig Zag underlay to give your topstitching a puff or rounded appearance.
- Lattice or Tatami– This underlay is a low-density fill stitch used underneath Complex Fill stitches or Tatami stitches, depending on which embroidery design program you are working in. Lattice is usually used in combination with the Contour or Edge walk underlay. It runs at a 45 or 90-degree angle to the topstitching in a lattice form. It helps to reduce the pulling up of the fabric as it is stitching and to keep your stitches in good registration especially if you are going to add a border. It will help to keep the border in the proper place.
- Full Lattice or Double Tatami Stitches forming a full lattice effect going in both directions. This is a good choice if you are using a heavy contrast thread or fabric color such as a white thread on top of a black garment. This will hide the color of the fabric.
Very few designs or letters, even small ones are acceptable without underlay. Of course, there are always circumstances that change this rule. If you are working on a very lightweight fabric such as a wedding gown and you are using tone on tone, you may not want any underlay in certain areas especially if you are going to be seeing through the stitches. For this type of embroidery, you would not use any underlay at all but you would have to be careful that your stitch length was not too long because it would pull up and your garment would pucker.
I have created an entire program teaching you how to use the Embroidery Underlay Stitching properly. I even show you how to create your own underlay if you do not have the correct type in your embroidery design program. You can find that program at https://TheEmbroideryCoach.com It will teach you everything you need to know to add the right type of embroidery underlay stitching in your embroidery designs.

by The Embroidery Coach | | Embroidery Business Marketing
Be Creative during the slow periods in your embroidery business is a great way to add new materials and do some extra planning that will bring in more sales. These slow periods are good times to develop new sales materials and samples. This is a time to be creative designing your new sales materials to use in marketing your embroidery business.
I embroidered new designs on white felt, cut out the design samples with pinking shears, and glued them onto card stock. I put these samples into 3 ring binders to distribute to my dealer customers during these slow times. I also embroidered all of the lettering styles that we offered onto the white felt using the standard thread colors that we had in stock. I labeled each lettering style the font name and the thread color. The dealers were always very impressed and thrilled to get their new sales materials from us. This was a way to showcase our work to our dealers and it gave them a way to show their customers the quality of work that they were offering.
I also embroidered coasters to give away as samples. I created a design with my logo, added my contact information and embroidered these on white felt. This is an excellent way to showcase your embroidery and a great leave behind when you are visiting a customer. This can be done for wholesale and retail customers alike.
You can also create new samples to give your showroom a fresh new look.
If you do not have any slow periods in your embroidery business, you need to block out some spare time to accomplish these little profitable, sales creating tasks.
Joyce Jagger
The Embroidery Coach
by The Embroidery Coach | | Embroidery Business Management
To expedite your checking in process, create a Log In Form and check list for your employee to use when they are logging in the orders for your embroidery business. Logging in the orders is very important in order to keep complete control of your production process and know exactly what you have in house at all times.
By creating a check list, you can speed up the process and make sure that each step of the logging process is complete and there are no missing pieces within your system.
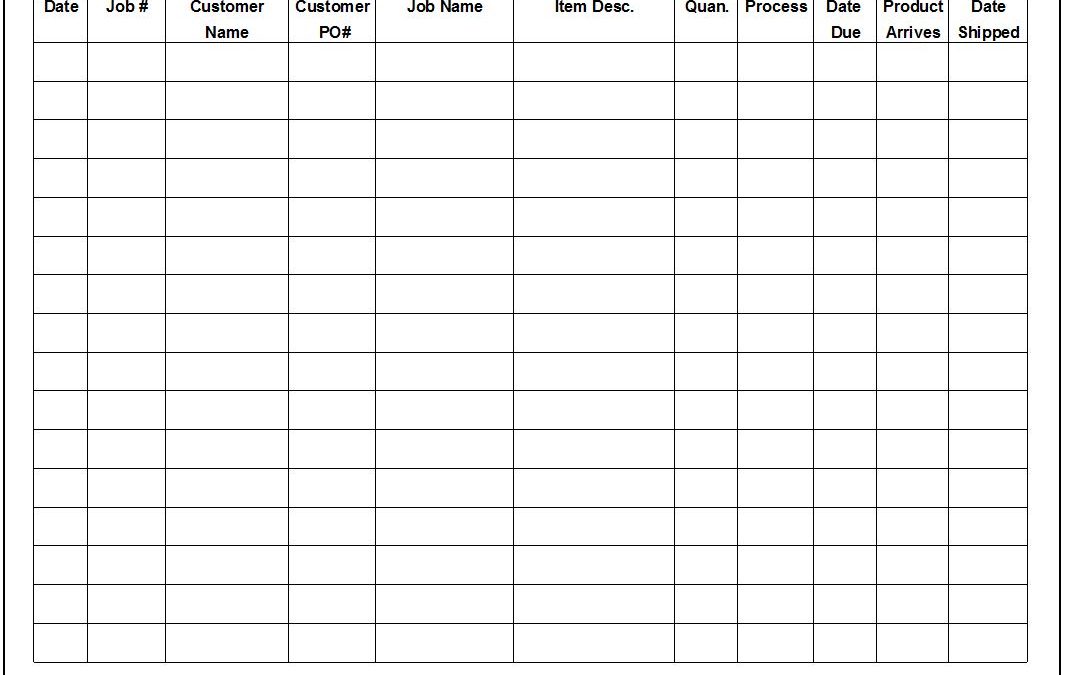
The check list should include the following:
- Date order was placed
- Customers Name
- Customer PO number
- Job Name or Number
- Quantity of Items in order
- Description of goods –shirts, caps, jacket, etc.
- Date Due
- Other information that is necessary for the nature of your business
As the order is being checked in, it should be the responsibility of the employee to make sure that all of the information on the Log In Form is complete and the order is ready to be placed into process. If one piece of the information is missing, the employee should contact the customer to obtain the missing information. The packing slip that was received with the goods must match the PO from the customer.
This Log In Form is then placed into a 3 ring binder for quick reference. Should it be entered into the computer, absolutely, if you have a system for entering in all of your orders. I have found that having a printed log in form available to view at all times is a simple way to see what you have in house, ready for production at all times.
Whether your order has been input into the computer on a Log In form or written in by hand on the Log In form, a printed copy is very important. When your order is shipped, a line can be drawn through the Customer order on your Log In form to signify that it has been shipped or picked up. This is an easy way to check and see if the order is still in house or has been shipped.
Using a simple system and creating a check list for logging in your orders will help to organize your paper work flow and the production process. You can download the Embroidery Log In Form that I have used for my embroidery business or you can create your own.
Joyce Jagger
The Embroidery Coach
by The Embroidery Coach | | Embroidery Business Management
I go into many embroidery shops to do on-site training and I am totally amazed at the amount of spoilage that I see in boxes. These boxes of ruined garments are very costly to the business owner.
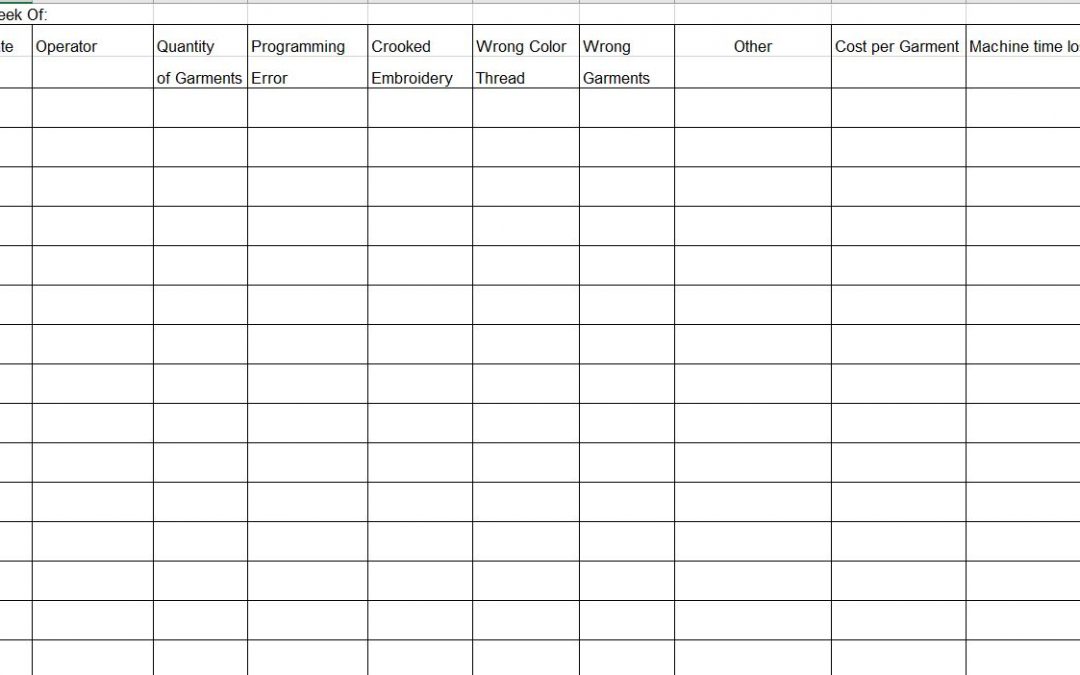
Learning how to control production spoilage in your embroidery business is an important step in reducing the total cost of operating your embroidery business. Operators should be required to show the amount of garments that were lost or ruined. This should be part of the production form that they are required to fill out at the end of each completed job. You must also know why the loss occurred. Keeping tracking the causes and the operators can help to reduce the loss and avoid them in the future.
Keeping a chart on a weekly basis of these losses is very valuable. This information can be reviewed at the end of the week and used to help retrain the operators in the areas that they are apparently lacking information. When operators know that they are being tracked, they have a tendency to be more careful and pay closer attention to detail.
Many people say that this is part of your Production Cost! I do not agree with that at all. This is a cost that can be almost eliminated if the employees are trained to pay attention to all of the details. Yes, there is some spoilage when a person first starts to be trained, but they must be trained from the very beginning that this is not acceptable.
Embroidery Industry Standard of Loss
There has been an industry standard for many years of a 2% loss. Many claim that a 2% spoilage rate is acceptable. You may have that in your contract, but many people will not do business with you if you have a spoilage rate that high. If you properly train your operators to be aware of all of the factors that can happen and how to avoid them, your spoilage rate will be greatly reduced.
I created a simple Wastage and Spoilage Report that you can download, print out and use to keep track of the production spoilage in your embroidery business. Just fill in the form below and I will send you over the Spoilage Report. Even if you are a one person shop, this will help you keep track of the costs that your errors create. This is a huge eye opener to everyone!

by The Embroidery Coach | | Embroidery Business Management
Using Computer Keyboard Shortcuts is a huge time saver. If you are like me, I spend a lot of time on my computer and every second of my day counts. I am either writing an article, creating a program, writing emails or working on a design for someone and I am very grateful for whatever time I can save.
Basic Computer Keyboard Shortcuts To Save You Time
These Computer Keyboard shortcuts are helpful also if you find that your mouse does not seem to be working or if you are on a laptop with limited space and cannot use a mouse. Here are eleven of the most commonly used Computer Keyboard Shortcuts for changing and editing text.
- To select text shift + arrow left/right
- To select an entire page of text shift + page up/page down
- To copy text control (CTRL) + C
- To cut text control (CTRL) + X
- To paste text control (CTRL) + V
- To undo your last action control (CTRL) + Z
- To close a program ALT + F4 or ALT + F + X
- To open the task manager control (CTRL) + shift + escape (ESC)
- To tab between applications ALT + tab key
- To return to your desktop Windows key + M
- To lock your workstation Windows key + L
My Favorite Computer Keyboard Shortcut!
It is very common for me to have several windows open at the same time and I just want to find something simple on my desk top but I do not want to have to go through and close everything down in order to reach it. I just hit the Windows key + M and it instantly takes me back to my desk top. I find this such a huge timesaver! This is my favorite computer keyboard shortcut!
If you have some favorite computer keyboard shortcuts that I do not have listed, please share it with us and I will expand my list to include it!