by The Embroidery Coach | | Embroidery Business Marketing, Embroidery Education
Setting up the lettering to Embroider on the back of a mesh cap can be done very easily if it is done correctly. There is more than one way to accomplish this, but the way that you select will depend on the actual design that you plan on selecting or creating. Many embroiderers are afraid to try this, but if you follow the simple directions, I will try to make it easy.
If it is a text-only design, the small letters can get lost in the mesh and you will need to add a knockdown stitch under the lettering.
If it is a design that is a heavy complex fill design and no small lettering is outside of the area of the design, you can simply add a piece of topping to cover the entire area before you begin the actual sewing operation.
The Areas That I Will Cover In This Article
- The different ways you can create the lettering
- I am going to show you how to set up the lettering
- The process of creating the lettering
- Explain how to create the knockdown stitch
- Explain the settings I used and why I used them
I am going to show you how I set up the lettering to embroider on the mesh cap back using small text lettering only. The lettering that I will be using will be 6 mm or about 1/4 inch in height. I try to keep it to a simple block font that does not have serifs if at all possible. I also want to keep it in uppercase only, as this makes it much easier to read.
At that small size, a font with serifs does not work well because of the size of the serifs.
Different Ways To Create The Text Lettering
I have found that there are about 4 different ways that you could lay down the text lettering for the cap back.
- Horizontal for a straight bottom fitted cap
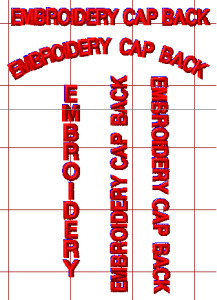
- Arched for a Snap-back keyhole cap back
- Vertical with the lettering starting at the top
- Vertical with the lettering reading up or reading down.
The Basics of Setting Up The Lettering
I used Pulse Embroidery Software to set up the lettering. I started with the basic Horizontal for the straight bottom fitted cap. The font that I used was Block New at 6mm.
Step 1 – I selected my font, set it to 6mm, and then I drew a straight
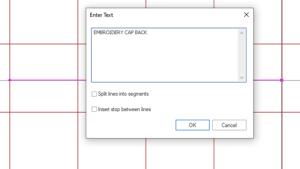 line across the front of my workspace and typed in the lettering, EMBROIDERY CAP BACK. I then clicked OK and my lettering was on the workspace.

Step 2 – I added Center run Underlay Stitching at 1.5 mm in stitch length because the letters are so small and .20mm for the Pull Compensation settings.
Step 3 – I adjusted my spacing between the letters. You want to make sure that you have all of your settings in place and the lettering exactly as you want it before you add the knockdown fill on the design.
Step 4 – Zoom in on your lettering, turn off the 3D or TrueView of your lettering so that you see the stitch points on your letters.

You will notice that there is very little space between each letter. You want your stitch points to almost touch. This will give you a clean easy run on the machine without the machine adding locks and trims between each letter. You do not want your machine to stop and start between each letter, but you also do not want a thread showing between your letters when it is finished sewing,
Step 5 – Create the Knockdown stitch. Pick up your Complex Fill tool in your digitizing tools and start plotting around the outside of the stitch points of your letters. You do not have to be perfect when you are doing this. You want it to be out and around the letters, but do not draw an oblong around the lettering, because it will show much more. You only want to draw around the shape of the letters.

This is what you will see when you have it completed. You would repeat the same process for the remaining 2 words before you go any further.

Step 6 – Now you must change the angle of the fill stitches so that your letters do not sink into the fill stitches and reduce the density to about -35 stitches per inch from your normal fill setting. I also added a .30mm pull comp setting to the fill. The image below will show your finished results.

Step 7 – In your Sequence View, move your fill background (knockdown stitch) up before the lettering so that it will sew out before the lettering sews. You will sew the fill stitching the same color as the mesh on the cap. When it is sewn out, you will hardly see the background stitching at all.
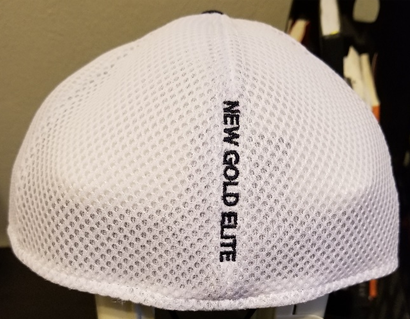
Here is a finished Embroidery on the back of a mesh cap. This is a vertical design up the seam of the back of the mesh cap. The fill stitching or knockdown stitch is sewn in white. You cannot see the fill stitching under the letters and the letters sew out crisp and clean.
This same lettering could have been sewn straight across the back at the
Setting up the lettering to embroider on the back of a mesh cap is not hard, it just takes a few minutes and the finished result is amazing.
Click on the PDF to print out How To Set Up The Lettering To Embroider On The Back of a Mesh Cap You will be able to see the images much better.
by The Embroidery Coach | | Embroidery Business Marketing
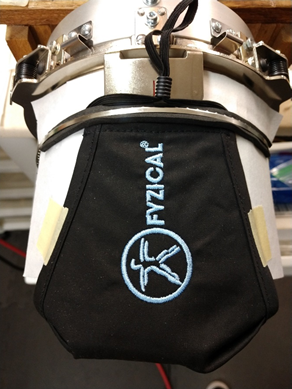
It looks like Face Masks are here to stay for a while in many parts of the country and the world. David wrote an article that may be very helpful to you if you are asked to embroider on face masks. He has 2 different options for hooping them with tips for using each one.
Option #1 – He uses a standard 12-centimeter round tubular hoop and in Option #2 he uses a Cap Frame.
Both options work and it made the embroidery on face masks simple when he perfected the process.
In his example, the logo is almost 3 inches long and we had a large order of them to embroider. Click the link below to download the article to read. If you have an order to embroider on face masks, this article will work to make it easy for you.

by The Embroidery Coach | | Embroidery Business Marketing
How Has The Pandemic Affected Your Embroidery Business? How has the pandemic affected you personally? Have you spent much time thinking about this and how you are going to make changes to be able to cope ? Do you know how to hang on to your embroidery business during these uncertain times?
Do you still have the same amount of business and customers that you had before the pandemic started? Have you noticed any attitude change in your customers and prospects? Are they giving you unreasonable requests?
I have heard a lot of embroiderers say that their customers are getting obnoxious and more demanding than ever. Some embroiderers are being treated like servants and are expected to continue to do more and work more and in today’s’ world they are being bullied into lowering their prices.
Are you wondering how you to deal with all of these situations right now? How should you hang on to your embroidery business? What you should do right now to hang on to your embroidery business and keep your customers coming back for more during these uncertain times?
No. 1 – PLEASE, do not get caught in this pricing trap. DO NOT LOWER YOUR PRICES to get the work! You will go out of business quicker than any thing. With the way that prices are increasing to all of us, you are going to have to raise your prices as well. We all have to pay our bills. All of our supplies and products that we have to purchase to do business with and resell to our customers are increasing in price and you cannot absorb those price increases. You must adjust your pricing and get your pricing structure created to work during this time.
No. 2 – Keep in touch with your customers. You want your customers to realize how important they are to you and how you value their business. Your customers are the lifeblood of your business and deserve your best. If you have not focused on your customer list and keeping in touch with them, stay tuned to my next post. I will explain how to get started with it so you can get that hang on to your embroidery business!

by The Embroidery Coach | | Embroidery Business Marketing
Recently, I was working with one of my Lifetime Students that was not sure how to price her embroidery. She had the misconception that the proven embroidery pricing program that I have created was not for her. She was a home embroiderer and thought that this program and the way that I teach you was only for big businesses! I was shocked! Do you feel like learning how to price your embroidery correctly seems to be too difficult or more advanced than what you feel you are ready for?
If that is the case, let me simplify this! Pricing your embroidery correctly, so that you can make a profit and not work quite so hard is comprised of 7 basic things.
- How much money you need to be bringing in every single day and then each hour of the day to pay all of the bills and give yourself a salary=Cost per hour
- Break this cost down into minutes
- How long each process in your business takes in minutes
- Knowing how much each process costs based on your minutes cost=Cost per process
- How long it takes to complete a job, from start to finish.
- What was that total cost?
- How much do you want to mark up your cost? (Min. 25%, I highly recommend 50 to 100% depending on the type of customer)
Basically, that is the total formula. Now that being said, it does not matter how long you have been in business, at what level of business you are, how many embroidery heads you have, whether you work from home or have a storefront, whether you have employees or not, whether you paid cash for your machine or borrowed the money. None of that matters. It all works the same.
Learning to price your embroidery is not difficult, but pricing must be done correctly so that you can in fact make a profit. but you may need some guidance in your circumstances to make it easier.
To make it easy, go to https://howtopriceembroidery.com. This simple program that will help you get your pricing together very easily. All you have to do is add your expenses and it will create your price list for you! Go to: https://HowToPriceEmbroidery.com You will be glad you checked it out!
by The Embroidery Coach | | Embroidery Business Marketing
Preventing possible issues with production runs is essential when planning your daily embroidery production. Trying to get the best production possible out of every single day is a must if you want a profitable embroidery business!
In today’s economy, where so many embroidery business owners are doing all they can to keep expenses down with less employees, this is extremely important.
You always sew out all of your embroidery designs before you start any new jobs. Right!! Paying close attention to every detail of a logo is important when you are trying to prevent errors before starting a long production run! You want to thoroughly examine your design as it is stitching to see if there are any issues you need to correct or improve on.
You must watch the machine as it is sewing out your design in order to be able to pinpoint any of the possible problems! You cannot start the machine and walk away then expect to be able to find the issues, it just does not work. YOU MUST watch it as it sews out! As it is sewing out, ask yourself these questions:
- Is there something that you can do to shorten your run time?
- Are there any thread breaks? If so, find out why. Maybe your density is too heavy. Check for a dull needle, bad thread, or tension that is too tight.
- Is it locking as it starts and stops? If it does not lock at the beginning, the thread can come out of the needle. This can cause a real production nightmare! No lock at the end, the thread can unravel.
- Is it trimming where it is supposed to?
- Do I see any threads between my letters? If you do, they are not close enough.
- If I change my running order of my text will it run faster? First line left to right, second line right to left, third line left to right.
- Are all of the colors correct and are my colors running in the correct order?
- Do your letters or columns look to thick or too thin? Your letters may be pushing because your density is too heavy or your pull comp is too heavy. If too thin, your pull comp needs to be increased.
Check your sew out and have it verified before the job is started. Make sure that you watch each stitch as you sew out the design to see if there are any mistakes or problems that can be prevented. Slowing the machine speed down can help you pinpoint any issues.
- Do you have any jump stitches that are too long? This can cause the thread to get caught and your needle to break.
- Are all of your starts and stops in the correct location? If not, your machine has to move too far to start the next sequence causing wasted production time.
- Is your sew sequence in the right order? You do not want any travel stitches showing. A wrong sew sequence can create too many trims that could have been prevented if the sew sequence was changed.
- Can any of your color changes be combined? This will depend on how your design was created and what it is going to be sewn on. Sometimes like colors can be combined if your design is going to be sewn onto a flat garment. I do not recommend doing this for embroidery on caps. Please note: This can cause registration problems. Before you take this step, make sure that you can combine the colors and not have any registration issues.
It does not matter if you digitized your embroidery design or had the best digitizer out there doing your work, make sure that you sew out every design before you start the job and watch it sew out stitch by stitch. Not only will you prevent issues; you can also learn from watching your designs sew out. This is also true if you have set up a design or lettering in your software. Every design is a new design, digitized or not, and needs to have the same close attention to detail.
Create a checklist of all of the items to look out for as you are doing your sew outs and go right down that checklist to make sure that you have covered every item. This is going to help you save a lot of time and frustration as you are going through your long production runs.
There is nothing any more frustrating than having constant thread breaks or knowing that something could have been changed in your design to make the entire job get done in a lot less time! Time is precious and time is money! You cannot get it back once you have lost it!
It may seem like a waste of your time to watch designs sew out but it never is. I have been digitizing for many years and planning out production for many more years. I never send out a design to production unless I have sewn it out at least once to make sure that it has no issues, and yes, I watch it! Preventing unnecessary production issues is part of planning for all your embroidery production runs. This is going to help you create more profit in your bottom line!
Would you like a copy of the same checklist I use while sewing out each design? We will be happy to send it to you. You can pick one up for free by filling out this form.
by The Embroidery Coach | | Embroidery Business Marketing, Training Embroidery Employees
Do you have high-quality standards set in your embroidery business or are you focused on just getting the job done? Quality is extremely important if you want to build a business that is going to last no matter what state the economy is in.
Many customers are unaware of what good quality is when it pertains to embroidery. When you educate them and show them the difference, they get it. They also realize you want to provide them with the best!
I have certain standards that we have always gone by and if they are not met, the person responsible has to either be retrained so that they can produce the quality that I want or they will no longer have a job. If there has been a mistake on a job or if the job does not meet my standards of quality, I will not charge the customer for the job.
Case in point! We finished a set of 49 football jerseys that I was not happy with. While I was out training a new student, an operator embroidered the school name on the back of half of the jerseys instead of the front below the V of the neck where it belongs. I truly do not know how he ever made such a mistake, but it happened! These were $70.00 jerseys, which the customer supplied, before the numbers and embroidery were ever applied to them. This was an awfully expensive job, but I could not charge the customer for this. The mistake was rectified with the customer’s help, but I could not in good conscience charge him for this job.
When I called him and told him about the problem, he was extremely grateful and happy that I was so honest about it. When I told him that I would not be charging him for the job, he was thrilled and said that they would live with the issue and that he would be sending me a lot more work!
If a mistake is made, do not try to pass it off on the customer without them being totally aware of it. Mistakes do happen to all of us, but you must own up to it, keep the customer informed, correct it, and in most cases let him make the decision on how to handle the job. It does not matter how large or how small the job is.
If you do not have high-quality standards set in your embroidery business, you will not stay in business for the long haul. This is especially important.