by The Embroidery Coach | | Organizing
In Part 1 of Organizing Your Embroidery Business, I talked about organizing your information that you use in running your embroidery business. In Part 2 I l talked about your customers design information. In Part 3 I am going to talk about your Production process.
The first step of my production process is to log in the job on the log in form, make a list of new artwork that has to be created and either gives that to the person that creates the artwork or sends it out to the digitizer. If I have to order anything for the project, I do so and put a copy of the original customer order in a plastic sleeve and hang it in the receiving area waiting for the goods to come in. A production form is filled out with the customer and job information on it that follows through the entire production process. The original order is placed into the customers file folder in the office. I connect that order and the production form with the goods when they arrive.
After the design is ready, I place that with the order and it is then placed onto a shelf ready for hooping. If you have employees, it is best to have at least one job hooped ahead of time. This creates a smoother and faster production flow. When I had my large embroidery business, I have all of the jobs hooped the day before they were placed onto the embroidery machines. I had 24 dozen hoops of the most popular sizes (12 centimeter and 15 centimeter) so that this was possible, unless the order sizes were larger than 24 dozen. Sometimes this was the case, but at least the first 24 dozen pieces for the job was hooped ahead of time.
At the time for embroidery, the baskets of hooped garments are moved to the embroidery machine area and the machine operator can start the embroidery process. The design is loaded into the machine by whatever process you use to get your designs into the machine. The garment are then loaded onto the machine and embroidered. After they are embroidered, they are removed from the machine, unhooped and placed into another basket or bin and moved to the trimming area.
The trimmer will trim, steam, fold and pack the garments ready to be shipped. In a large business this will be more than one person. You will have a person that trims and steams and another one that will fold and pack the garments ready for shipping.
The production form is filled out by the operator with all of the information about each process as it passes through production.
Part 4 of Organizing Your Embroidery Business will be about shipping and invoicing procedures.
by The Embroidery Coach | | Embroidery Business Planning, Embroidery Production, Organizing
Saving time – Helping customers make quick ordering decisions can sometimes be very frustrating. Is your customer ordering process taking you too much time away from your production time? I want to talk about how you can cut back on the amount of time that it takes you to help your customers make a final decision.
As embroiderers we want to be able to offer our customers a full range of lettering and design options but in the process of doing so, we sometimes have the tendency to over complicate the process causing us and the customers unneeded frustration. There are 4 simple ways that will help to save time and speed up your customers ordering process.
- Embroidery Design Layout Options
- Limited Lettering Style Options
- Samples Tagged With Ordering Information
- Organized Ordering System
Today we will talk about the first in this series, the Design Layout Options.
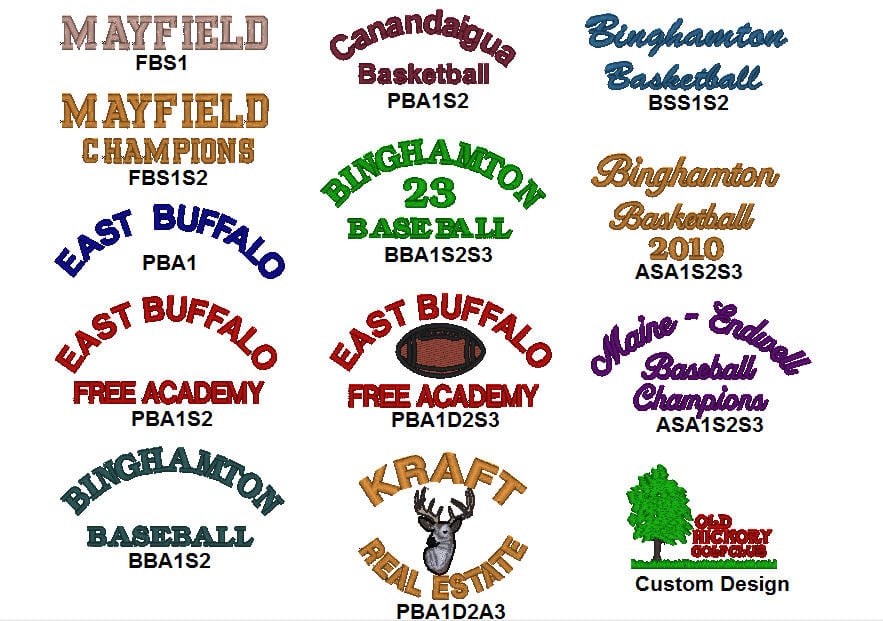
Embroidery Design Layout Options
 Create several Design Layouts Options for your customer to choose from. By giving your customer choices of different layouts for him to look at before he places his order, you prevent him from asking you to create his logo with several different options for his approval.
These Design Layout Options save time and instills confidence in the customer that you know what you are doing and know what will be the best option for him or his logo.
Create Design Layout Sheets with several design templates that you have you already set up in your embroidery design software. Give each one of these design templates a Style No. When the customer orders a specific style no. you can quickly recall the design template from your system that he has ordered, change the lettering to what he or she is asking for and your design is ready to be sewn out.
You can create two sets of identical design templates, one set to be sewn on woven fabrics and one set to be sewn on knit fabrics. These two sets of Design Layout templates will work for 95% of your customers garment or fabric choices.
Click on the picture and you will see a larger view of the Design Layout Options
Helping customers make quick ordering decisions helps your business in several ways!
- You look more professional
- It save a lot of your time and the customers time
- You have more time for production
- You will bring in a lot more revenue!
In Part 2 of this series, I will talk about Limiting Lettering Style Options.
Joyce Jagger
The Embroidery Coach
by The Embroidery Coach | | Organizing
Next on our journey of Organizing Your Embroidery Business is the Finishing Department. Setting up the finishing department with the right tools and equipment is very important if you want to present a high-quality finished garment to your customers. Most of the tools are very simple and easy to gather. The only real equipment needed is a commercial steamer and a steam iron.
When I say commercial steamer, I mean just that and not one of the handheld ones. They do not do the job that the upright steamers do and my favorite brand of a steamer is the Jiffy steamer. The reason for that is the amount of time that it lasts and the ease of being able to get parts for them if something does need to be replaced.
 The only other piece of equipment is a table. Depending on the size of your area or business, you will need at least one table in your finishing department. It is best to have one area for the trimming & steaming and another area for the packing. If this is not possible you will have to go through one entire process before you can start the next process. This is not an issue if you are a one-person organization, but if you have more than one person in your finishing department, they will each need their own area or table.
The tables can be very simple but they need to be high enough so that the employee is not bending over too far to do the job as it can be very tiresome by the end of the day. Cover the tables with some type of cloth-backed plastic or a piece of heavy canvas. If you are using the plastic covering you will need a towel or some type of terry cloth to lay down on the table during the steaming process.
The basic tools that are required for your Finishing area are:
- Terry Towel
- Shout Wipes
- Liquid Dish Soap
- Textile Marking Pens
- Fray Check
- Lint Roller
- Clothes Brush
- Wash cloth
- Nail Clippers
- Scissors
- Trimmers
- Plastic Bags
- Scraps of Topping
- Commercial Steamer
- Large Trash Can
- Steam Iron
All of the small tools need to be kept in a plastic drawer or some type of container so that they are all easily accessible and not scattered around. I make sure that each one of my departments has their own tools so that there is no wasting of time searching for a tool.
Embroidered Garments Go From Embroidery Machine To Finishing
When the embroidery machine operator removes the garments from the machine, she also removes the hoop and then places the garments into a basket, bin or on a cart. This basket, bin or cart is then taken to the Finishing area.
The process for Finishing is as follows:
- Remove the backing
- Trim the top threads if this is necessary
- Stack the garments in a pile by size
- Steam the topping off and remove the hoop mark
- Fold up the garment and place it in a size stack
- Count the finished garments in each sized stack
- Bag the individual garments if required for the order
- Place them in a box
This box of finished goods is then sent to the shipping department.
I have found from my own experience that the employee works much faster if she or he is standing during the entire finishing process, but if it is necessary for health reasons, the employee can be sitting for trimming and removing the backing but they need to be standing for the steaming, folding, counting and stacking the garments into the sized stacks.
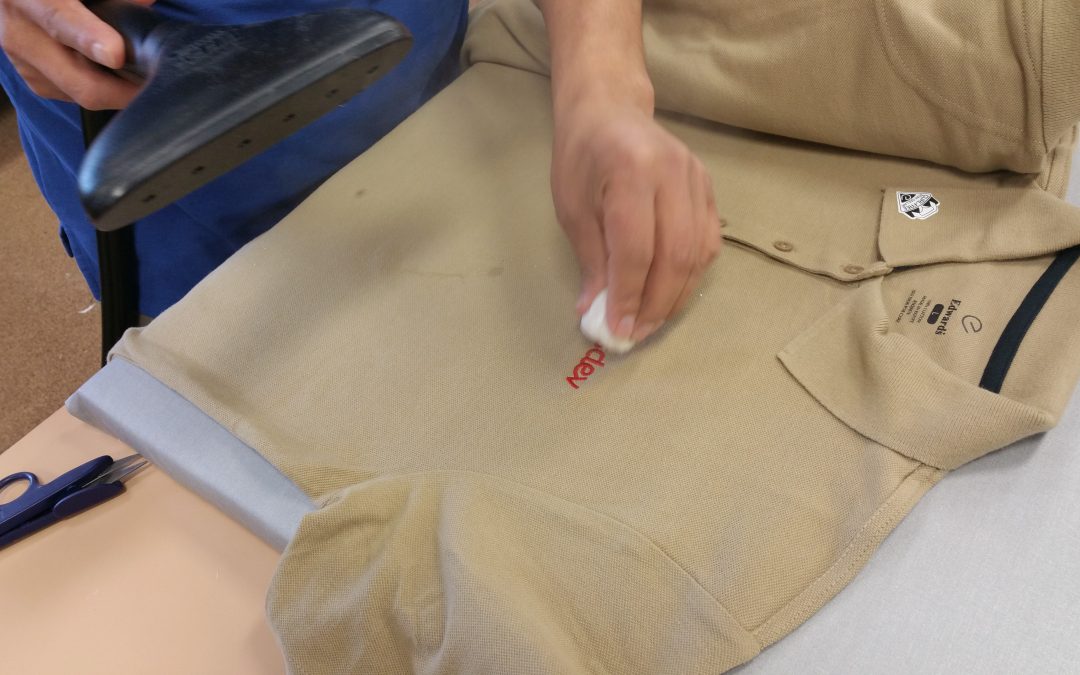
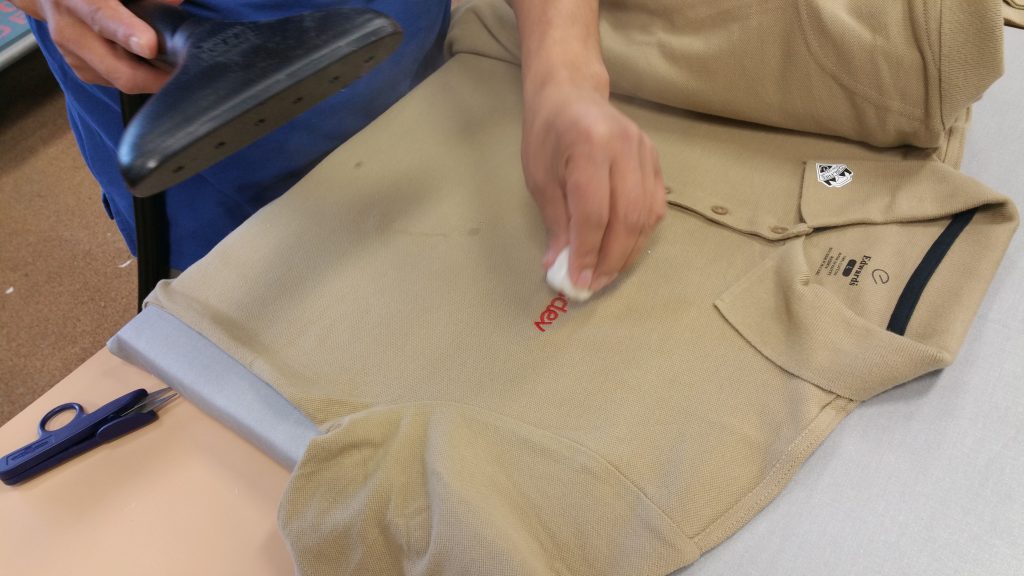
A quick and easy way of removing the topping is to remove it with a topping ball as you are steaming the garment. Steam your garment thoroughly and then dab the topping ball on top of the embroidery to remove the topping. It may take 2 or 3 tries to remove all of the topping but it removes it even in the tiniest areas. I have heard of and tried many other solutions for removing the topping but none are to my satisfaction and quite often leave a wet mess behind. This is not acceptable to me. When that garment is finished, I want the process to be finished, not waiting for it to dry; plus the steamed finished garment looks more professional!
0Please leave me a comment below to let me know that this has helped you to get your Finishing department set up for finishing your garments efficiently in your Embroidery Business! If you leave a comment below, I will send you access to a bonus video showing you how to Remove the Topping!
Joyce Jagger
The Embroidery Coach
by The Embroidery Coach | | Organizing
In part 4 of this series on Organizing Your Embroidery Business I am going to be talking more about the Hooping Area how to set it up so that it will run efficiently. I am also going to show you the basic process of hooping.
In part 1 of this Organizing Your Embroidery Business series, I showed you a floor plan and in part 2 I talked about The Receiving area and what you needed to Process your Orders. In part three I talked about the Hooping Area and the Tools and Equipment that you need.
Setting Up Your Hooping Area
When you are setting up your hooping area there are some important points that you need to think about.
- The space that you have to work with
- How many embroidery machines you have
- How many machine operators you have that are not doing their own hooping
- How many people you have that are actually hooping
- The different types of items that you are working with that need hooping
This may sound like a strange criterion, but it all depends on the size of your embroidery shop and your product mix. I have different hooping setups for different types of products. The standard left chest or right chest logo is hooped in one area and on one type of hooping equipment, the large jacket backs or sweatshirt fronts are hooped on another type of equipment and the caps are hooped on a cap hooping device. This means that I would have 3 distinct areas set up for hooping. Each one of these areas use different types of hoops or hooping frames, different type and size of backing and/ or topping.
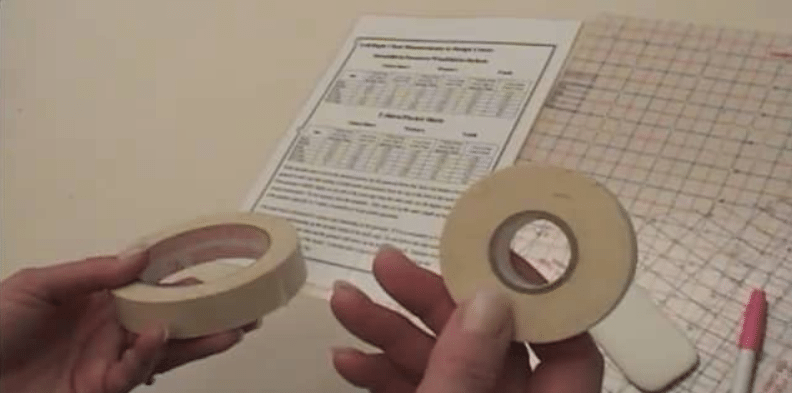
After you have determined what you are going to be hooping, you can set up your area with the right supplies. I purchase my backing by the rolls and cut them into pieces to size for each situation, with the exception of the cap backing. I purchase that in 4 inch x 8 inch cuts as well as by the 250 yard roll. I need the 250 yard roll for the designs that embroidered on the front and sides of the cap at the same time.
I also purchase the topping by the roll, usually a 25 yard roll and cut that to size. I cut 8″ strips 2″ wide, 3″ wide, etc to keep on hand at all times. You only need to have enough topping to go through the part of the hoop that is going to have your embroidery. You want to make sure that it is cut wide enough that you can catch it into the sides of the hoop while you are hooping it. If you purchase cut squares of topping, cut them into strips so you are not wasting unnecessary yardage.
(more…)
by The Embroidery Coach | | Organizing
In part 3 of this series on Organizing Your Embroidery Business I am going to be talking specifically about the Hooping Area and the tools and equipment that you need to be able to run that area efficiently in your embroidery shop.
In part 1 of this Organizing Your Embroidery Business series, I showed you a floor plan and in part 2, I talked about The Receiving area and what you needed to Process your Orders. Now we are ready to move to the next department in processing your order and that is Hooping.
For an efficient workflow in the Hooping department you need:
- Hooping Equipment
- Tools
- Supplies
Embroidery Hooping Equipment
In this article, I will talk about the Hooping Equipment and tools. You will need a Hooping Device and Embroidery Hoops or Hooping frames as they are sometimes called. Hooping can be done without a hooping device, but it is much quicker and more efficient to use one. You need to learn how to hoop without a Hooping device so that you know the basics of hooping. You will then be prepared for the times when a hooping device does not work for your particular situation. This happens quite often, depending on your garment and which type of hooping device you have.
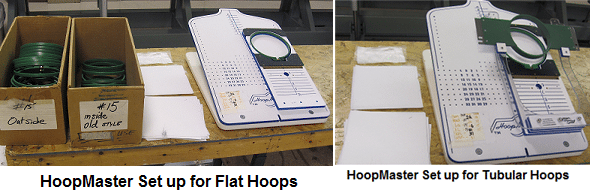
Some of the Hooping devices will work with almost any size hoop such as the All in One Hooping device but others are specific to a sized hoop and you will need template inserts to use for each size hoop such as the HoopMaster.
If you have a large shop you may need a foot-operated hooping device. I have used all 3 types in my shop and have found each one to be very beneficial for the different types of hooping situations. In a large shop, you will need more than one device because you will need more than one person hooping the orders. It all depends on your workflow and how many embroidery machines you have in operation at one time.
If you are just starting out with your embroidery business a HoopMaster will be the best choice for you.
If you hoop a lot of caps, it is advisable to purchase the ‚ Third-hand Cap hooper. I purchased my first one in 1995 and I would not be without this hand-saving piece of equipment. If you are an older person or if you have a high-volume shop, this device is a must. It is easier to hoop caps and a lot faster using the Third-hand Cap hooper. It will pay for itself in a very short time and you will be so grateful that you made the decision to add this hooping device to your shop!
Embroidery Hoops or Hooping Frames
There are basic sizes and quantities that you need to keep in stock for your embroidery hoops or your hooping frames. The 12cm and the 15cm frames are the most widely used in this industry for most applications. I have also found that at least 6 hoops of each one of these sizes per head work best. If your budget will allow it, 12 per head is even better and more efficient. You can have your garment hooped ahead and the machine is never waiting for you to catch up. In order to make the most of your actual machine running time, you must keep it running as much as possible. You are not making any money if the machine is not in constant motion.
This is the list of the inventory that I have found to be necessary for a good workflow in a small home shop with two machine heads.
- 4 – 9 cm frames
- 12 – 12 cm frames
- 12 – 15 cm frames
- 4 – 18 cm frames
- 4 – 21 cm frames
- 6 – 30 cm square frames -12 in square
- 4 -270 Cap frames
- 4 -Large jacket back frames-whatever size that will fit your machine. Each machine requires a different size.
You can build your hoop inventory as you grow your business.
There are also clamping systems that make it easy for some hard-to-hoop items such as inside pockets of bags and inside of small areas.
Embroidery Marking Placement Tools
Necessary tools to keep on hand that will cover all of your hooping needs for marking placement are:
- Ruler
- Marking Grid
- Marking Tools
- Masking Tape
Marking tools are very important and necessary so that you can be consistent in your embroidery design placement. When you first start out you need to mark your first garment for placement using a Ruler or a Marking Grid. There are placement charts available and I furnish them to my students at the Embroidery Business Academy. These charts will give you the placement for most of your embroidery placement needs.
The tools that I have found that are the most useful for marking placement are:
- Chalk Pencil
- Air or Water Erasable Marker
- Soap
Soap is my favorite but you must be careful that it does not have any cold cream in it. I have found that the small soaps that I have picked up in hotels have worked the best, but again, do not use one that has cold cream in it. On some garments, this will leave a mark. I had this issue a couple of weeks ago. A dress shirt that had a Teflon coating on it was to be embroidered above the pocket.
The person that was hooping the shirt was new to hooping. She wanted to make sure that the embroidery was going to be straight above the pocket so she marked it and used a soap that in fact did have cold cream in it. Previous to now they had used that same soap on many fabrics without any type of issues. The finishing person wiped off the soap as normal but when she steamed the shirt it left a waxy marking line that would rub off.
As a general rule, the soap rubs off very easily on almost any type of fabric, but that was not the case with this teflon-coated fabric. After much rubbing, I was able to get that line removed. Another lesson learned, do not use a soap with cold cream in it. You must experiment with scraps to be sure that it will work on your fabrics.
The Air Erasable marker is great and was my favorite marking tool until I discovered the soap. You must be very careful though that you do not use the purple air or water erasable markers on red fabrics. Some of the brands will leave a blue line on the garment when you steam it. The purple ink in the marker reacts with the red dye in the fabric. This is also true for orange fabrics. You should not use these markers on any fabric that has red as its color base. For these fabrics use soap or a chalk pencil.
In part 4, I will talk about the supplies that you need and the actual process of hooping. After the garments are hooped they are placed in the staging area ready for the embroidery machine.
by The Embroidery Coach | | Organizing
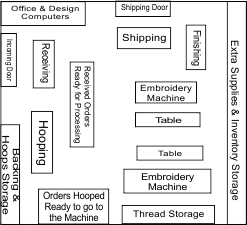
In part 2 of this series on Organizing Your Business I am going to start talking specifically about the individual work areas or work stations within your embroidery shop. In this article I am going to start with the first area in your business after the order has taken. That area is Receiving.
In part 1 of this Organizing Your Business series, I showed you a floor plan that is below on this page. This is a small shop with 2 embroidery machines and the square footage for this shop is about 1,000 square feet. I drew up this basic plan, but it is not drawn perfectly to scale. This plan was to show how you can lay out your shop for a good workflow and not specifically for an exact floor plan.
This is a basic floor plan that I had when I had a 6-head machine and 2 single-head machines. The single-head machines were sitting next to each other and in the floor plan, it is listed as one machine. At the time I had 5 employees, 2 machine operators, 1 hooper, 1 person finishing, and 1 person doing shipping & receiving.
It does not matter how large or how small your shop is, what matters is how you have it laid out and how many steps you are saving going from one area to another. Each one of your areas or workstations needs to be laid out in such a manner that it is physically easy for the person working in that area and efficient for the workflow.
One of the main concerns for employees is the table height that they are working at. It must be the right height for the person so that they do not have back aches and are not wasting time with the movements that are required for them to take as they are performing their tasks.
Received Orders Ready for Processing
Whether you have a large shop or a 1 person at home embroidery business, you must follow the same type of system in order to be efficient in your workflow. The first process that occurs after the order is taken is the Receiving of the order.
Your Receiving area needs to consist of a large table preferably with a back (like a short wall) built on it so that you have a place to hang your orders that are not complete in one form or another. The tools that you need for this area are a Copier or Computer and Printer and Plastic Job Folders for your orders. If you do not have a wall that you can hang the orders on, you can file them in a file box under your table.
As soon as the Order Processing is completed you are ready to Log in the Order. This is the first step in Receiving. You can Log the order in on the computer and then print out a copy daily and place it in a 3-ring binder. This binder will be stored on the Receiving desk. If you do not choose to Log in on the computer, you can create your Log in Form, print out the blank forms, and fill them in as the orders come in. If you are an embroidery shop where you have someone that receives the orders specifically, you can have them fill in the form as they receive the orders and at the end of the day, it can be input into the computer. This is the process for many small to medium-sized shops. The Login form should include the following information:
- Date (the order came in)
- Job Number
- Customers Name
- Job Name
- Item Description
- Quantity of Pieces in Order
- Process (embroidery, screen printing, twill, heat press)
- Date Due
- Date Goods Arrived from Distributor
- Date Shipped
The work order may come in from the customer by phone or email without the garments. If you are working with a Retail customer, you will be the one that is ordering the goods. The garments are shipped in separately from a distributor or manufacturer. Log the order in, assign it a job number and attach a copy of the order to a clipboard marked “Waiting for Goods”. When the Goods come in from the distributor or manufacturer, you pull out the Work Order and match it to the packing slip from the distributor. The order must match exactly.
- PO Number
- Quantity
- Item Number of the garments
- Color
- Sizes
You need to physically count all of the items and check to make sure that the color and sizes are correct and that there are no damaged goods. Notify the customer that the garments have been received and that there is a complete match or that there is a problem with the order and it is up to the customer to make whatever corrections there are to be made with the distributor or manufacturer. If it is for a Retail customer, you are the one that has to solve the problem with the distributor or manufacturer.
Design Work Can Begin As Soon As Job Is Logged In
After the goods have been successfully Logged In and even before the Goods are received the process for the design can begin. The design and sew-out can be done and approved by the customer while you are waiting for the Goods to arrive. Many times the entire job can be ready for production as soon as the goods arrive from the distributor. I will talk more about the design process in another article.
Once you have all of the information together and you have all of the correct items, place all of the information along with the order inside of a clear plastic Job Folder and tape it to the front of the box that has the goods inside of it. If there is more than one box label each box with the Order No., Job Name, and Box 1 of however many boxes in the order. It is now time to place the order in the Staging area of Received Orders Ready for Processing. At that point, the order can be picked up by the next person that is going to process that order. In the case of the Embroidery area, the next stop is Hooping. In our next article, I will talk a lot about the Hooping area. This is a big subject with lots of variables!